

How To Develop a Web Page Without Coding
Do you want to create a website for your business or blog, but the thought of coding makes you nervous? You’re not alone! The good news is that you can develop a fully functional, professional-looking web page without writing a single line of code. Thanks to the rise of no-code tools, web development has become accessible to everyone, regardless of technical background.
In this article, we will guide you through the process of creating a website using powerful drag-and-drop website builder. With user-friendly interface and a vast collection of templates, widgets, and add-ons, you can design a website that reflects your brand’s identity in just a few steps.
What is No-Code Development?
No-code development enables you to build apps and websites without having to write code. It has gained popularity since around 2015, due to platforms such as Bubble and Webflow. By 2020, the market for no-code products had developed significantly, drawing everyone from small to large firms.
WordPress has grown to include drag-and-drop functionality through plugins such as Elementor and WooCommerce, making it easier for non-technical users to administer websites and online stores.
Platforms such as Shopify and Squarespace have made no-code even more accessible, providing templates and tools for building websites and e-commerce sites without coding knowledge.
No-code is increasing the pace at which enterprises may deploy digital goods. It also reduces barriers between business and technology teams, facilitating collaboration.
Looking ahead, no-code tools are likely to get even more advanced, with AI features and better automation. This means more innovation and faster responses to market changes across industries.
Benefits of Developing a Web Page Without Coding
Accessibility for Everyone
No-code tools are incredibly accessible. You don’t need to spend months learning to code or hire a specialized developer. With their intuitive drag-and-drop interfaces, building a website becomes as simple as creating a presentation.
Cost-Effective Solutions
Hiring a web developer can be really expensive, sometimes costing thousands of dollars. No-code tools are a budget-friendly alternative. Many offer free versions or affordable plans, so you can build and maintain your site without a hefty investment. This is perfect for startups, small businesses, and personal projects.
Speed and Efficiency
No-code tools let you create a website much faster than traditional methods. There’s no need to write complex code or troubleshoot issues. You can quickly prototype and make changes in real-time, allowing you to launch your site faster and start attracting visitors sooner.
Flexibility and Control
With no-code platforms, you have complete control over your site’s design and functionality. You can customize everything to match your brand and vision. Need to change the layout, update content, or add new features? It’s all possible with just a few clicks.
Reduced Maintenance
Websites built with no-code tools are easier to maintain. The platforms handle technical aspects like hosting, security updates, and performance optimizations, allowing you to focus on creating content and engaging with your audience.
Scalability
No-code platforms are designed to grow with your needs. Whether you’re starting with a simple blog or planning a full-fledged e-commerce site, these tools can scale accordingly. You can start small and expand your site’s capabilities over time.
User-Friendly Updates
Updating your website is straightforward with no-code tools. There’s no need to dive into code to make changes. Just log in to your platform, make the edits, and publish them instantly. This ensures your site always stays current and relevant.
Popular No-Code Web Development Tools
Let’s talk about some of the top no-code web development tools out there.

Elementor
- Ease of Use: Drag-and-drop interface for easy website building.
- Features: Wide variety of widgets and templates, suitable for both beginners and advanced users.
- Integration: Seamless integration with WordPress plugins for added functionality.
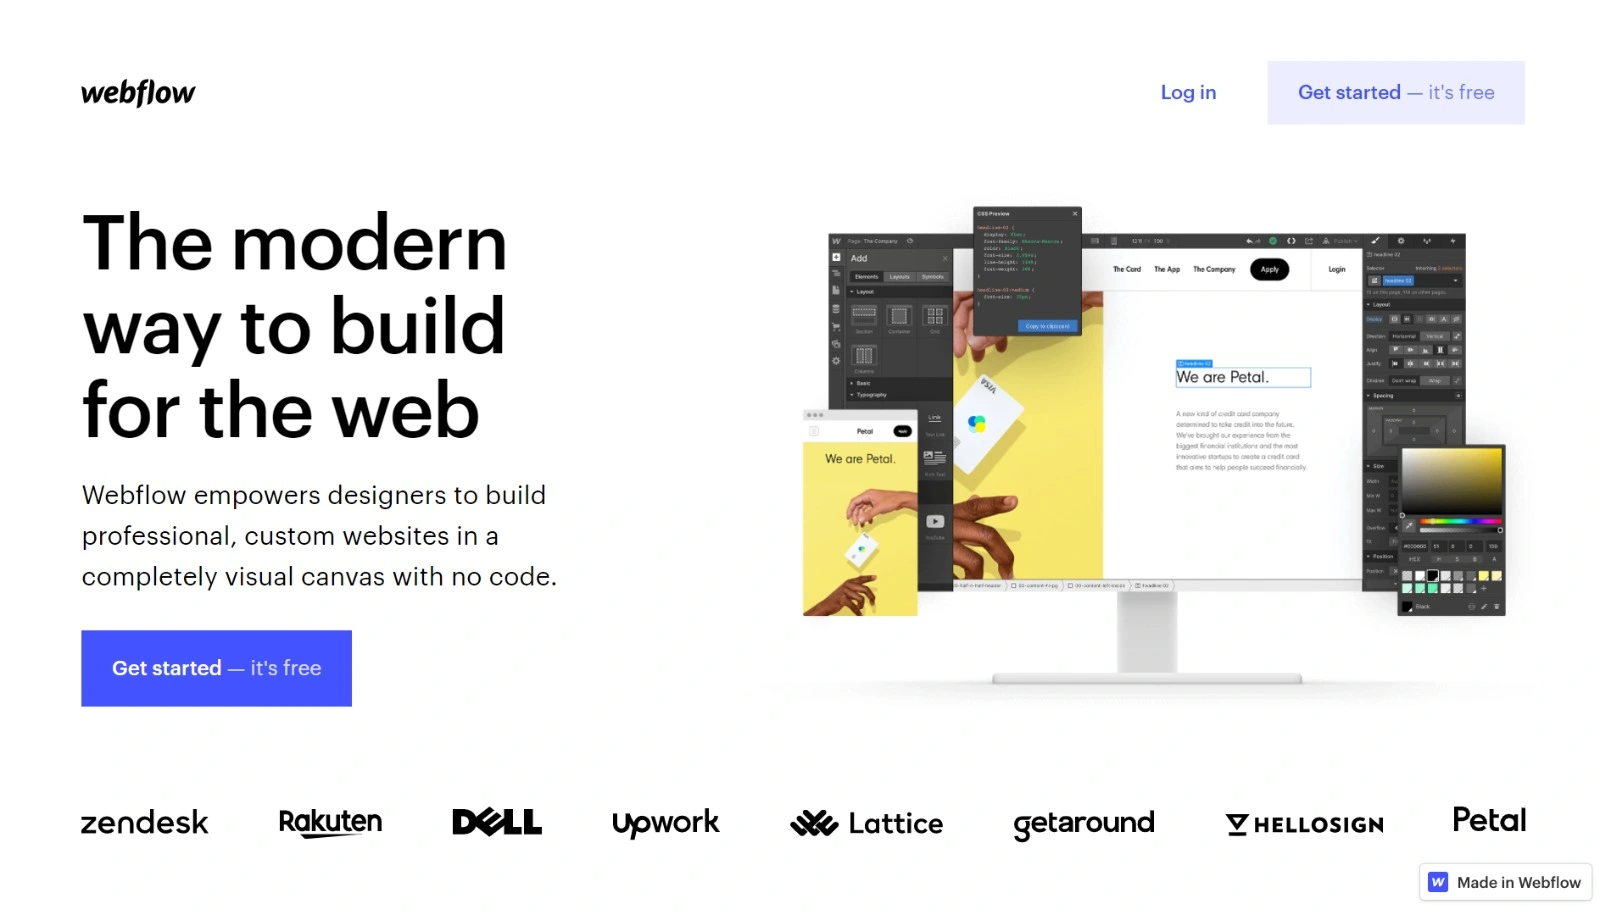
Webflow
- Design Control: Advanced design tools for precise customization.
- CMS: Powerful CMS capabilities for content management.
- Flexibility: Ideal for designers who want full control over their site’s design and responsiveness.

Wix
- User-Friendly: Simple drag-and-drop editor, great for beginners.
- Templates: Extensive collection of templates covering different industries.
- Customization: Easy customization options with Wix’s app marketplace for added functionality.

Squarespace
- Design Quality: Beautiful, designer-quality templates.
- Ease of Use: Intuitive interface for creating visually stunning websites.
- Features: Integrated tools for blogging, e-commerce, and analytics.
Getting Started With Step by Step Guide for Building a Website With Elementor Without Coding
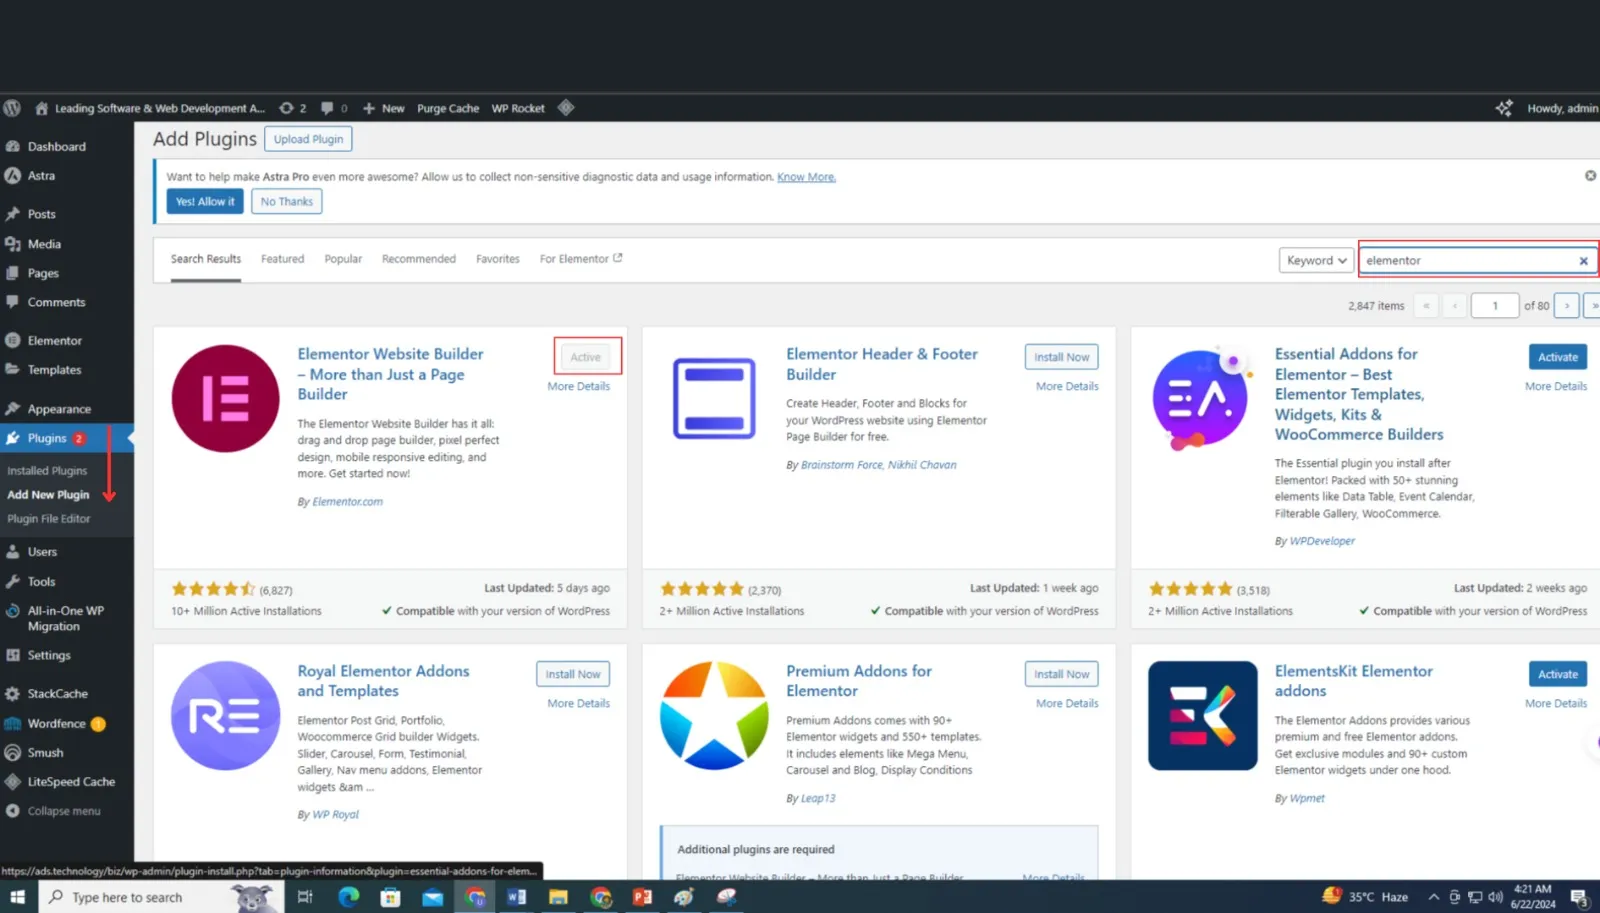
Building a website with Elementor without coding is straightforward and empowers users of all skill levels to create professional-looking sites. Elementor’s intuitive drag-and-drop interface allows you to design custom layouts and pages effortlessly. You can start by choosing a compatible WordPress theme or using Elementor’s built-in templates. Then, simply drag widgets like text, images, videos, and buttons onto your canvas to customize your site’s look and functionality. Elementor also offers responsive editing, ensuring your website looks great on any device. With its robust features and user-friendly approach, Elementor makes website development and maintenance accessible for small and medium business in very low cost.
Setting up WordPress on your hosting
Setting up WordPress on Hostinger is straightforward, thanks to their user-friendly interface and one-click installer. Here’s a step-by-step guide to help you get started:
Step 1: Sign Up and Purchase a Hosting Plan

- Choose a Hosting Plan: Select a plan that fits your needs (Shared Hosting, Cloud Hosting, etc.).
- Register a Domain: If you don’t have a domain, you can register one during the signup process.
Step 2: Access the Hostinger Control Panel (hPanel)
- Log in to Your Hostinger Account: Use the credentials you created during signup.
- Navigate to hPanel: Once logged in, you’ll be taken to Hostinger’s custom control panel called hPanel.
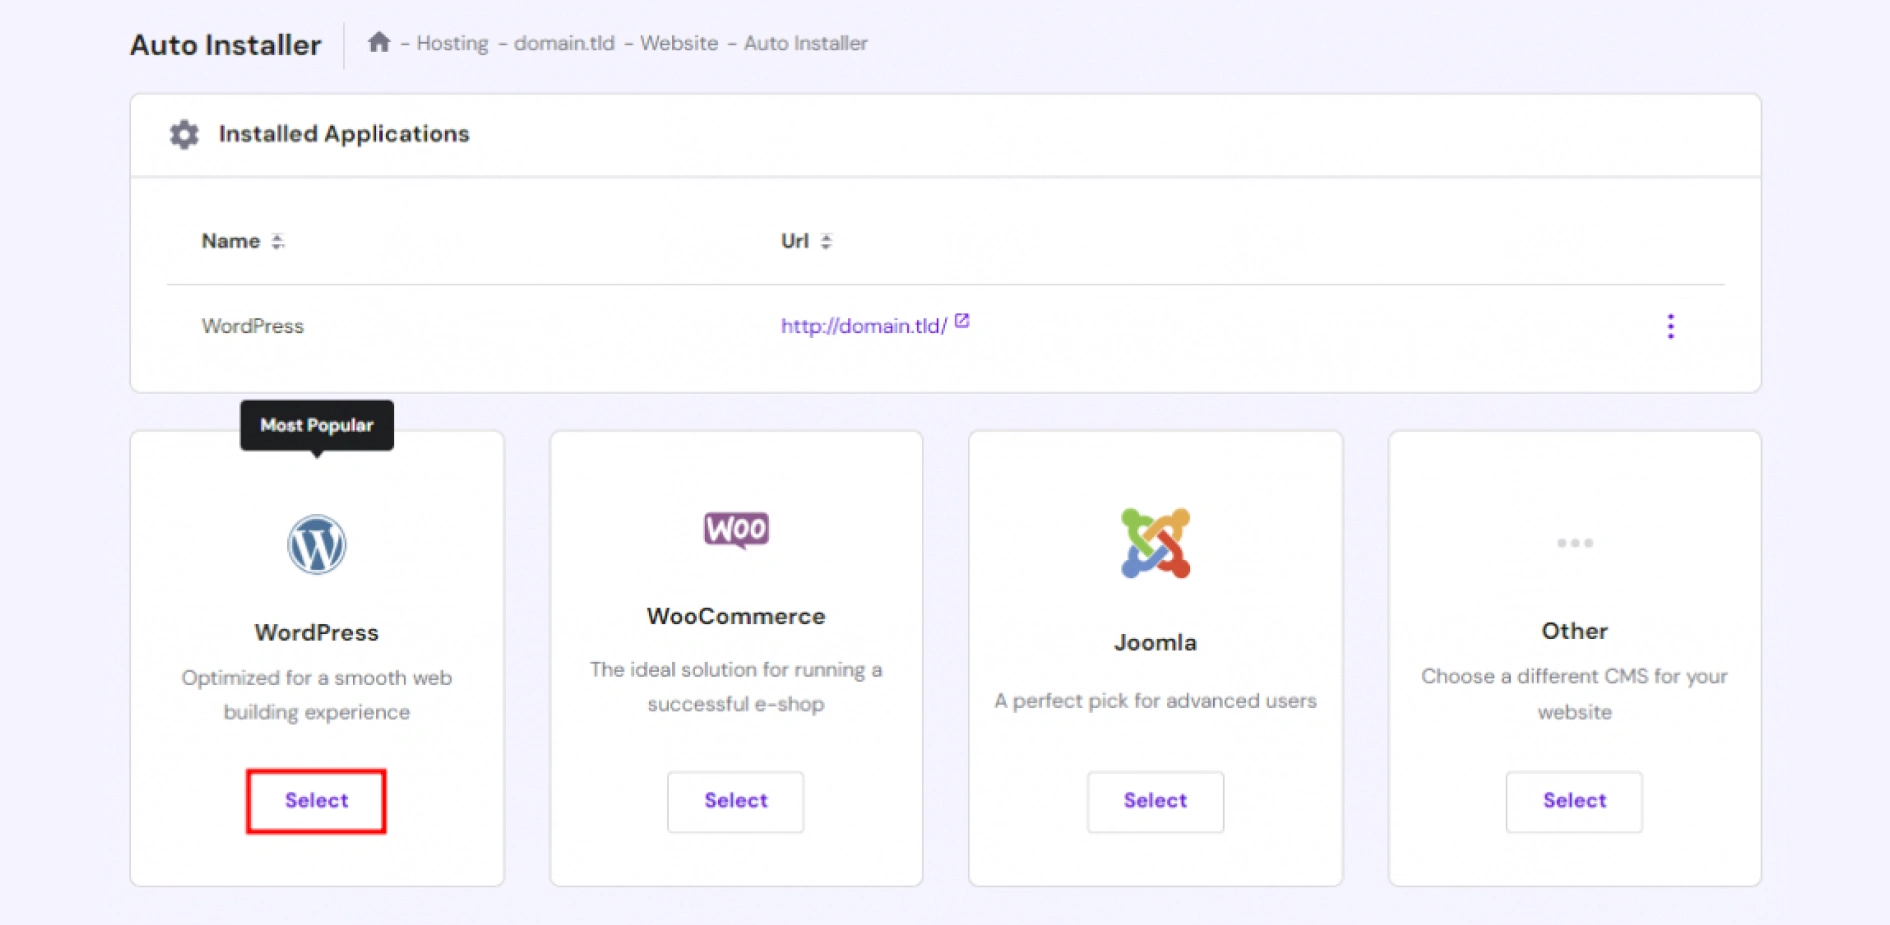
Step 3: Install WordPress Using Auto Installer
- Find the Auto Installer:
In hPanel, look for the “Website” section and click on “Auto Installer”. - Select WordPress:
In the Auto Installer, search for “WordPress” and select it.
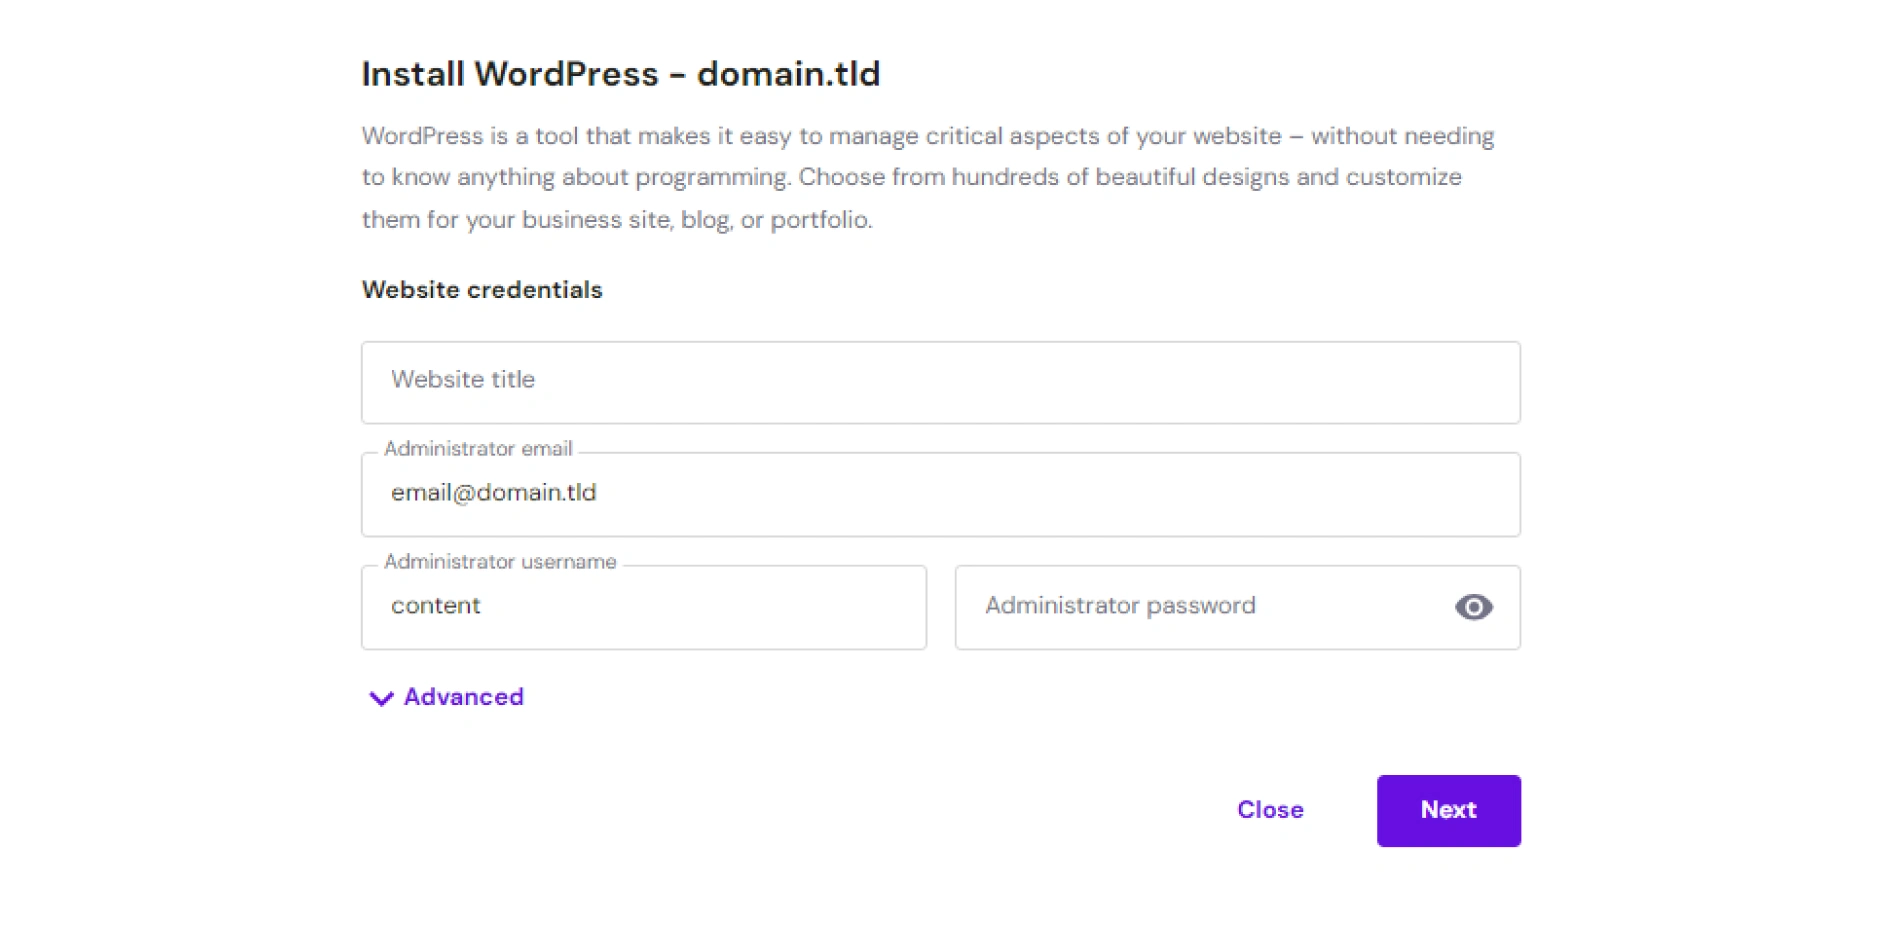
3. Configure the WordPress Installation:
- Domain: Choose the domain where you want to install WordPress.
- Administrator Username: Create a unique username for the admin account.
- Administrator Password: Set a strong password.
- Administrator Email: Provide an email address for the admin account.
- Website Title: Enter the name of your website.
- Language: Select your preferred language.
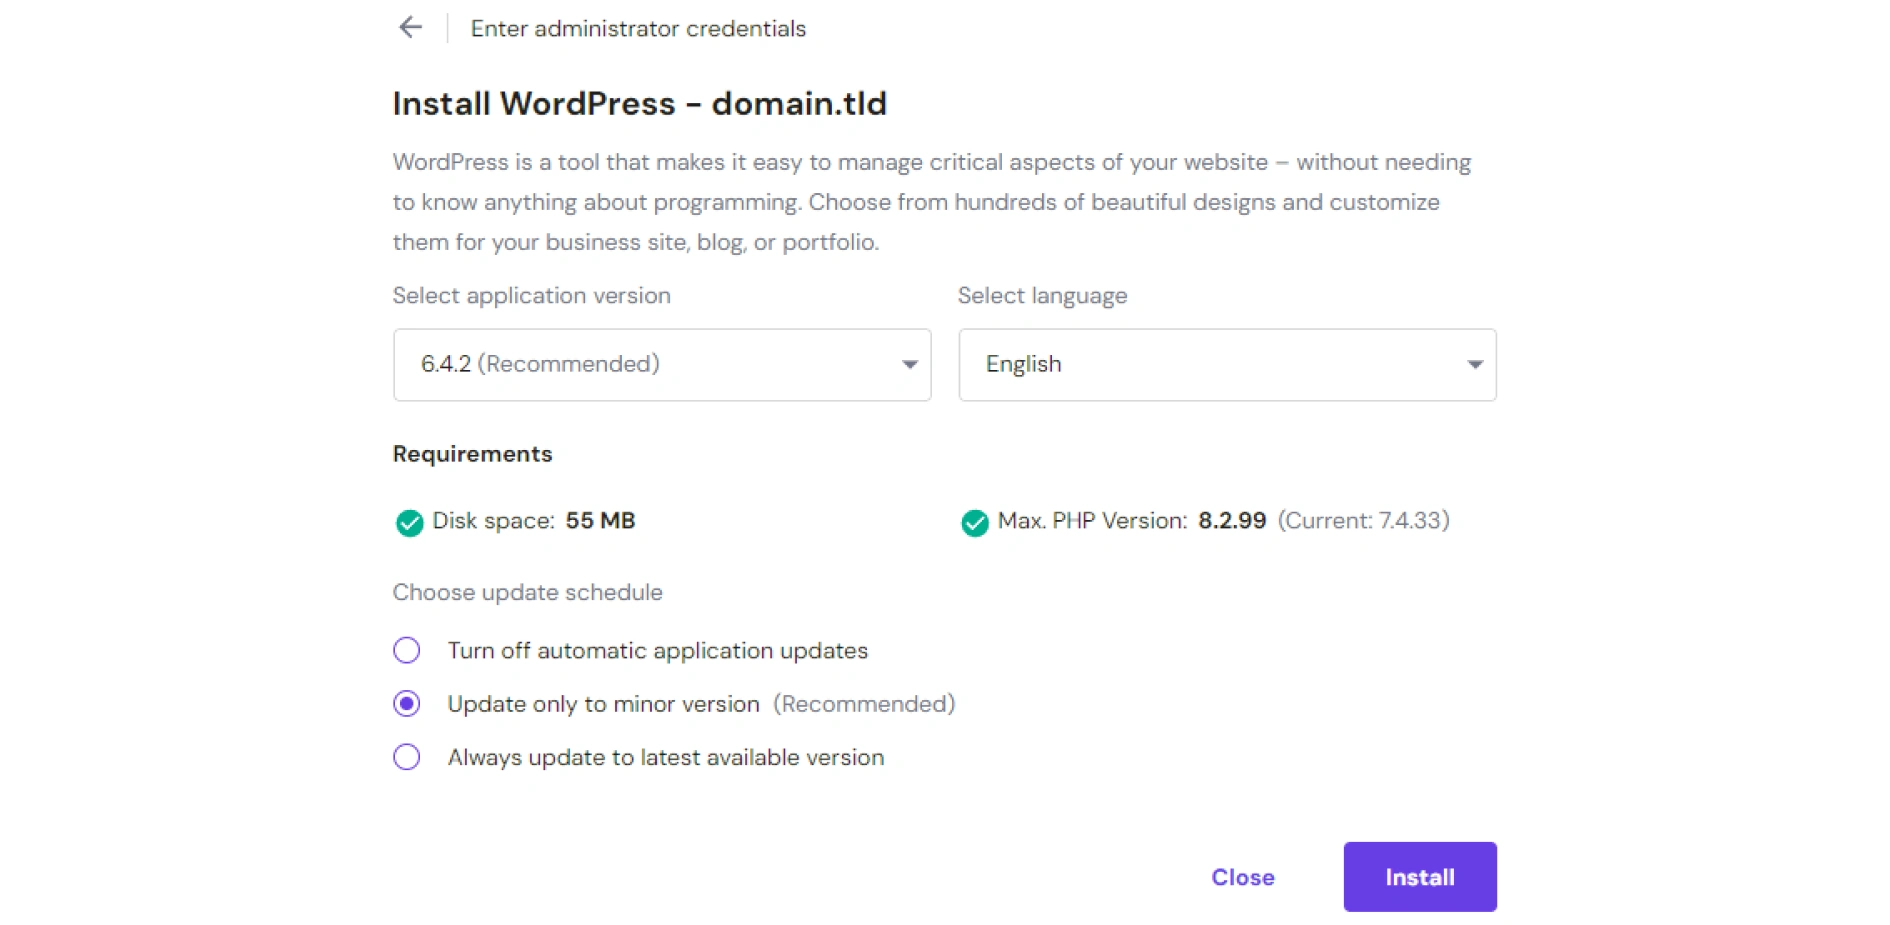
4. Install WordPress:
- Click the “Install” button to begin the installation. This may take a few moments.
Step 4: Complete Installation and Log In
Access Your WordPress Site:
- After the installation is complete, you’ll see a success message with your site URL and admin login URL.
- Example: http://yourdomain.com and http://yourdomain.com/wp-admin.
Log In to WordPress Admin:
- Go to the admin login URL (e.g., http://yourdomain.com/wp-admin).
- Enter the admin username and password you created during the installation.
Setting Up Your Elementor On Your WordPress
Choose a Theme
Elementor works well with many themes, but for the best experience, consider using the Astra by Brainstorm Force, which is lightweight and compatible.
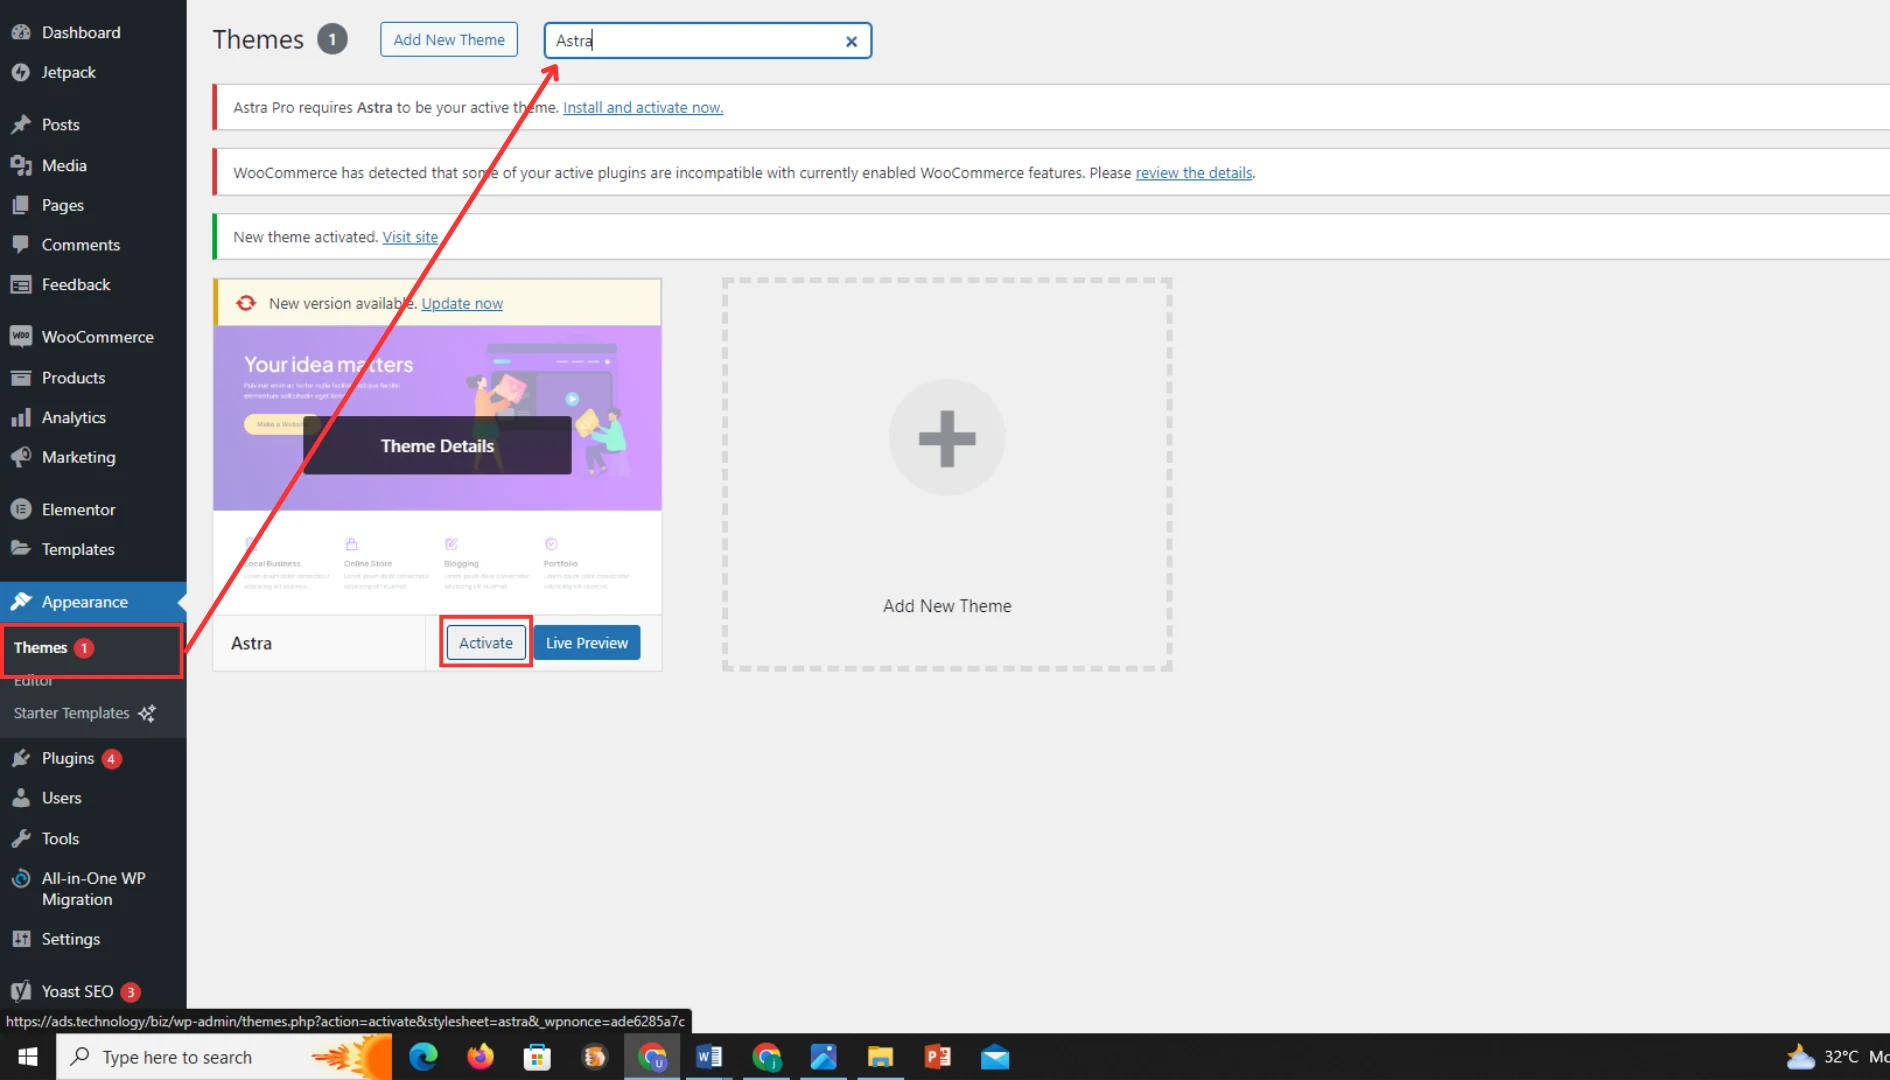
Steps to Install the Astra Theme
Navigate to the Themes Section:
- In the left-hand menu, go to Appearance and click on Themes.
Add a New Theme:
- At the top of the Themes page, click on the Add New button.
- Search for Astra:
- In the search bar, type “Astra” and press Enter.
- Look for the Astra theme by Brainstorm Force in the search results.
Install Astra:
- Click the Install button next to the Astra theme.
- Wait for the theme to be installed. This may take a few moments.
Activate Astra:
- Once the theme is installed, the Install button will change to an Activate button.
- Click the Activate button to make Astra your active theme.
Now, you have successfully installed and activated the Astra theme, You can now start customizing your site with Elementor and Astra!
Step-by-Step Guide to Building a Web Page with Elementor
Alright, let’s get started with creating a web page using Elementor. We’ll walk through everything you need, from planning to publishing. Ready? Let’s go!
Planning Your Web Page
Think about what pages you need—typically, a website includes a Home, About, Services, and Contact page. Sketch out a basic layout for each page, considering what sections and elements (like text, images, and buttons) you’ll need. This step will make the actual building process much smoother.
Designing Your Web Page
Create a New Page
Think about what pages you need—typically, a website includes a Home, About, Services, and Contact page. Sketch out a basic layout for each page, considering what sections and elements (like text, images, and buttons) you’ll need. This step will make the actual building process much smoother.
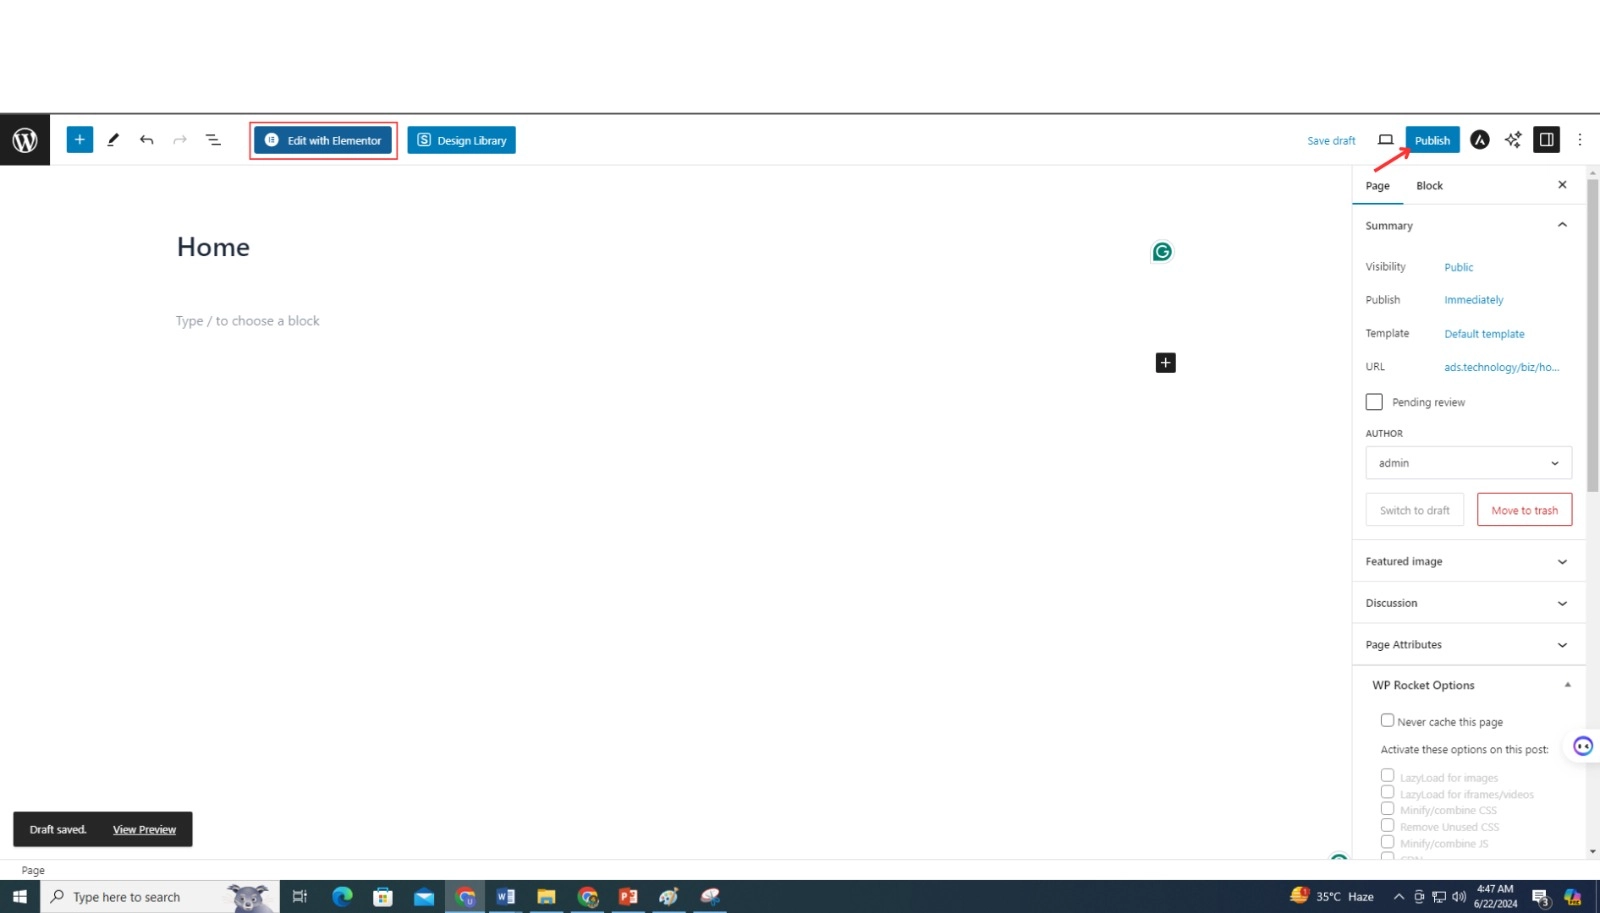
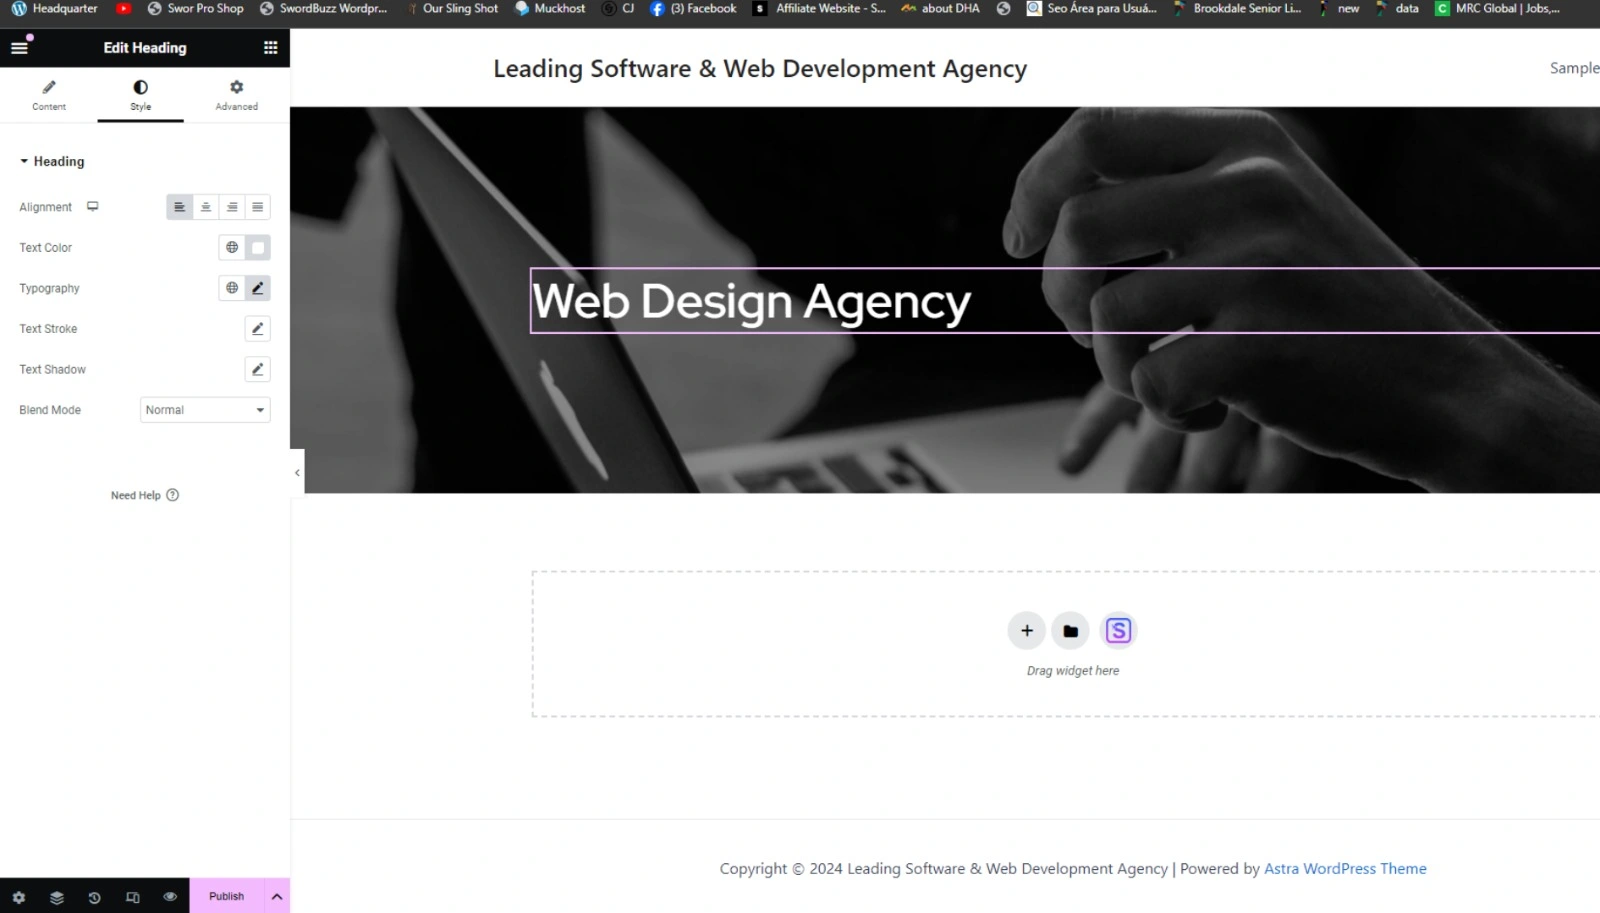
First, log into your WordPress dashboard. Go to Pages > Add New. Name your page (like Home or About), then click the ‘Edit with Elementor’ button. This action takes you into Elementor’s drag-and-drop editor, where the real fun begins.
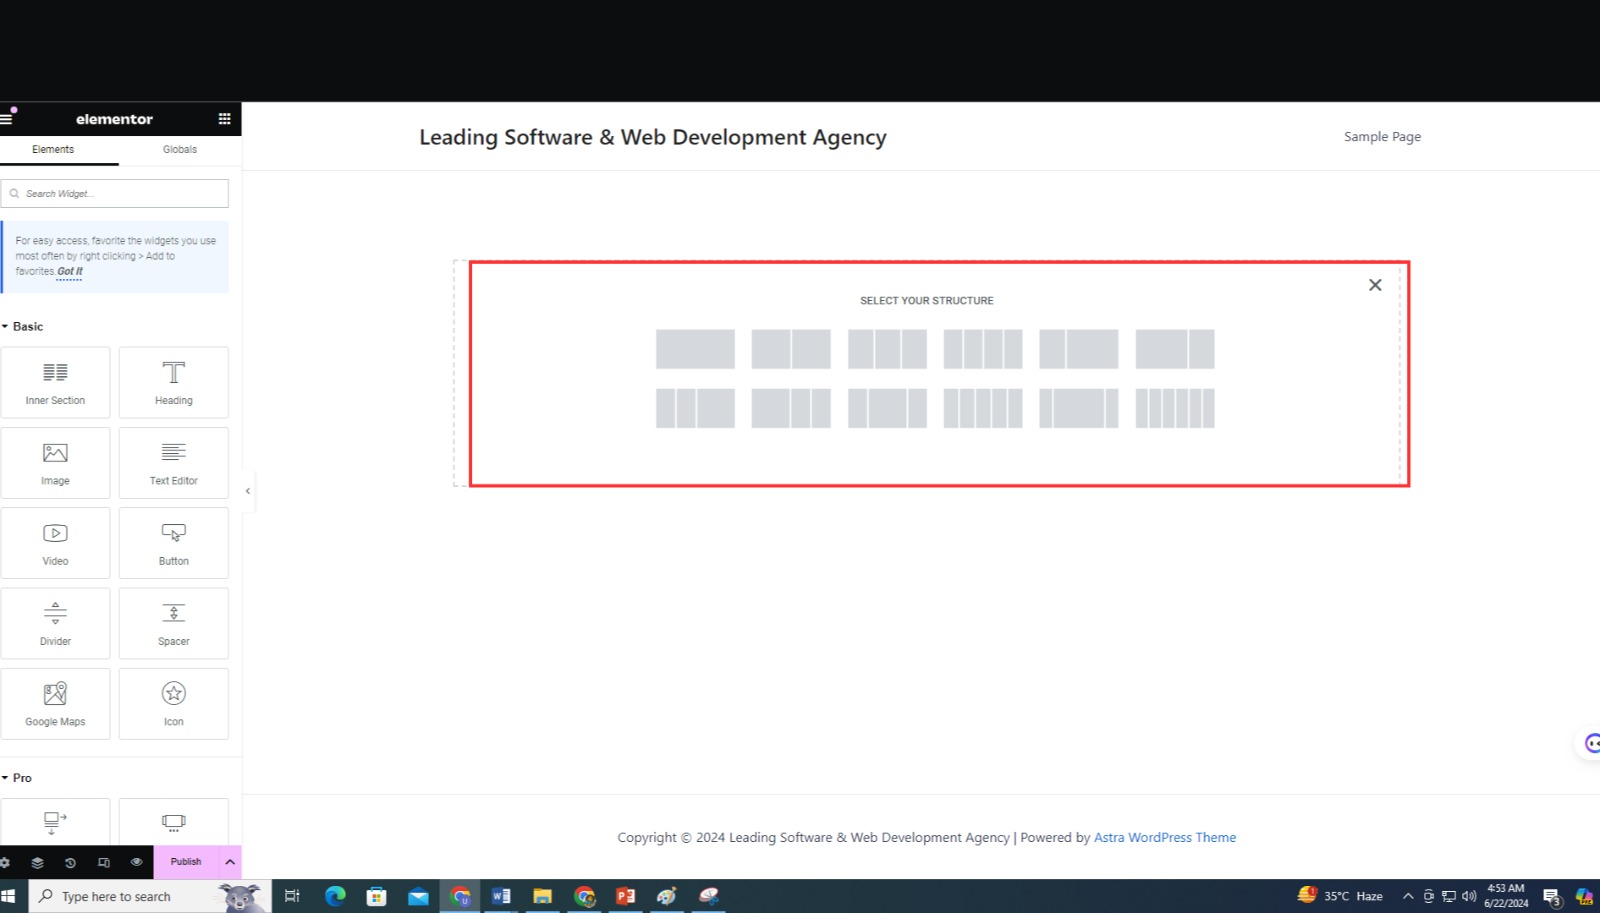
Add Sections
In Elementor, your page is built using sections, columns, and widgets. Sections are the main building blocks. Click the ‘+’ button to add a new section. You’ll see options to choose the structure of your section—whether you want a single column, two columns, or more. Choose what suits your design plan.
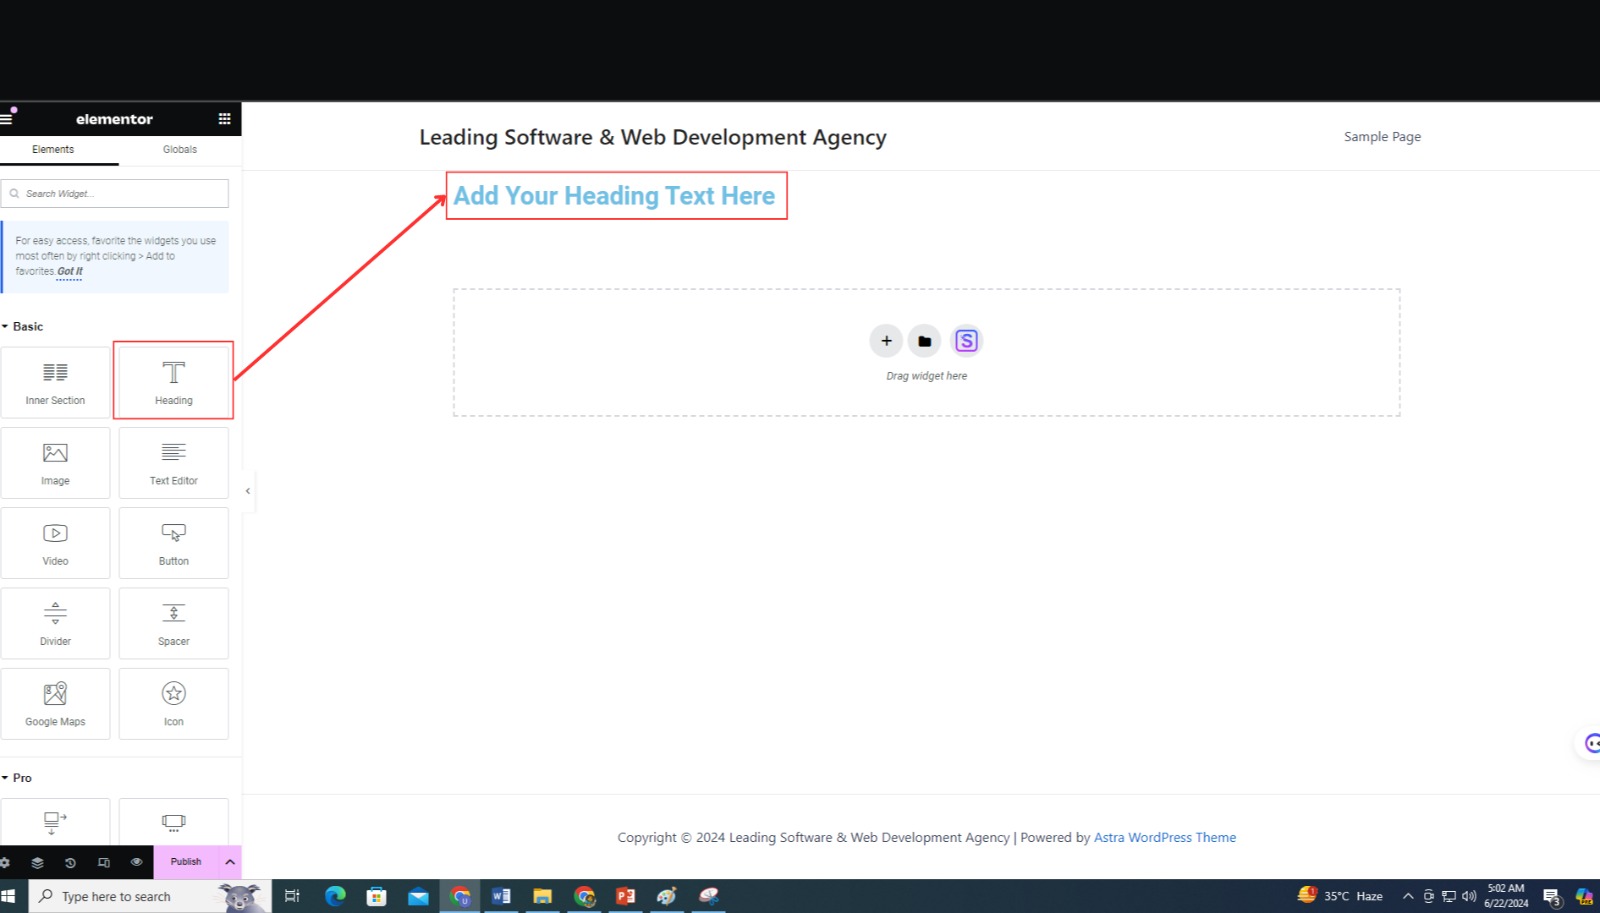
Add Widgets
Widgets are the individual elements you add to your sections, like text boxes, images, buttons, and more. On the left panel, you’ll see a list of widgets. Simply drag a widget and drop it into your section. For example, to add a heading, drag the Heading widget and drop it into your desired section. You can then customize the text, font, size, and color directly in the editor.
Adding Content
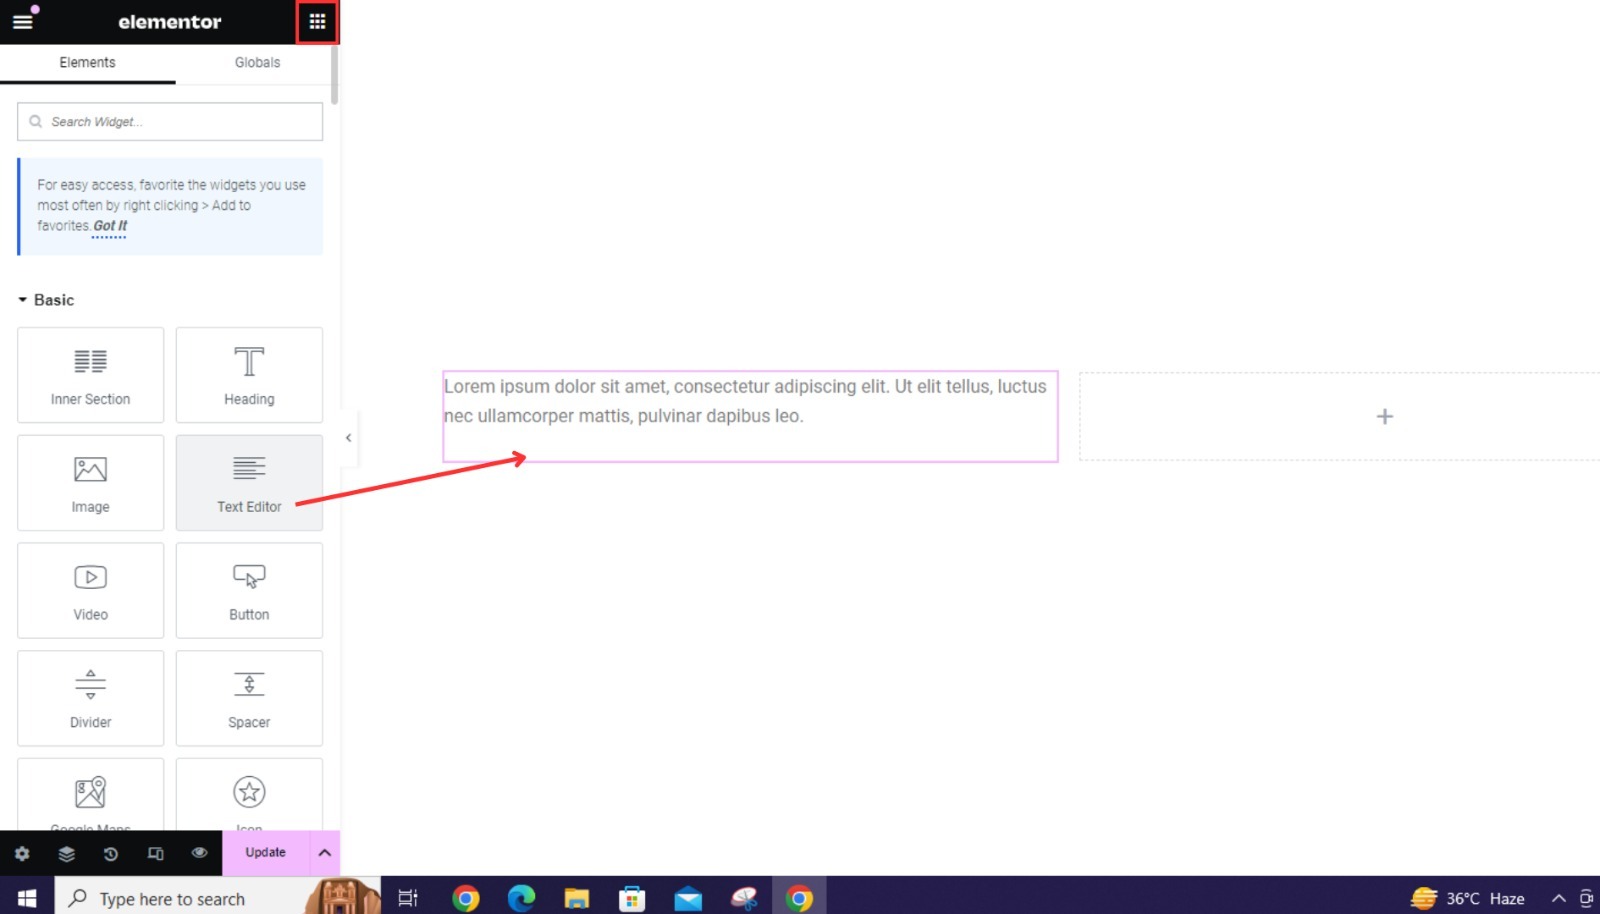
Text Content:
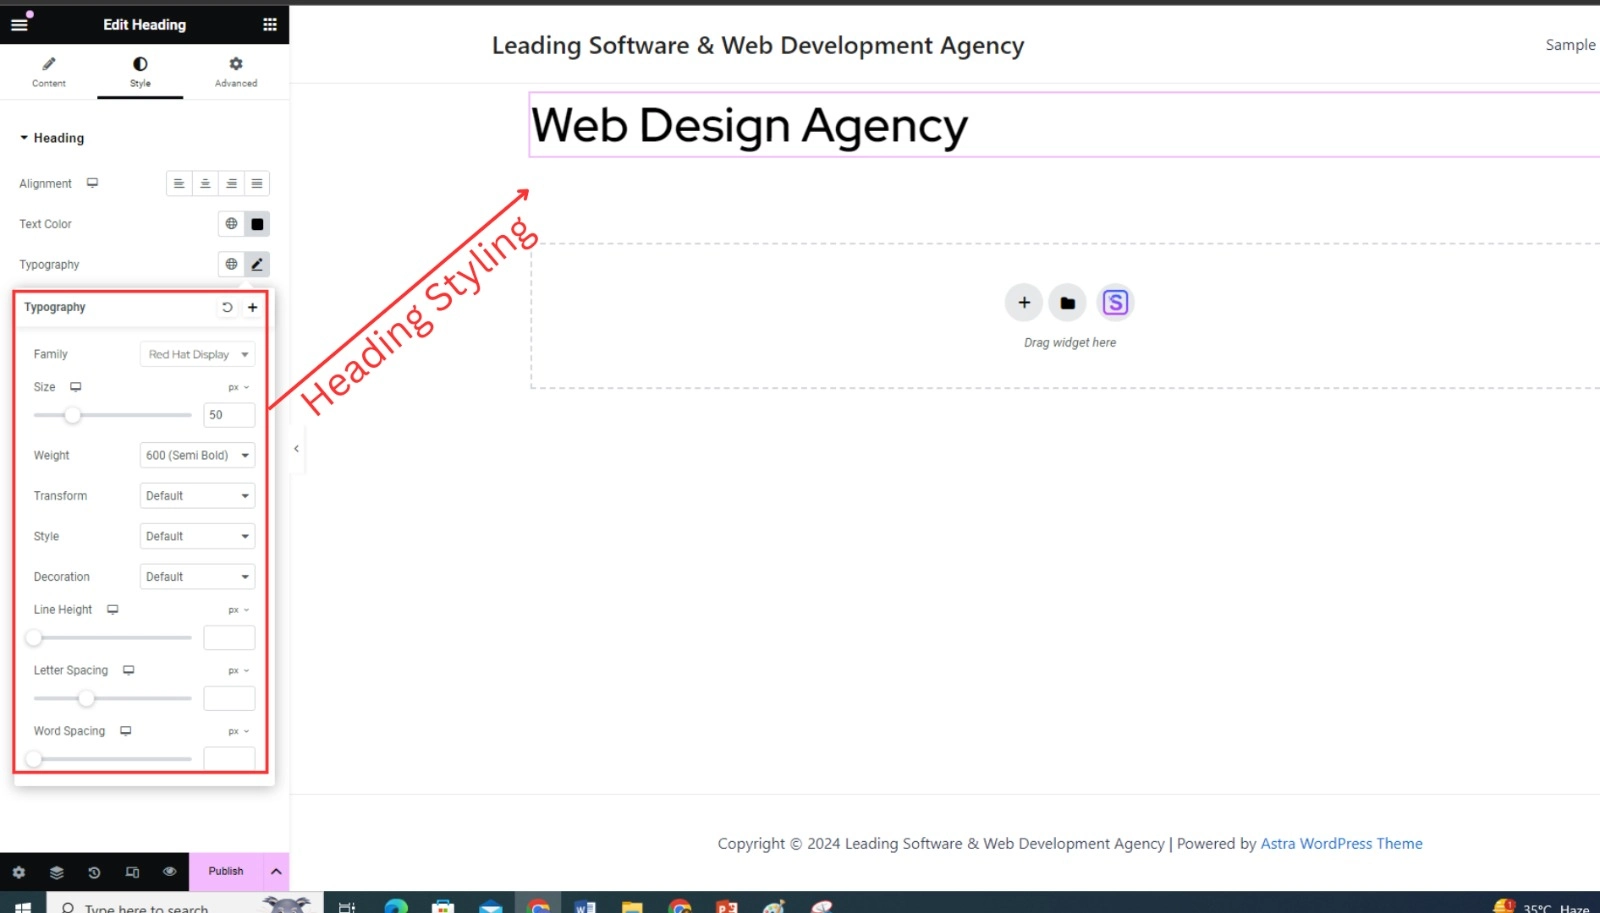
Click on any text widget to edit its content. Type directly into the box and watch your changes update in real-time. Elementor makes it easy to format your text just the way you want it.
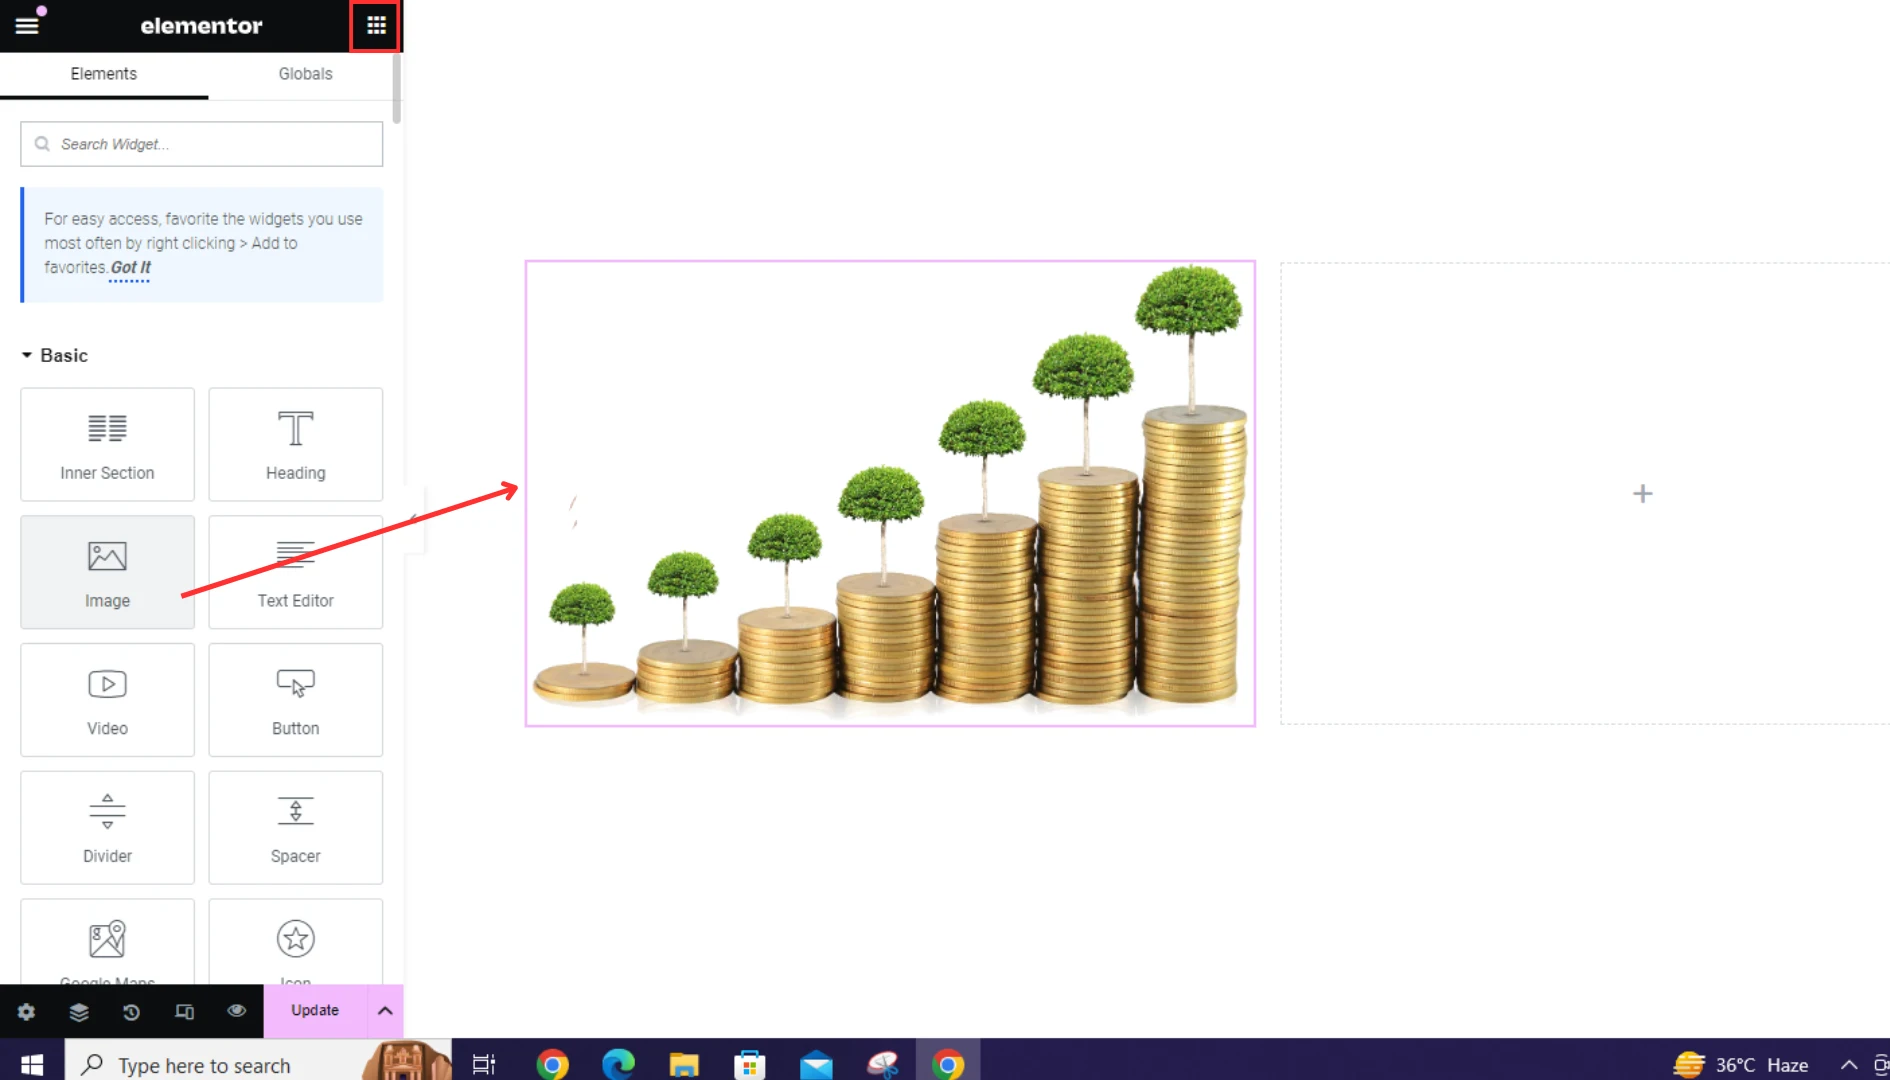
Image Content:
To add an image, drag the Image widget into a section, click on the box to upload your image, and adjust its size and alignment.
Multimedia
Want to make your site more engaging? Add videos, sliders, and galleries. Elementor supports various media formats. For example, to add a video, drag the Video widget into a section, then paste the URL of your video (from YouTube, Vimeo, etc.). You can adjust the video settings to autoplay, loop, or mute.
Customizing Features

Global Settings
Elementor allows you to set global styles for fonts, colors, and backgrounds. Click on the hamburger menu (three horizontal lines) in the top left corner of the editor and go to Site Settings. Here, you can define your site’s default font styles, color schemes, and background settings to ensure a cohesive look throughout.
Responsive Design
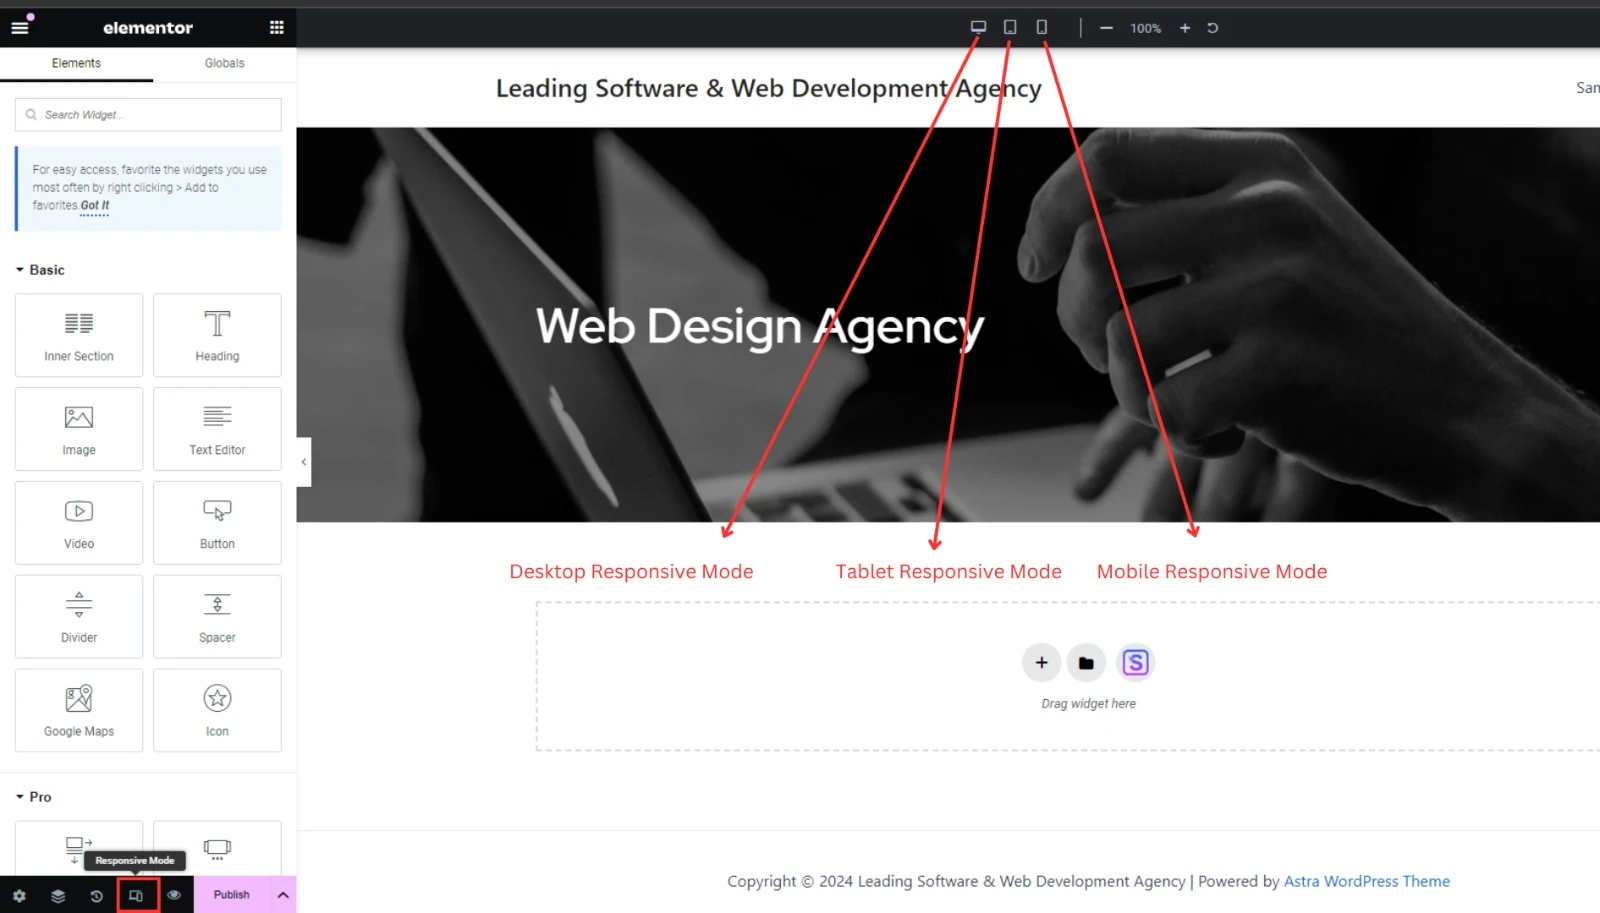
Responsive web design requires your site to appear amazing on all devices. Elementor’s adaptable editing features allow you to preview and customize your site for desktop, tablet, and mobile devices. The icons for each device type may be seen at the bottom of the Elementor panel. Click these to see how your site appears on various devices and make any required edits. You may customize font sizes, padding, and margins for each device to offer the best user experience.
Optimizing Your Web Page for SEO
Search Engine Optimization (SEO) is super important if you want people to find your website on search engines like Google. Basic SEO involves using relevant keywords, optimizing your meta descriptions, and making sure your images have descriptive alt text.
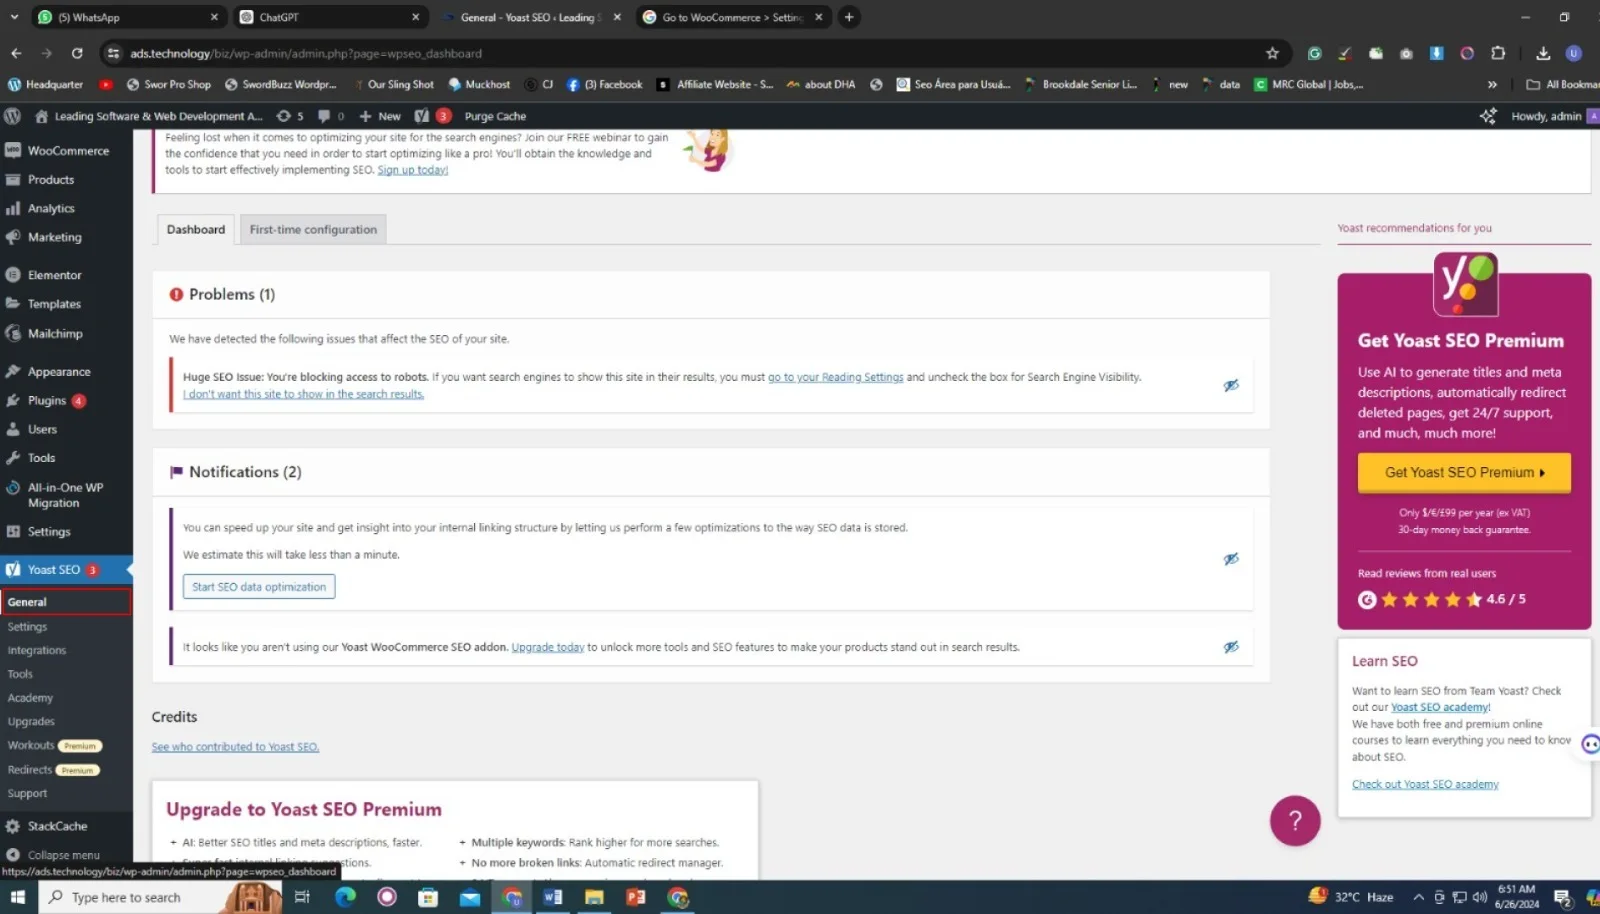
To make your page SEO-friendly, you can install an SEO plugin like Yoast SEO or Rank Math.
Why We Recommend Yoast SEO Instead of other SEO Plugins for beginners?
We recommend Yoast SEO over other SEO plugins like Rank Math, especially for beginners, because Yoast SEO is extremely user-friendly and does not require prior knowledge of SEO to get started. While Rank Math offers many advanced features, it can be overwhelming for beginners who may not be familiar with SEO concepts.
In contrast, Yoast SEO provides a comprehensive set of tools to optimize your website for search engines, including keyword optimization, readability analysis, and meta tag management. It offers real-time suggestions and actionable insights to improve content quality, making your posts both search-engine-friendly and engaging for readers. Additionally, its integration with social media platforms and straightforward interface make it an essential tool for enhancing and maintaining your online presence.
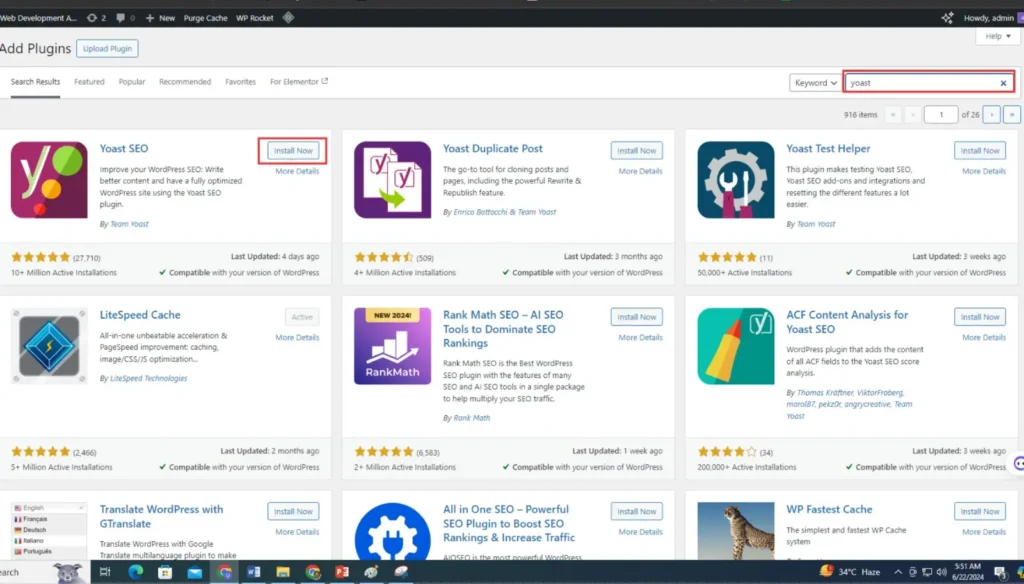
Installing Yoast SEO:
- Go to your WordPress dashboard.
- Navigate to Plugins > Add New.
- Search for “Yoast SEO” and click “Install Now”, then “Activate”.
Setting up Yoast SEO:
- Once activated, you’ll see a new SEO menu item in your WordPress dashboard.
- Click on SEO > General to configure basic settings like titles and meta descriptions.
- Follow the setup wizard to customize your SEO settings according to your site’s needs.
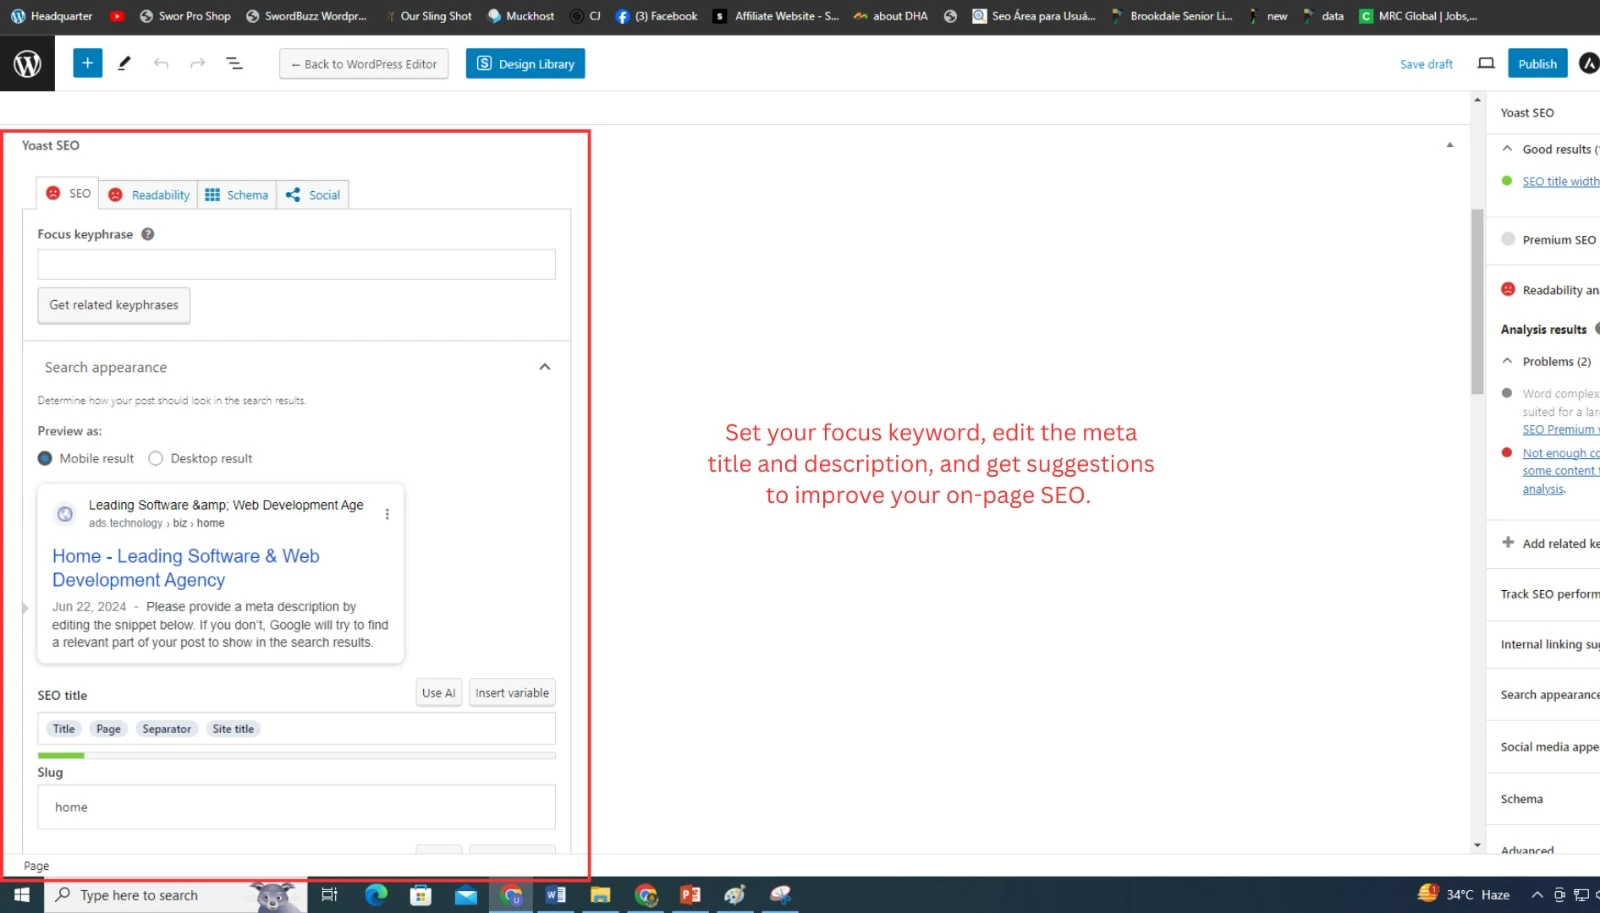
Optimizing Content with Yoast SEO:
- Yoast SEO provides real-time feedback and suggestions as you write your content.
- It assesses readability, checks for keyword density, and suggests improvements to enhance SEO.
- Follow the green, orange, and red bullet indicators to improve the overall SEO score of your content.
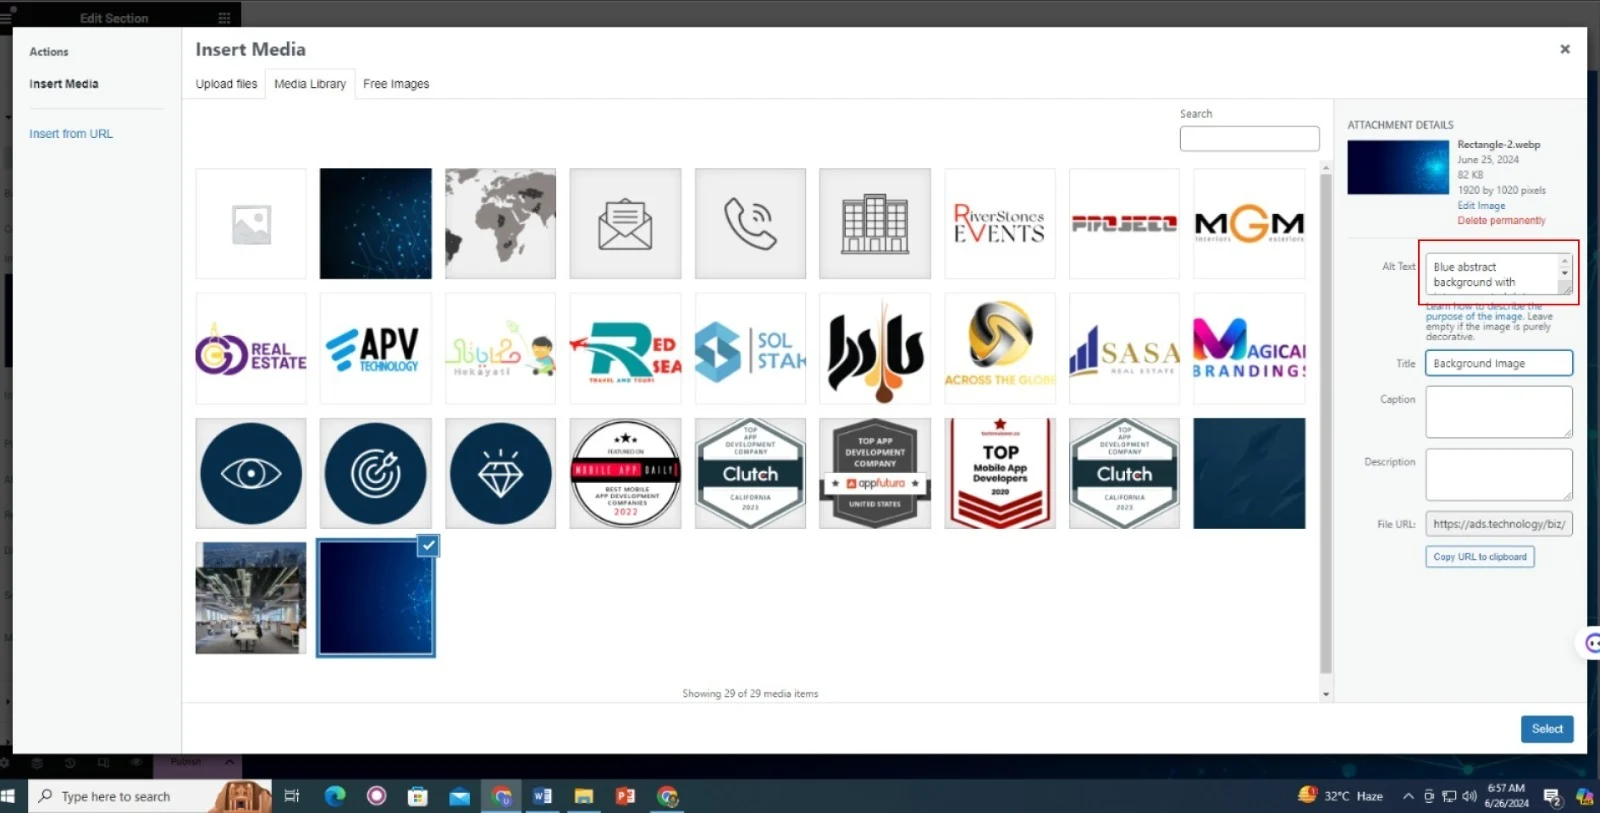
- Within Elementor, click on any image widget and go to the Advanced tab.
- Enter descriptive alt text for each image, which helps search engines understand the content of your images and improves accessibility.
Additional Features:
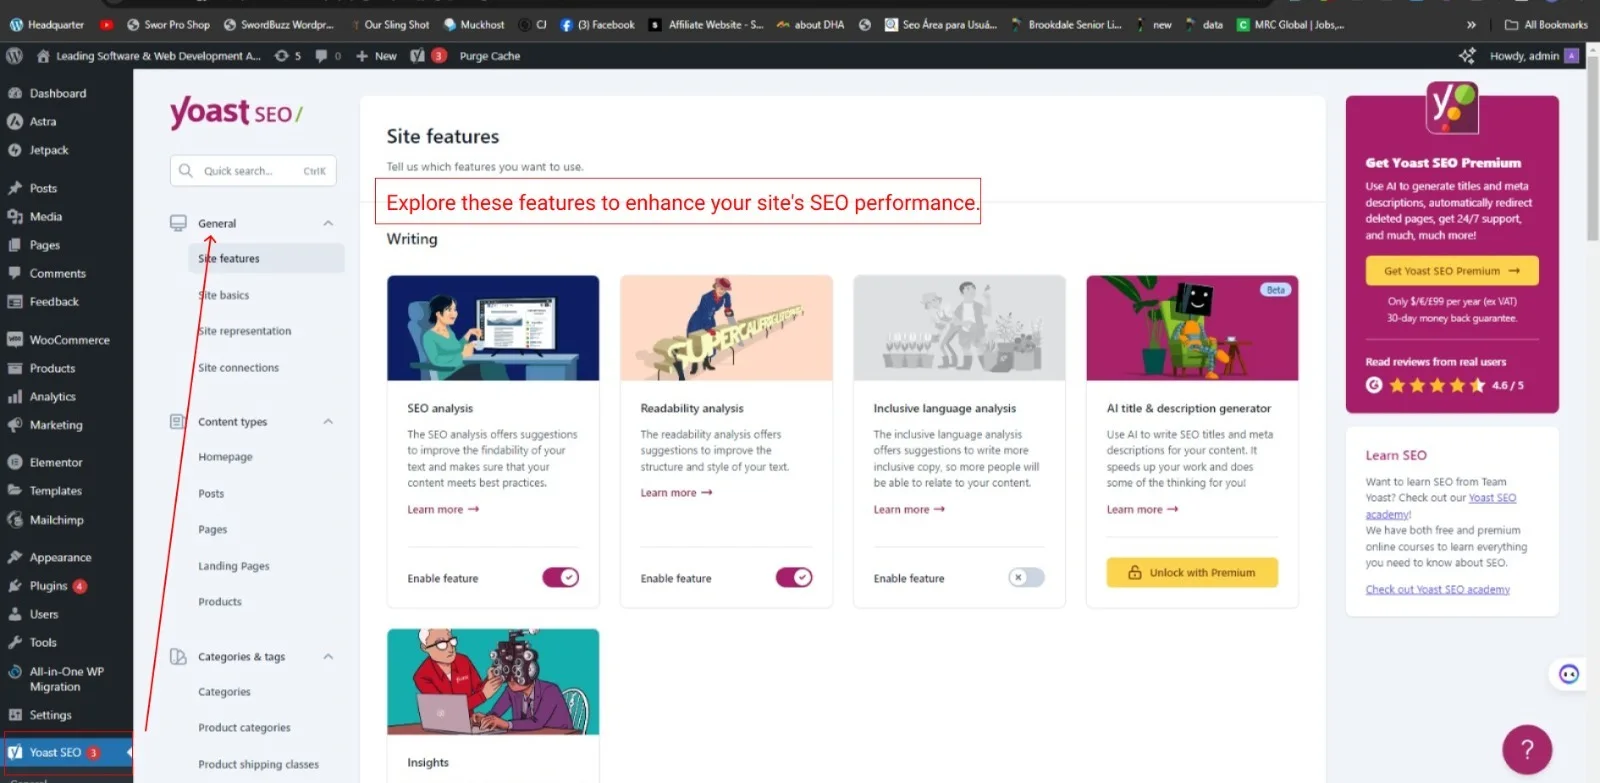
Yoast SEO offers additional features such as XML sitemap generation, breadcrumb navigation support, and social media integration. You can use these features within the Yoast SEO settings toenhance your site’s SEO performance.
Enhancing User Experience (UX)
Speed Optimization with LiteSpeed Cache
Fast loading times are essential for a great user experience. Here’s how you can speed up your site using the LiteSpeed Cache plugin:
Why Use LiteSpeed Cache?
LiteSpeed Cache is a powerful tool that helps reduce your site’s loading time by caching your web pages. This means that instead of loading every element of your page from scratch every time someone visits, it saves a static version and serves that instead. This greatly improves speed.
How to Use LiteSpeed Cache:
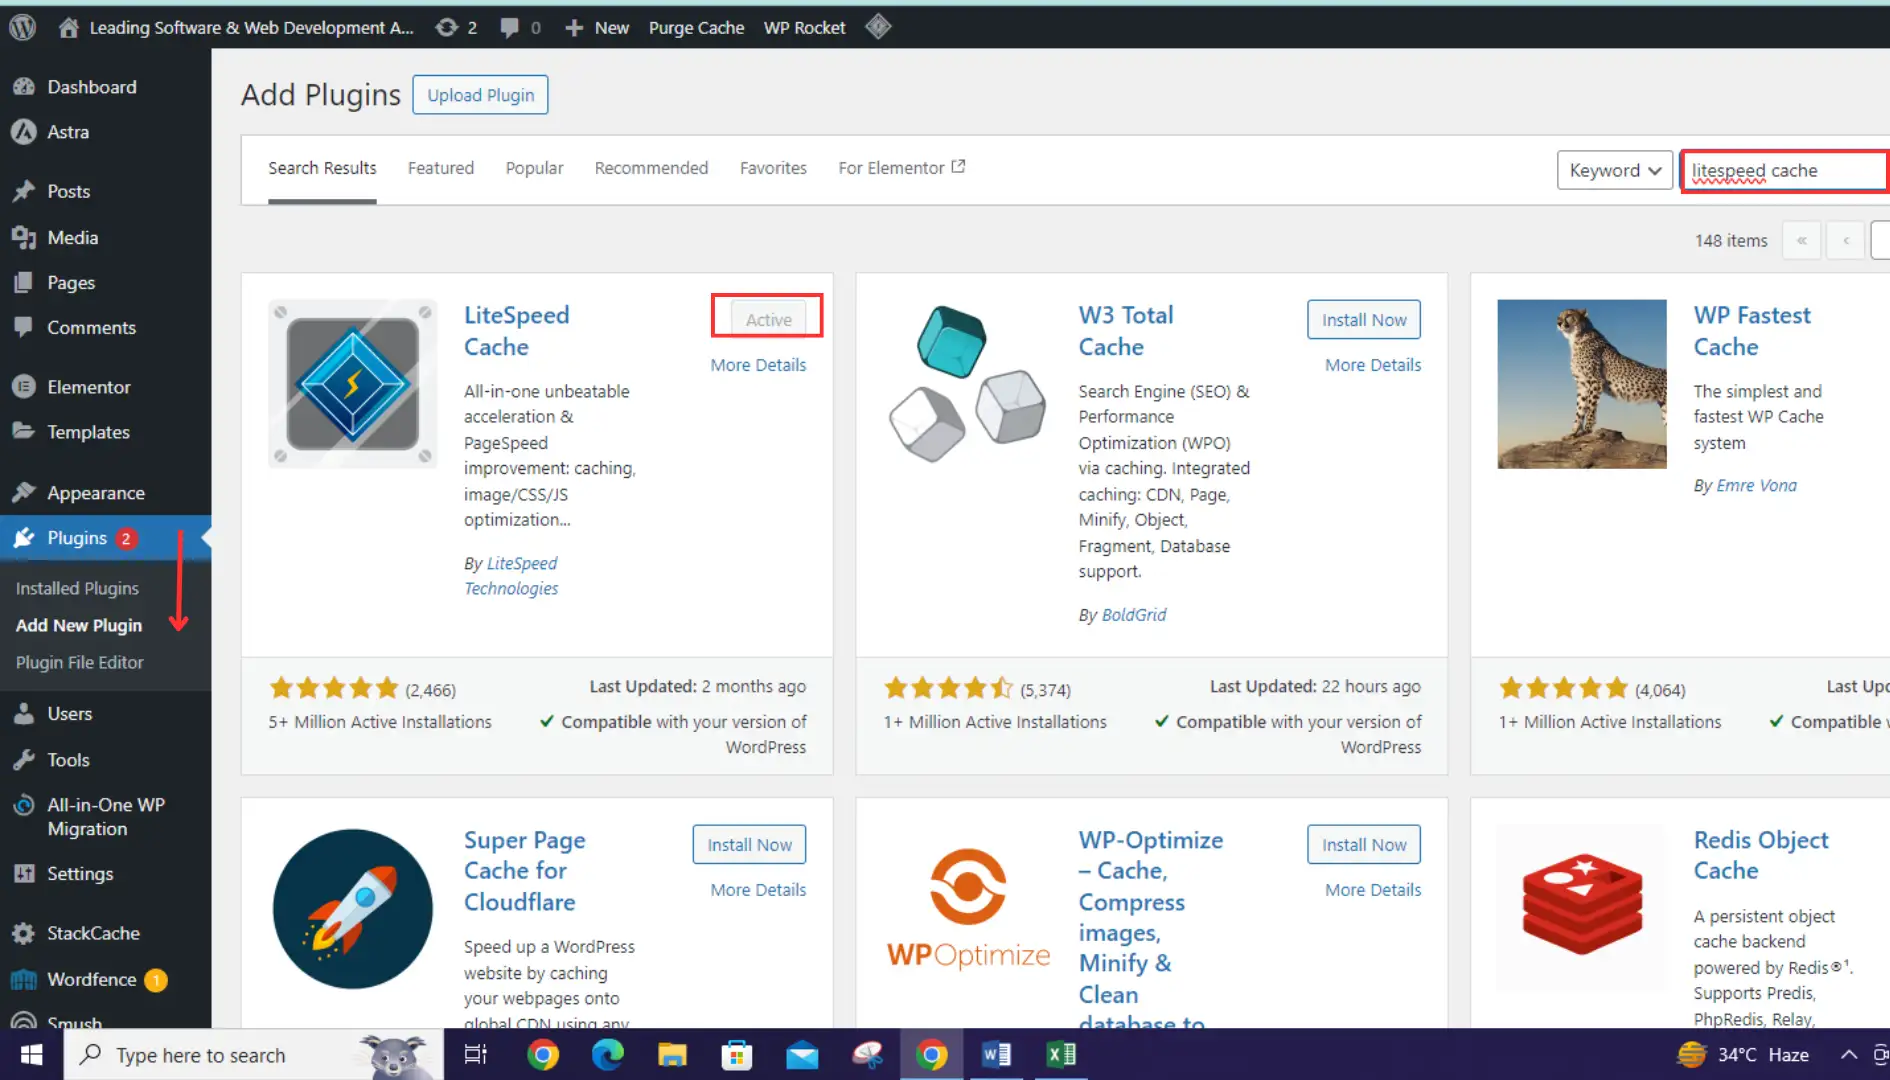
Install LiteSpeed Cache:
- Go to your WordPress dashboard.
- Navigate to Plugins > Add New.
- Search for “LiteSpeed Cache” and click Install Now, then Activate.
Basic Configuration:
- After activation, go to LiteSpeed Cache > General.
- Enable caching by switching the Enable LiteSpeed Cache option to On.
- Save changes.
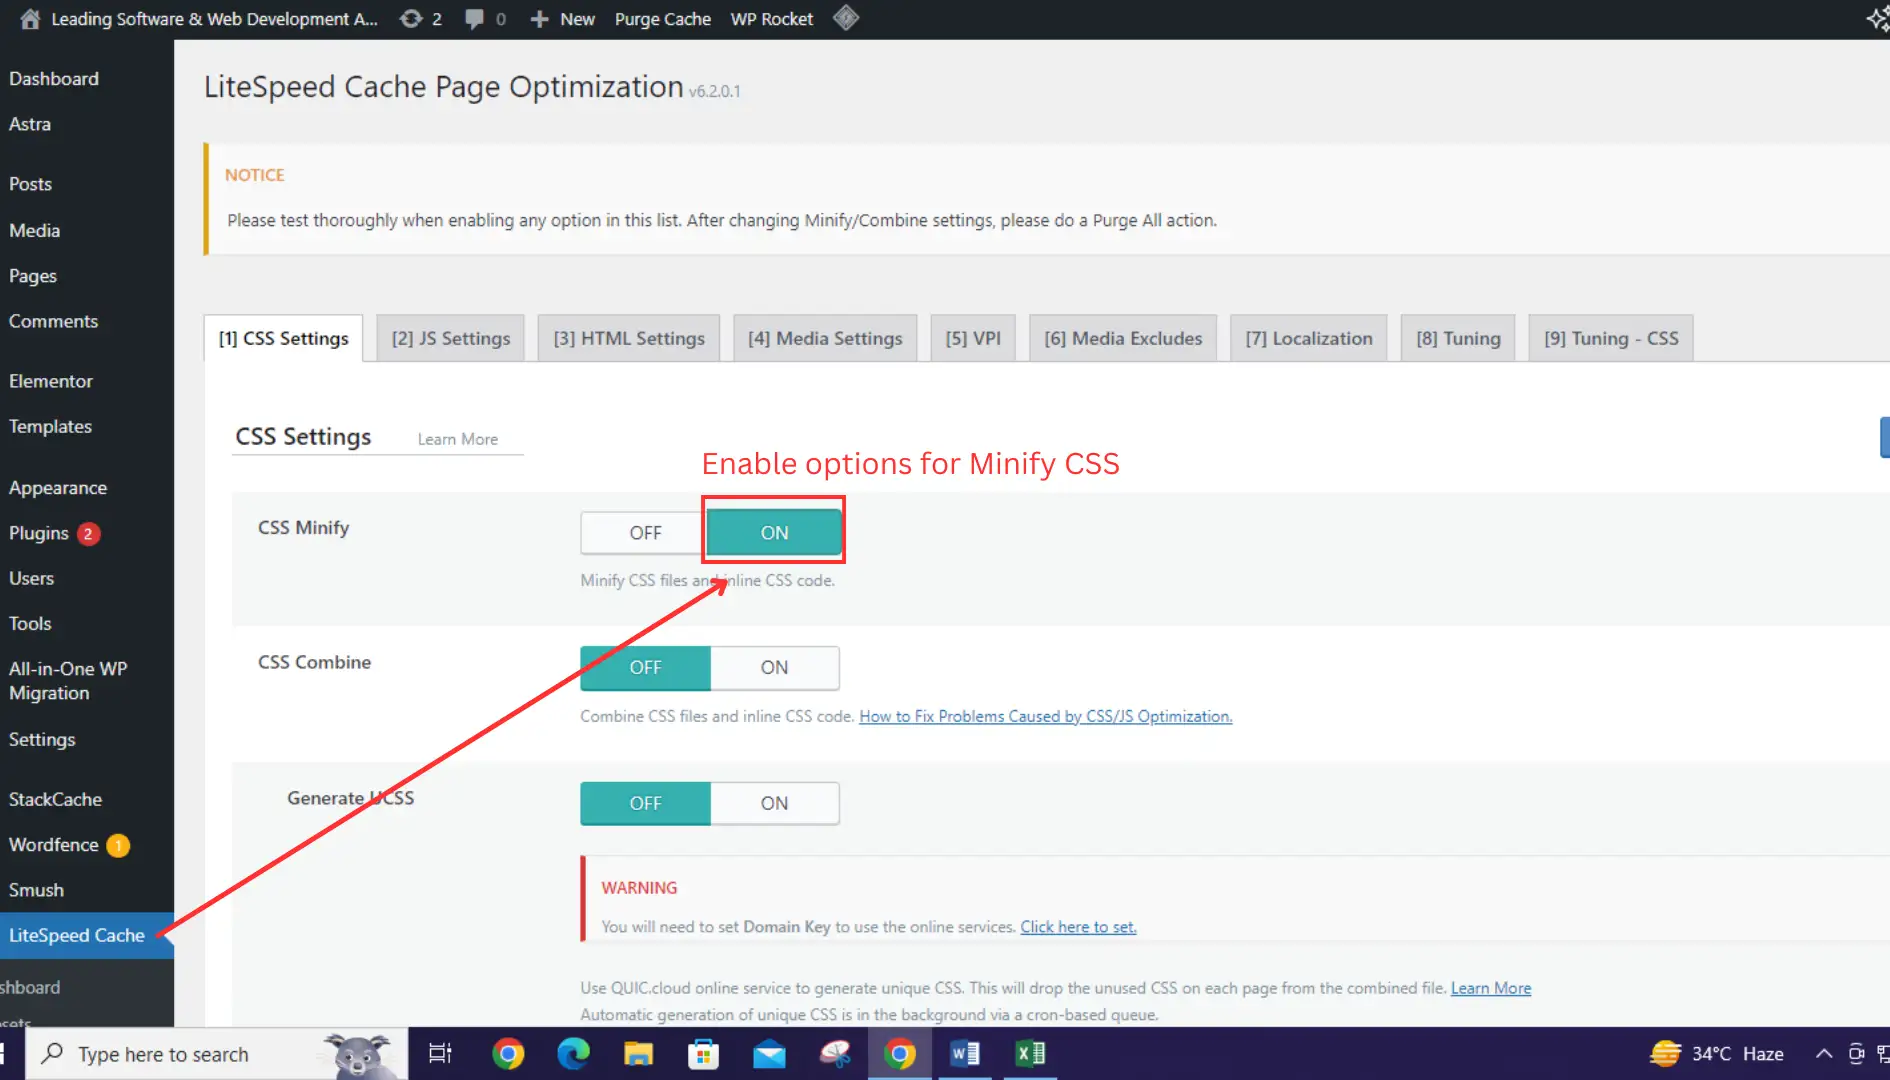
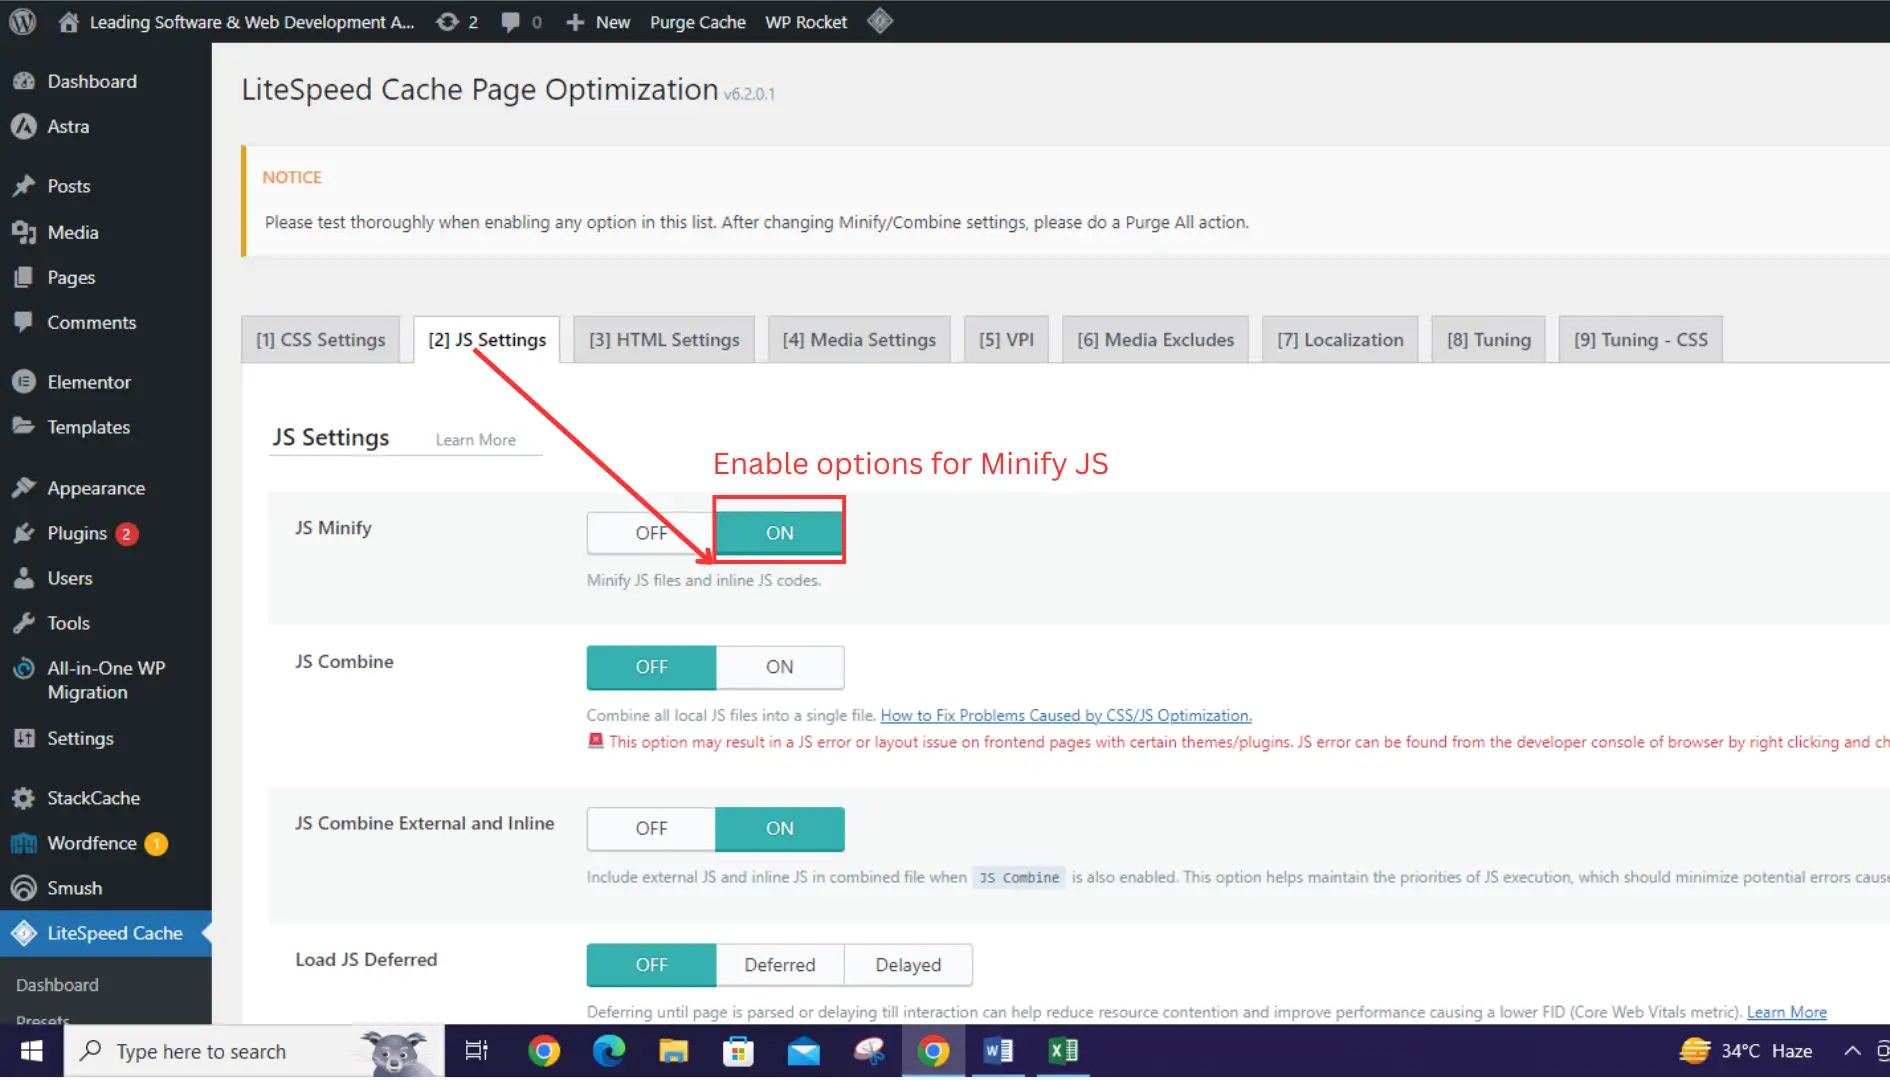
3. Optimize CSS and JS:
- Go to LiteSpeed Cache > Page Optimization.
- Enable options for Minify CSS and Minify JS.
- Save changes.
Using LiteSpeed Cache makes your website load more quickly, improving the overall user experience. Faster sites keep users happy and reduce bounce rates.
Improving Core Web Vitals with WP Rocket
Core Web Vitals are essential metrics for a healthy website. Here’s how to use the WP Rocket plugin to enhance these:
Why Use WP Rocket?
WP Rocket is a powerful caching plugin that not only speeds up your site but also improves your Core Web Vitals. These are metrics Google uses to measure user experience, including loading speed, interactivity, and visual stability.
How to Use WP Rocket:
Installing WP Rocket
- Visit the WP Rocket website (https://wp-rocket.me/) and purchase a license.
- You’ll receive a download link and license key via email after purchase.
- Download the WP Rocket plugin from the link provided in your email.
- Log in to your WordPress dashboard.
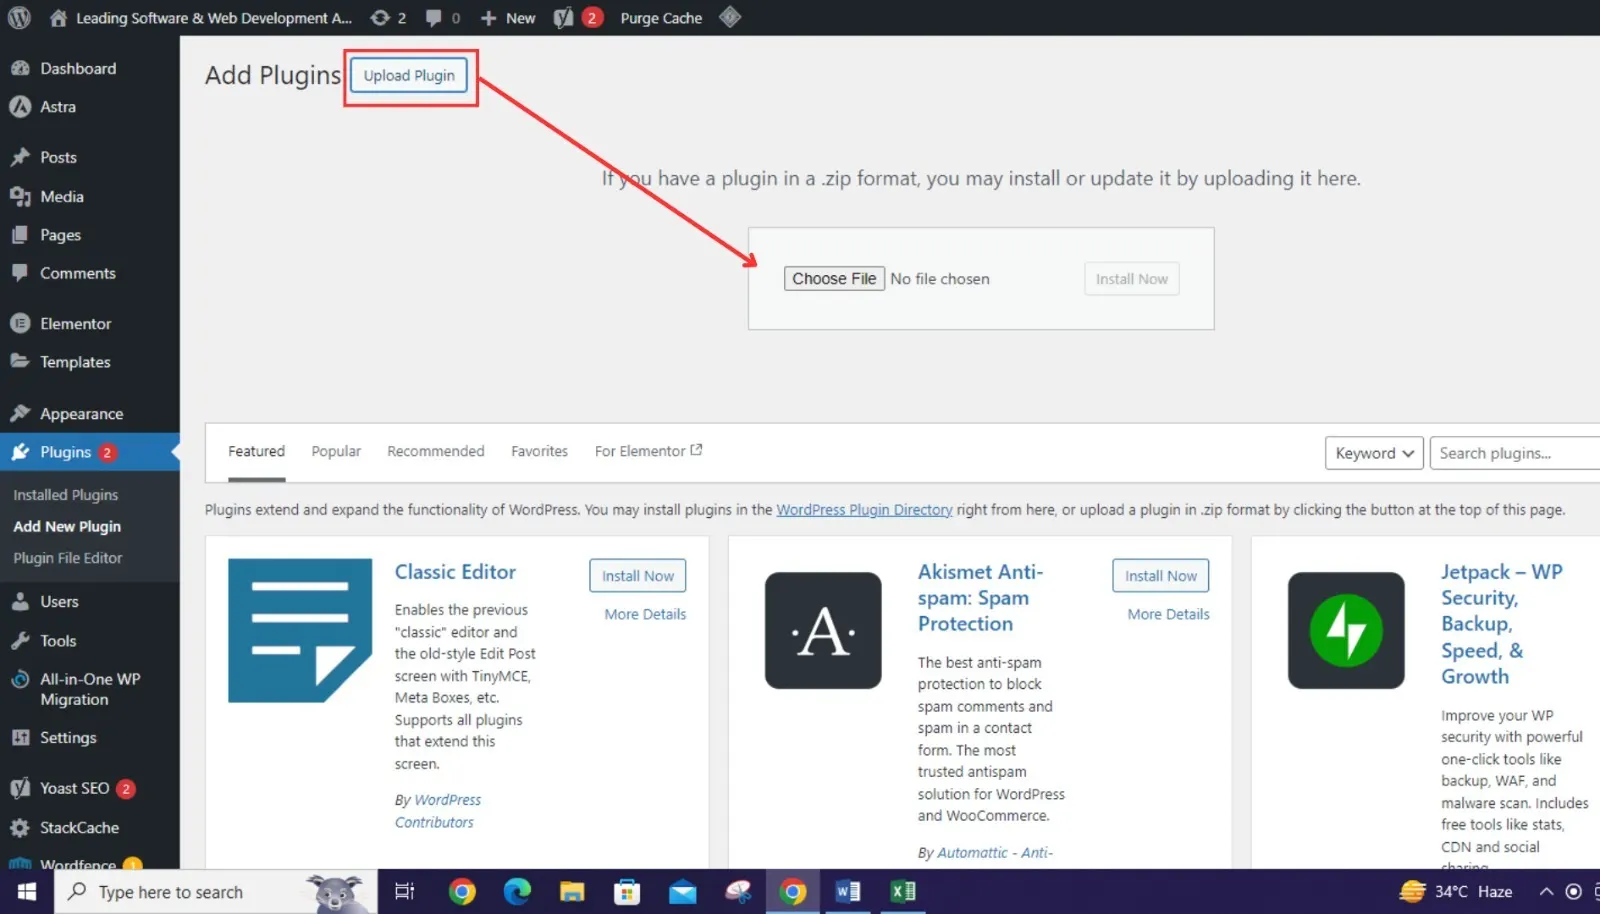
- Navigate to Plugins > Add New.
- Click on the “Upload Plugin” button at the top of the screen.
- Choose the WP Rocket plugin zip file you downloaded and click “Install Now.”
Basic Settings:
- Once activated, navigate to Settings > WP Rocket.
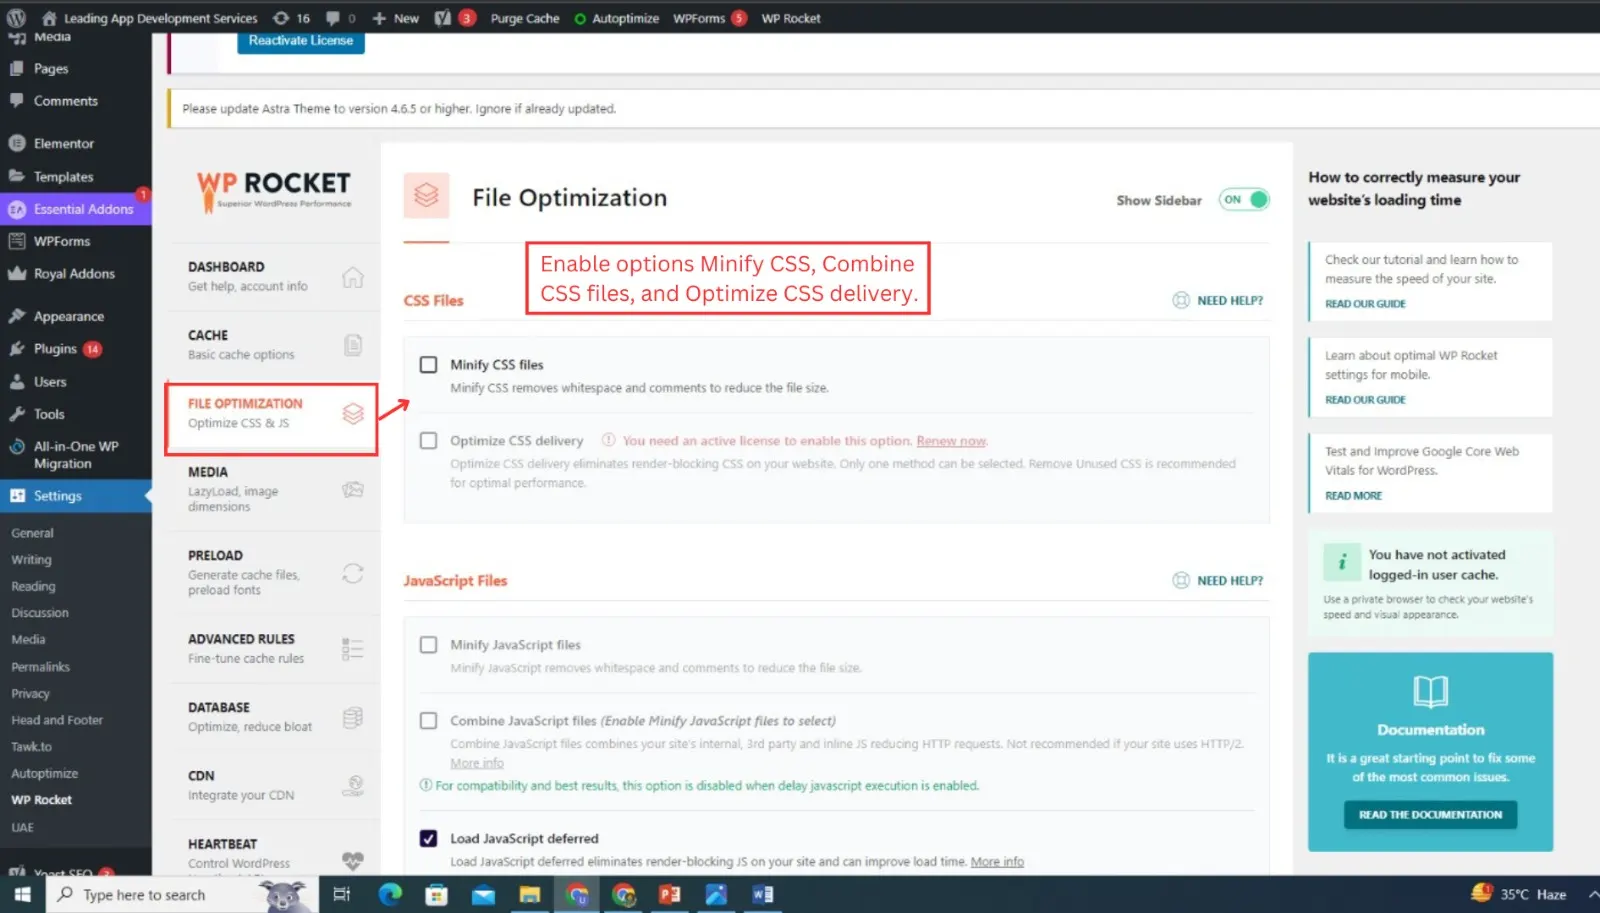
Optimize Core Web Vitals:
- Go to WP Rocket > File Optimization.
- Enable options like Minify CSS, Combine CSS files, and Optimize CSS delivery.
- Similarly, enable Minify JavaScript and Combine JavaScript files.
- Save changes.
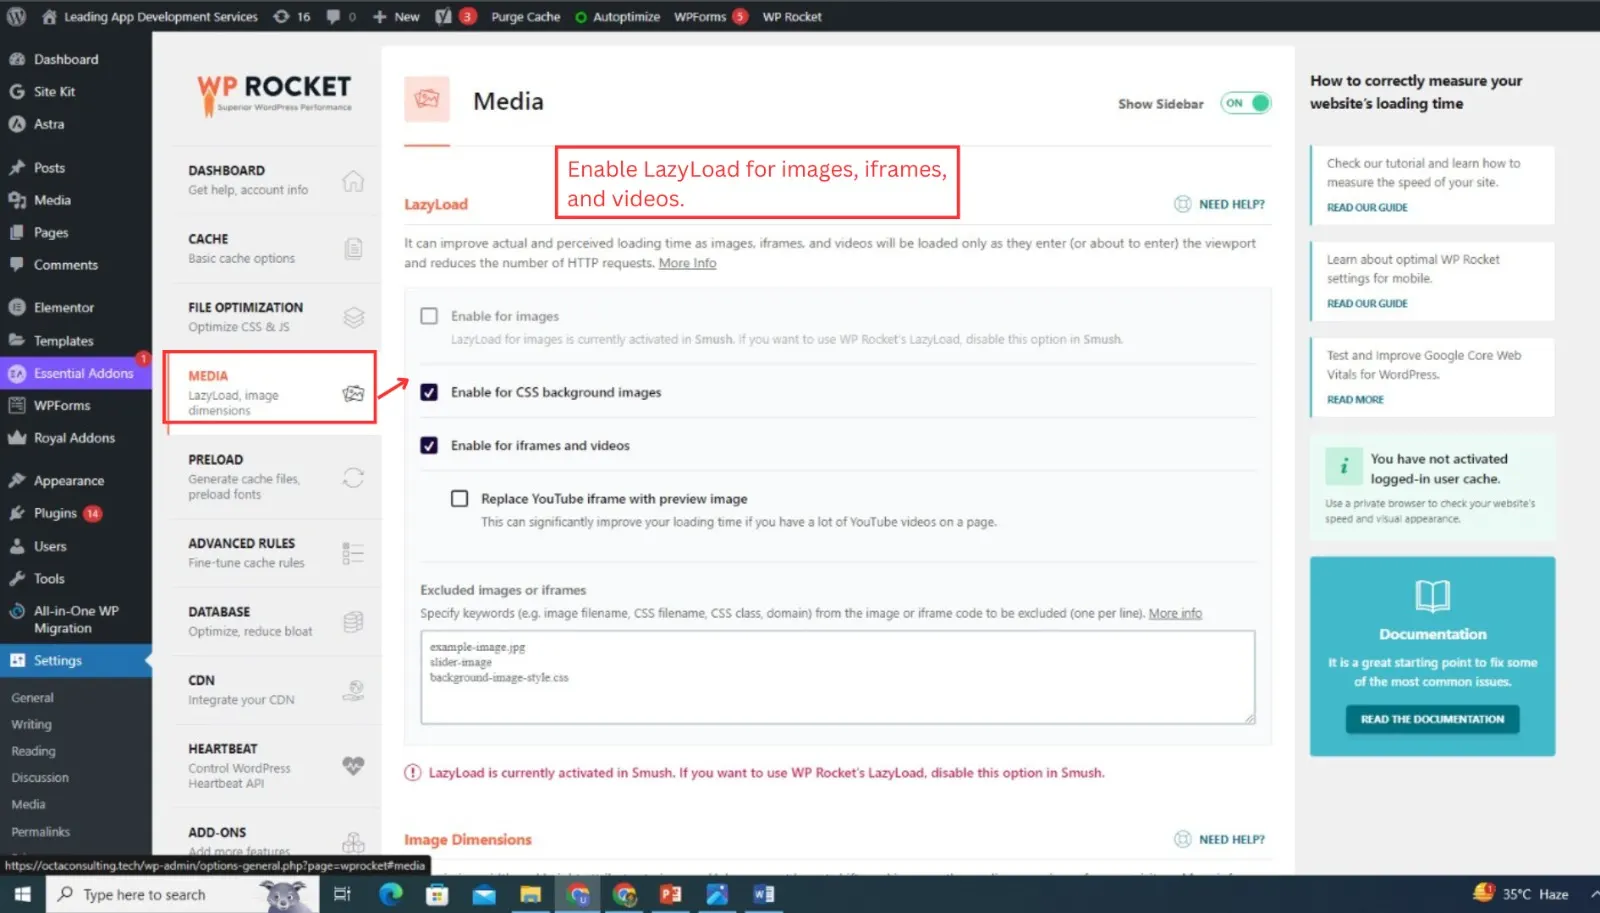
Lazy Load Images:
- Go to the Media tab in WP Rocket settings.
- Enable LazyLoad for images, iframes, and videos.
Using WP Rocket helps improve your Core Web Vitals, leading to better performance and a more pleasant user experience. These optimizations ensure your site meets Google’s standards for a fast, user-friendly site.
Image Optimization with Smush
Images play a significant role in website speed. Here’s how to optimize them using the Smush plugin:
Why Use Smush?
Smush is a highly effective image optimization plugin. Large image files can slow down your website, but Smush compresses them without losing quality, making your site faster and more efficient.
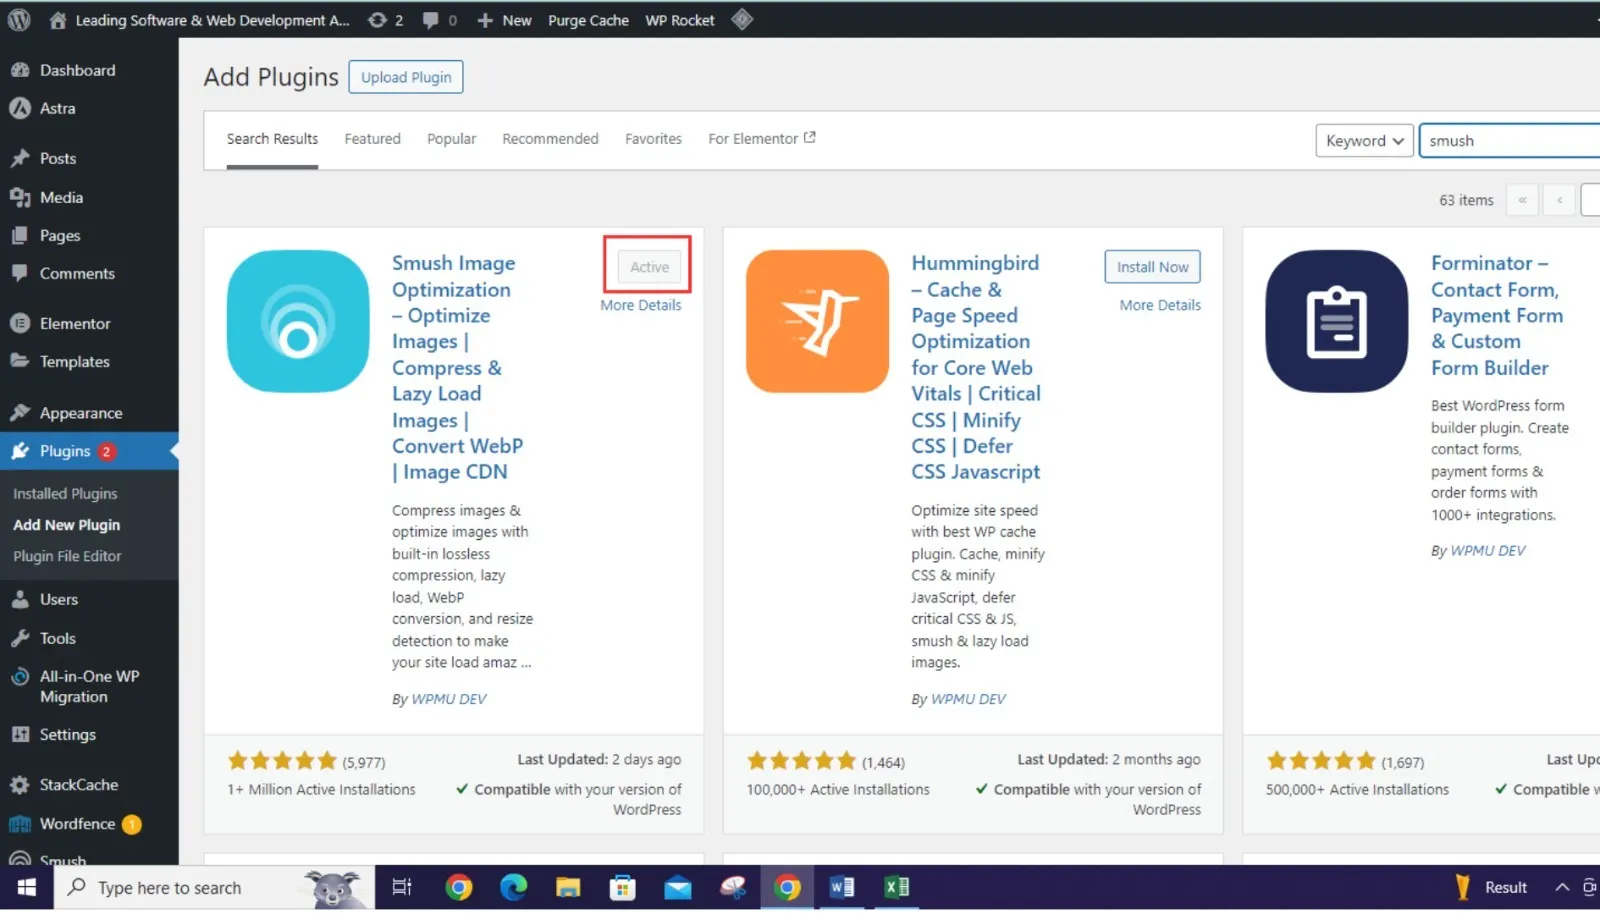
Install Smush:
- In your WordPress dashboard, go to Plugins > Add New.
- Search for “Smush” and click Install Now, then Activate.
Initial Setup:
- After activation, go to Smush > Bulk Smush.
- Click on the Bulk Smush Now button to optimize all existing images.
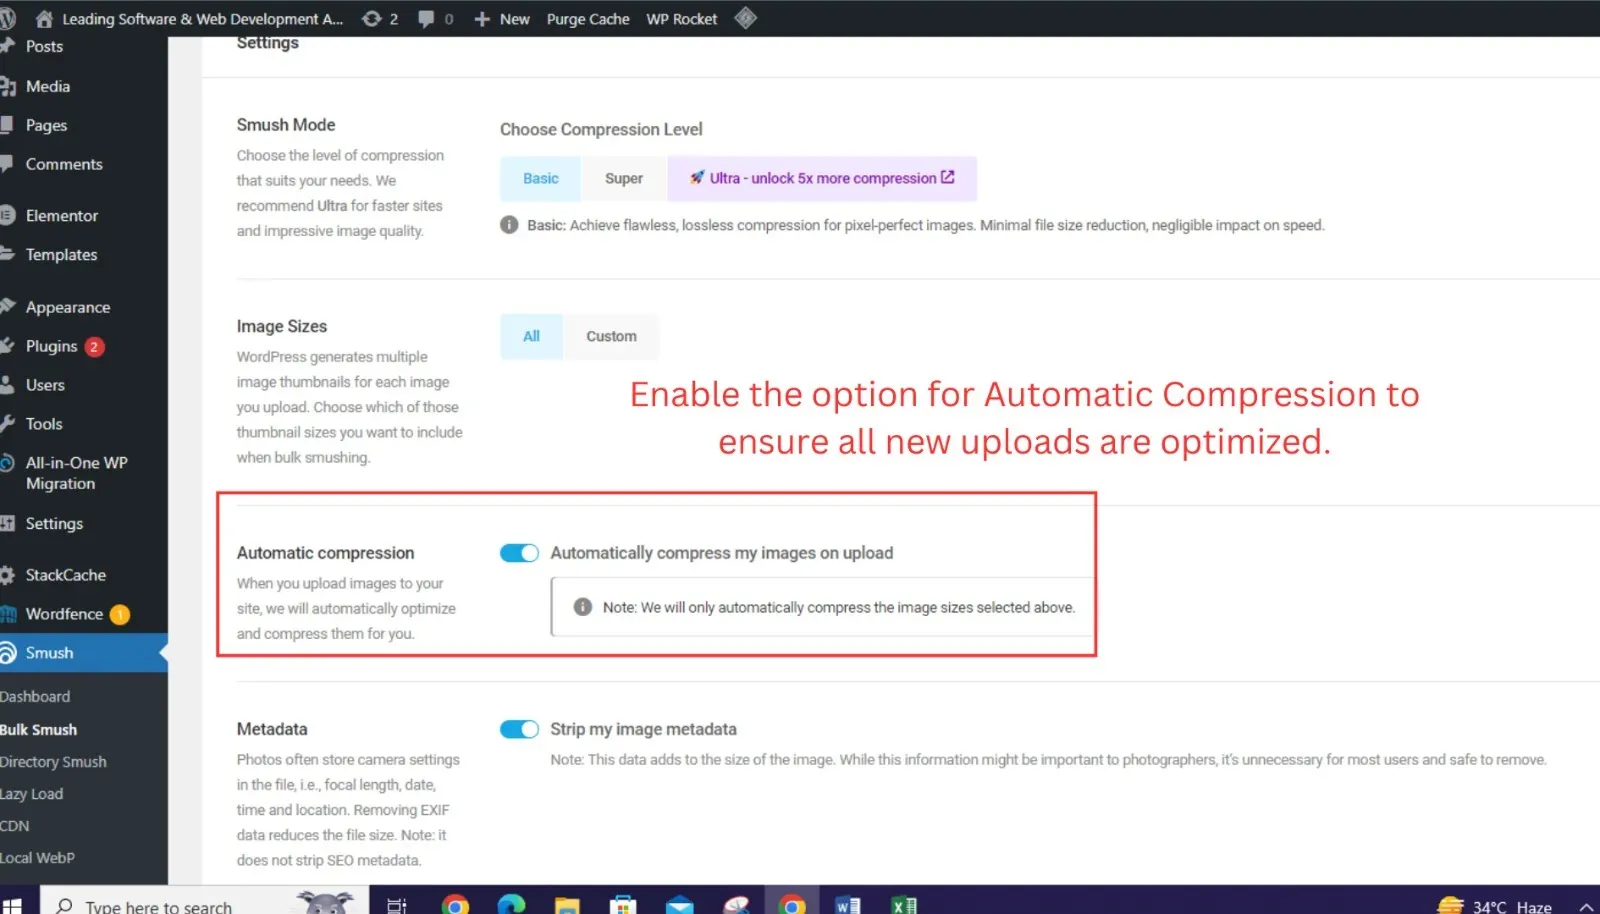
Automatic Optimization:
- Go to Smush > Settings.
- Enable the option for Automatic Compression to ensure all new uploads are optimized.
Explore Advanced Settings:
In the Smush settings, explore the following advanced options:
Lazy Load:
- In the WordPress dashboard, navigate to Smush in the left sidebar.
- Click on Lazy Load.
- Enable Lazy Load to defer the loading of images until they are about to be displayed in the viewport.
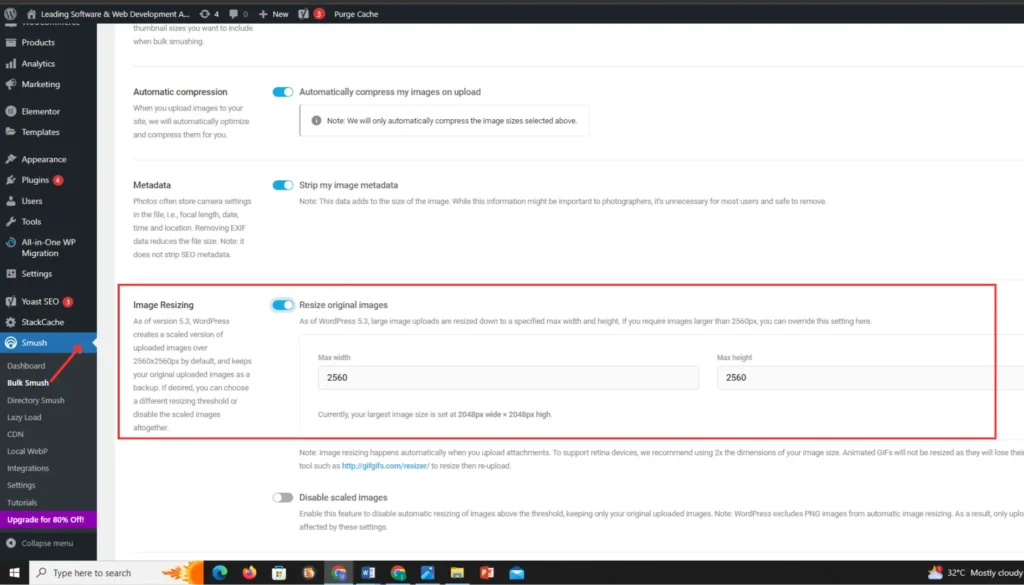
Resize Original Images:
- Click on Settings.
- Scroll down to the Image Resizing section.
- Enable the option Resize my full size images.
- Set the Maximum Width and Maximum Height dimensions for image uploads.
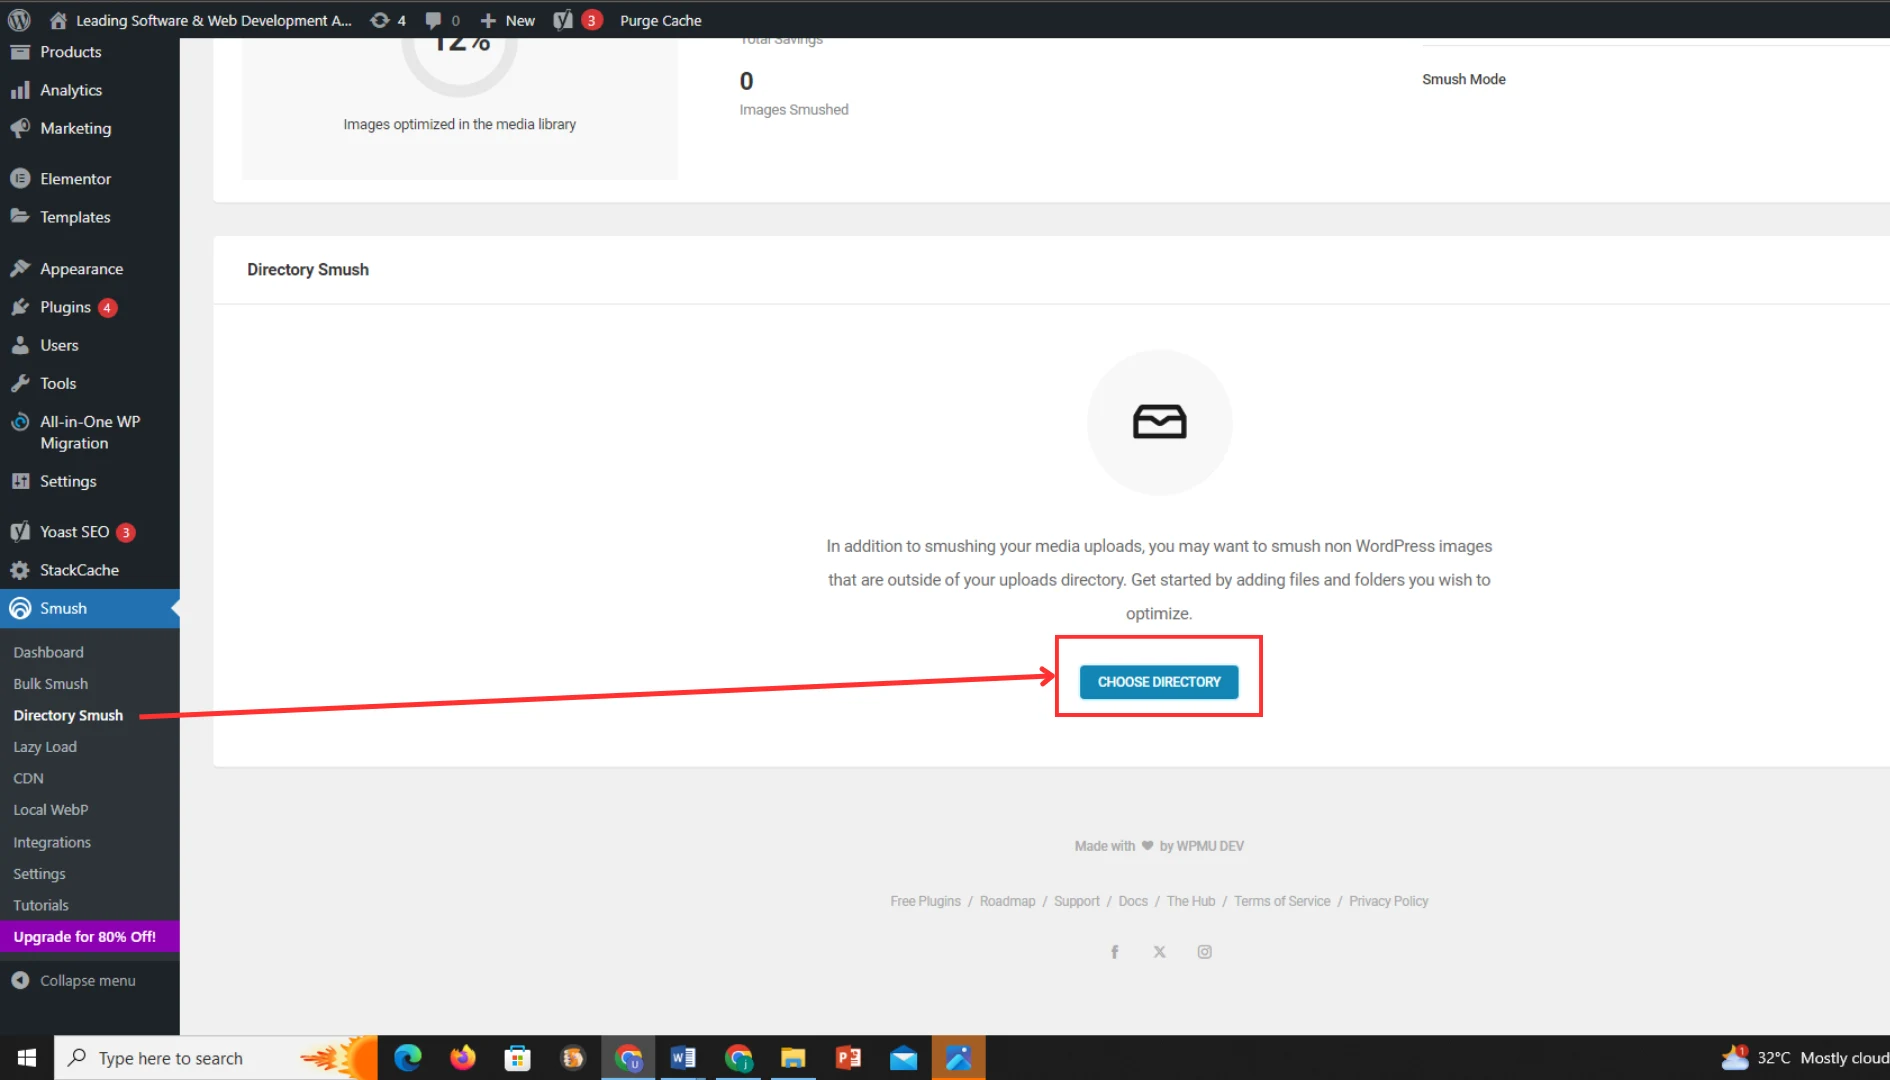
Directory Smush:
- Click on Directory Smush.
- Select additional directories outside of the standard WordPress uploads folder to include them in the image optimization process.
- Click on Add Directory and choose the directories you want to optimize.
By following these detailed steps, you can install, set up, and optimize your website’s images using the Smush plugin, ensuring better performance and faster loading times.
Integrating Third-Party Services
Elementor supports a wide range of third-party integrations, enhancing your website’s functionality.
Setting Up Google Analytics
Google Analytics is essential for understanding how users interact with your website. By integrating it with Elementor using a plugin like MonsterInsights, you can easily access detailed insights without leaving your WordPress dashboard.
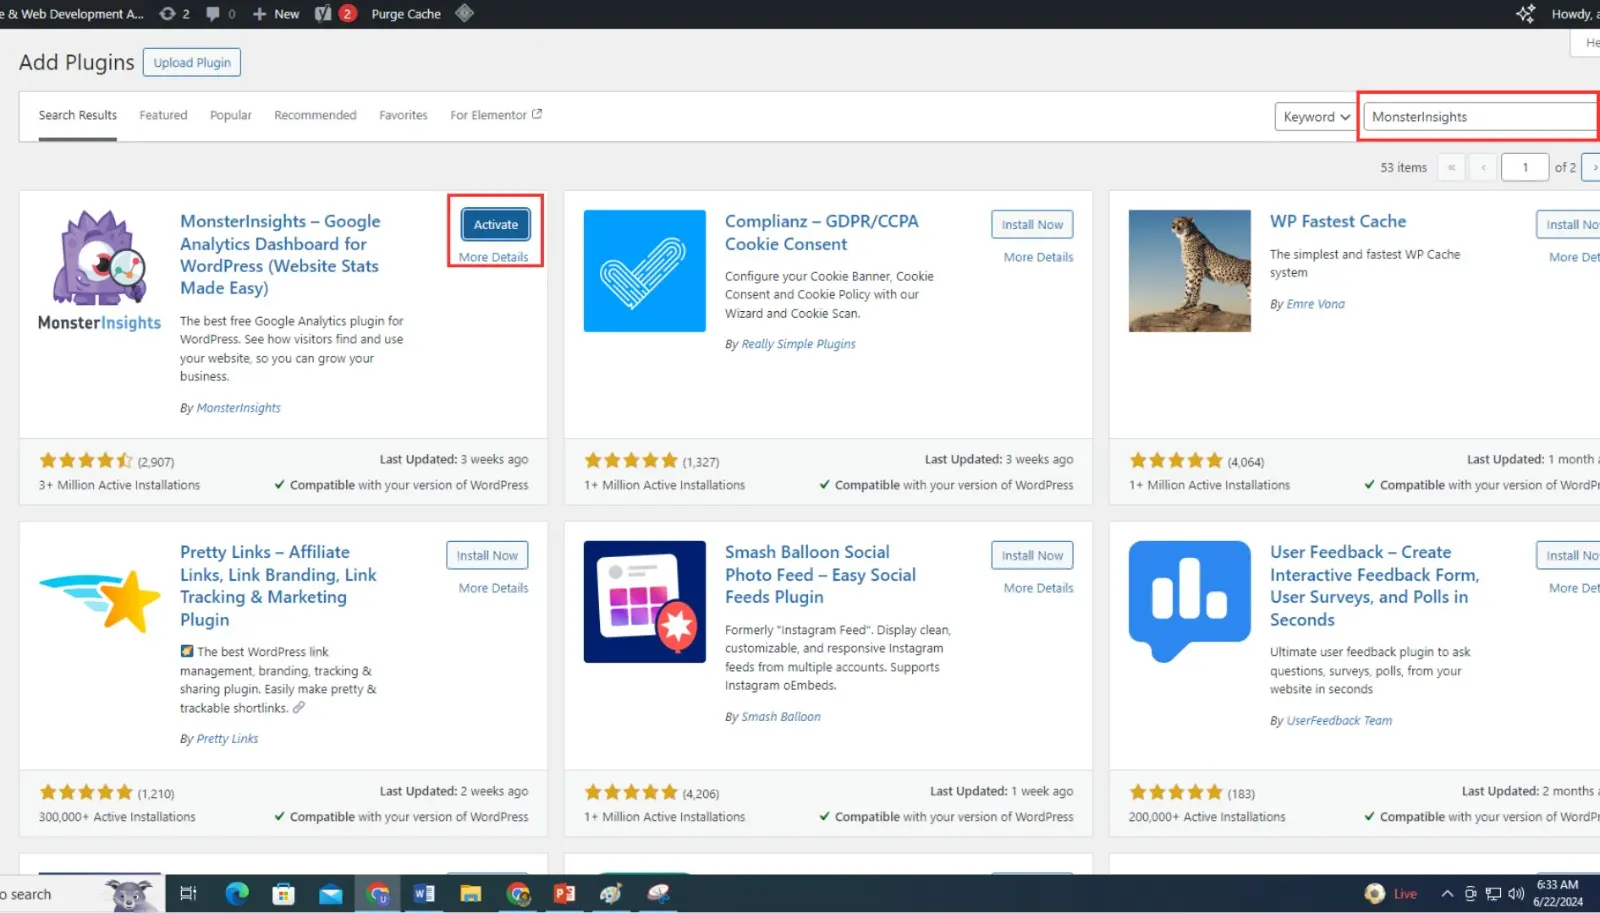
Install MonsterInsights Plugin:
- From your WordPress dashboard, go to Plugins > Add New.
- Search for “MonsterInsights,” then click “Install Now” and “Activate” it.

Connect to Google Analytics:
- Once activated, go to Insights > Settings in your WordPress dashboard.
- Click on the “Connect MonsterInsights” button to begin setup.
- Follow the prompts to log into your Google account and select the website you want to track.

View Analytics Data:
- After connecting, MonsterInsights will fetch your Google Analytics data.
- You can now see key metrics like traffic sources, pageviews, bounce rate, and more directly within your WordPress admin area.
- Use MonsterInsights reports to gain actionable insights into user behavior and optimize your website accordingly.
Setting Up Google Search Console
Google Search Console helps you monitor and maintain your site’s presence in Google search results. Using the Site Kit by Google plugin makes it easier to track your site’s performance.
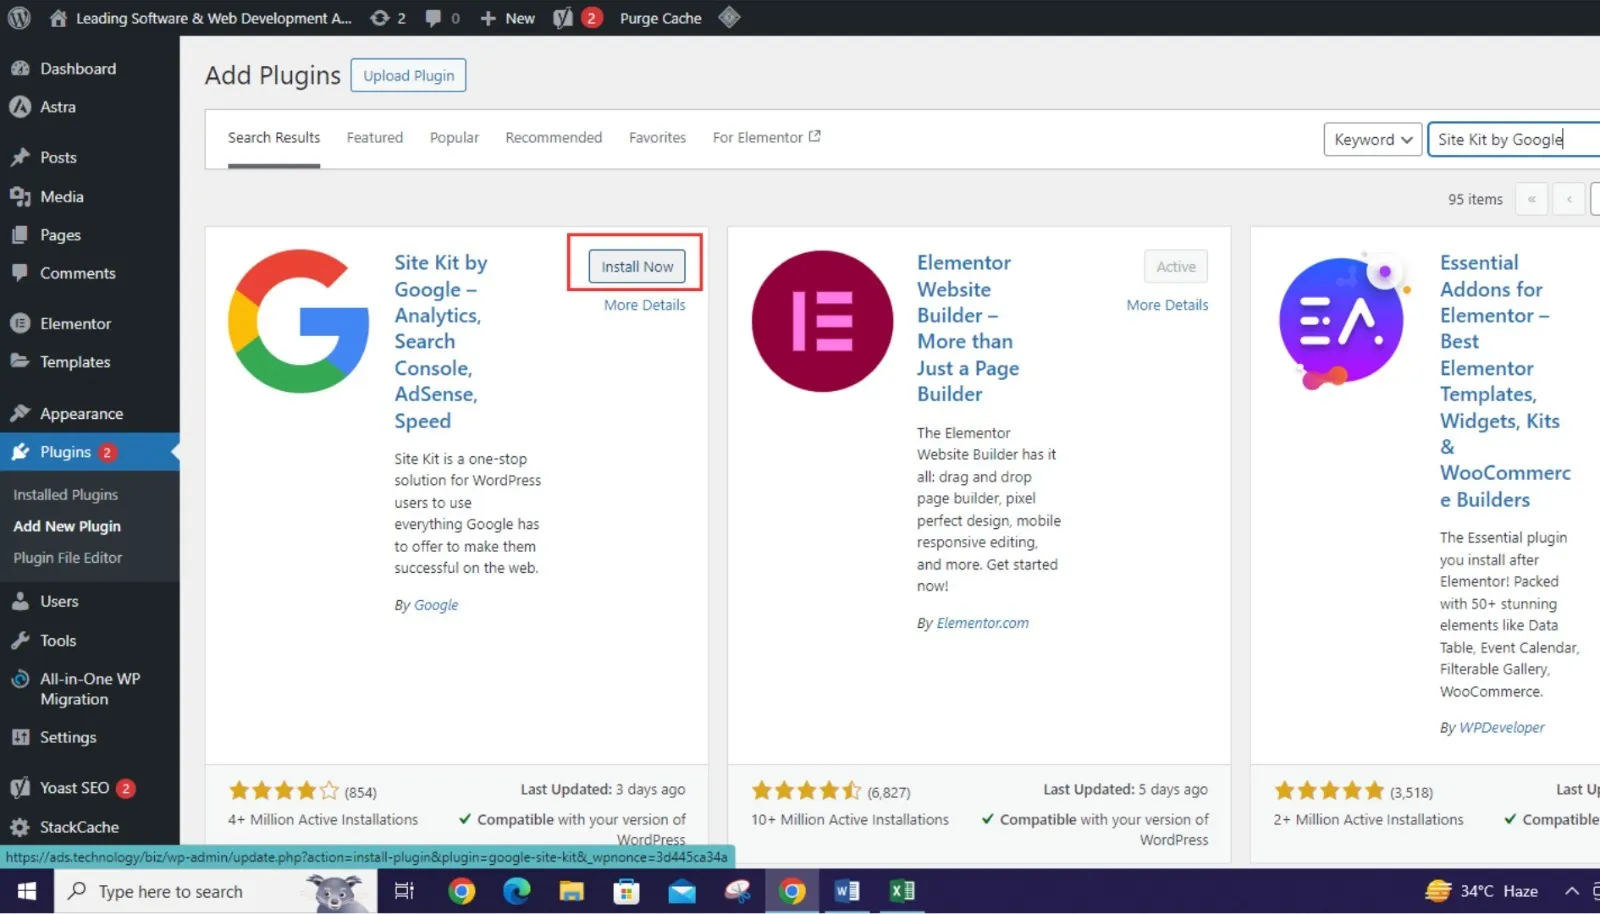
Install Site Kit by Google Plugin:
- From your WordPress dashboard, go to Plugins > Add New.
- Search for “Site Kit by Google,” then click “Install Now” and “Activate” it.
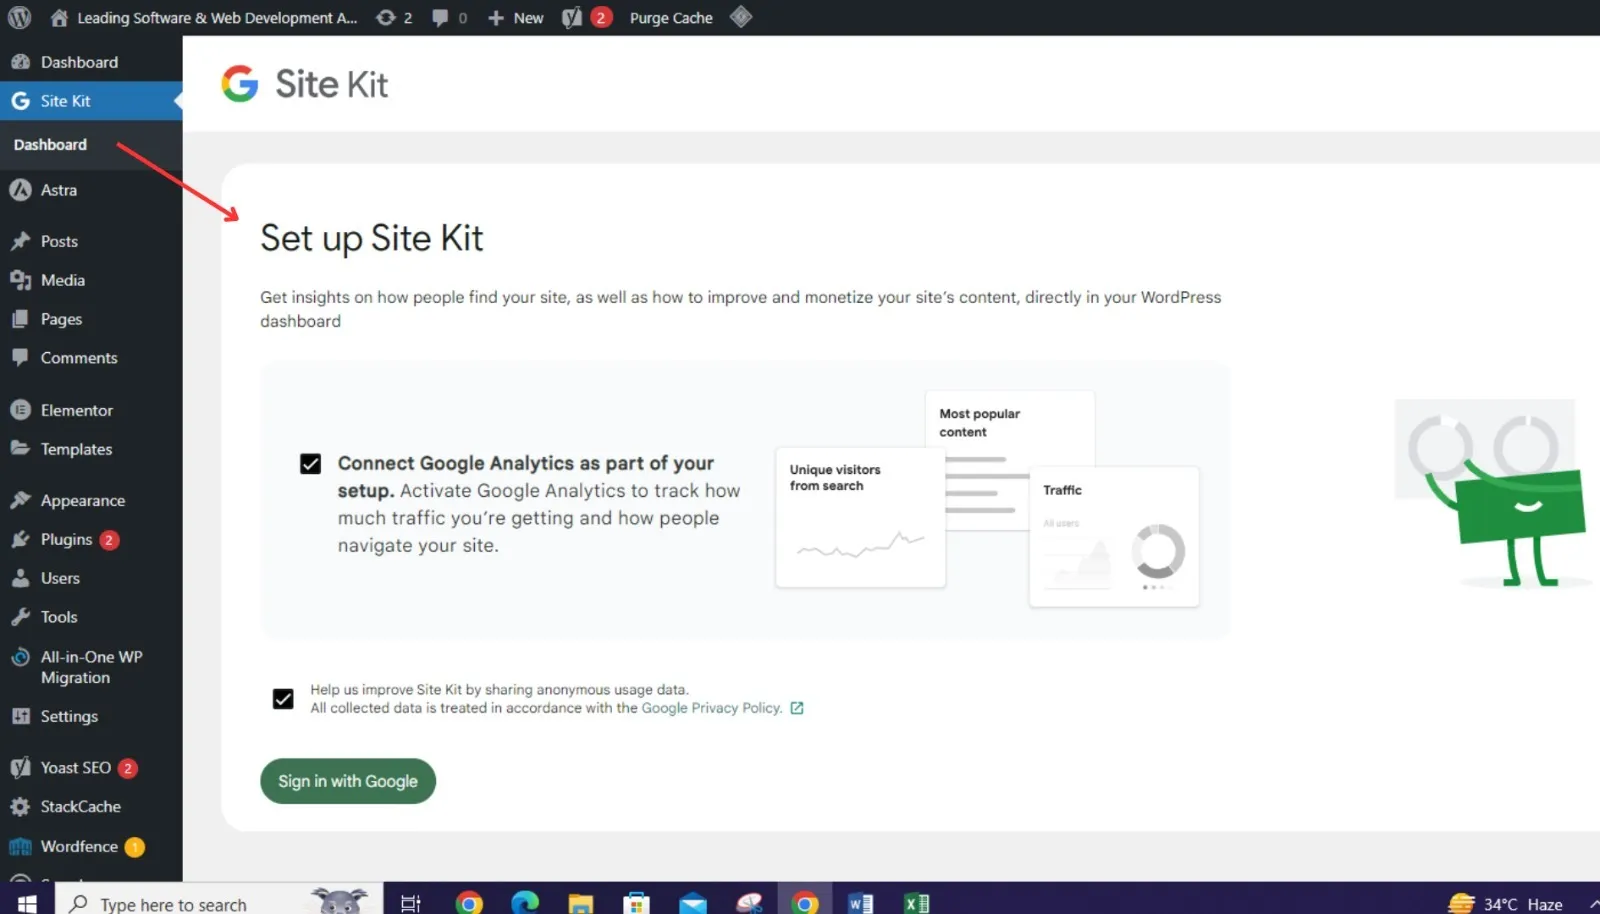
Connect to Google Search Console:
- Once activated, navigate to the new Site Kit menu item in your WordPress dashboard.
- Click on “Start Setup” and follow the on-screen instructions to connect Site Kit to your Google account.
- Grant permissions and select your website property from Google Search Console.
- Complete the verification process to link your site with Site Kit.
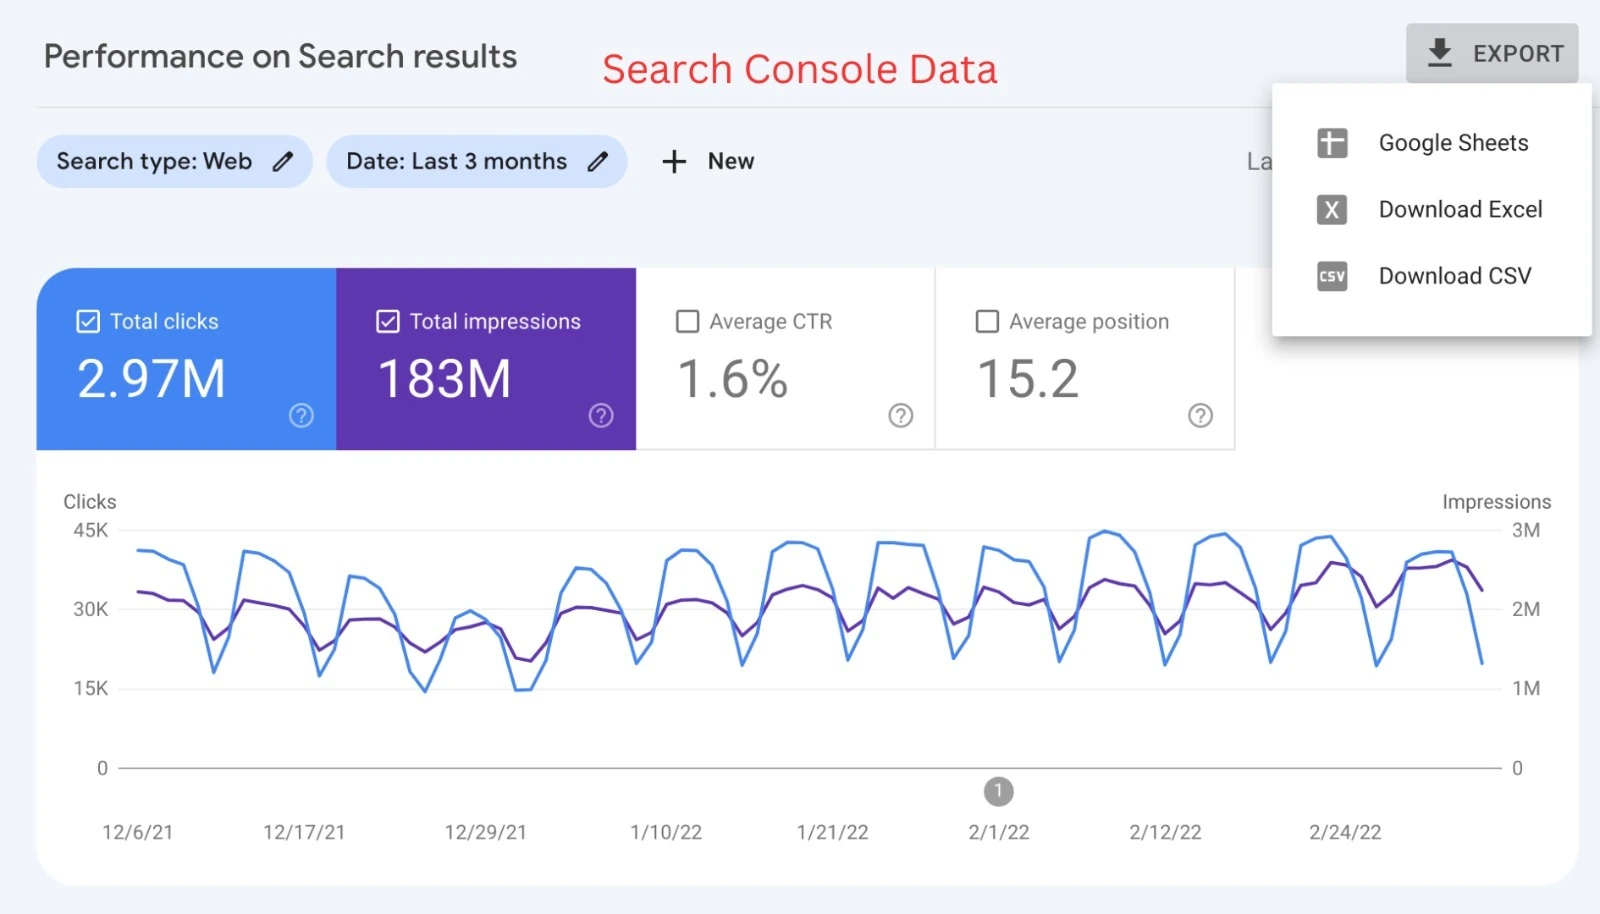
View Search Console Data:
- After setup, you can access important metrics such as search queries, click-through rates, and indexing status directly within your WordPress dashboard.
- Use this data to optimize your content for better search engine visibility and performance.
Mailchimp
Set Up Mailchimp Integration:
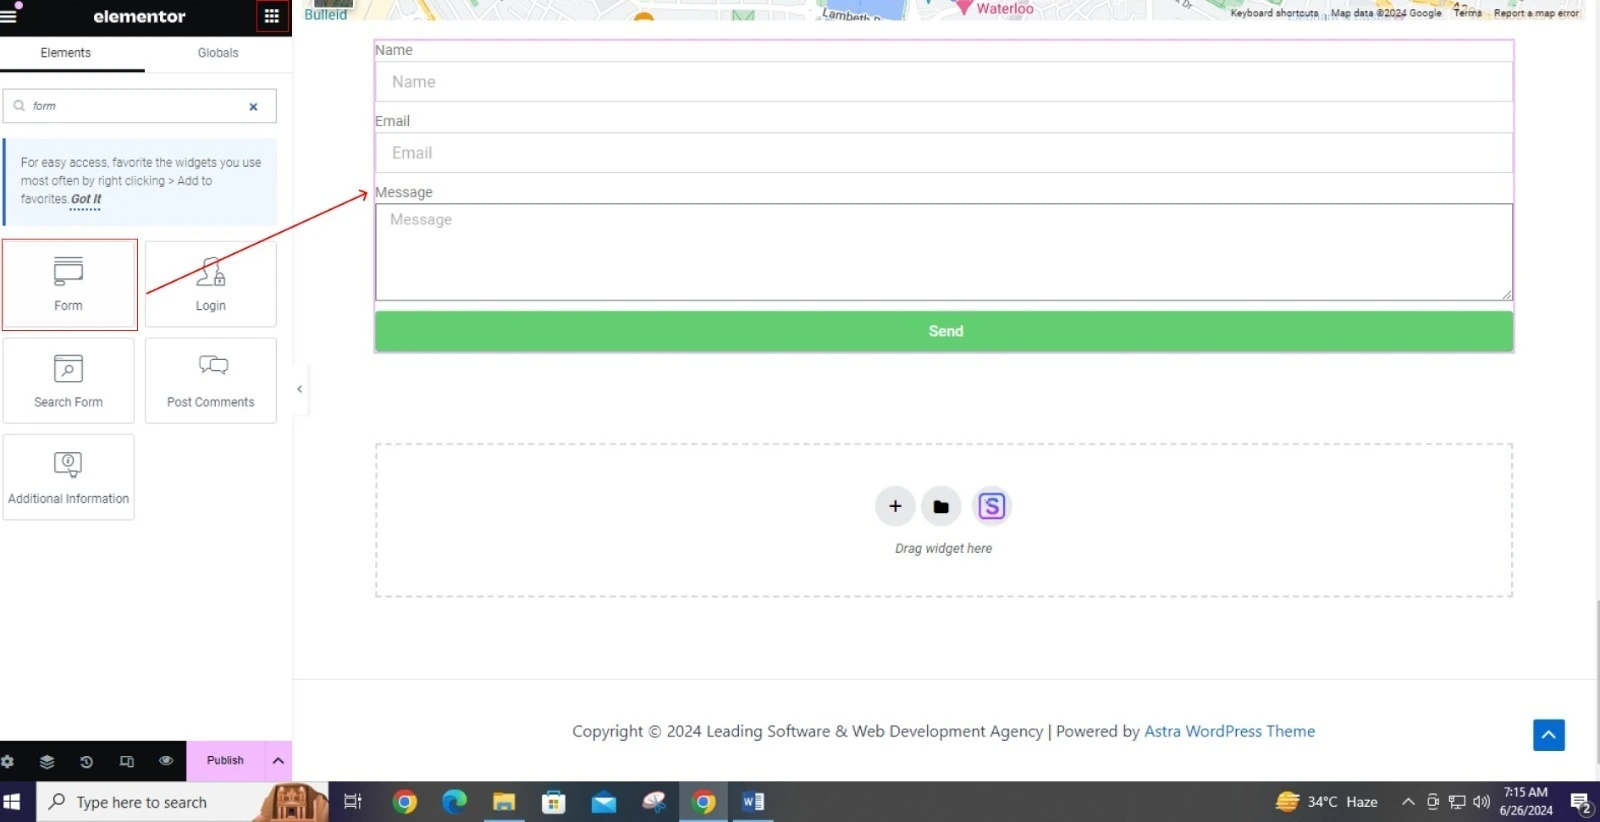
- Ensure you have the Elementor plugin installed and activated on your WordPress site.
- Drag the Form widget onto your desired page using Elementor’s editor.
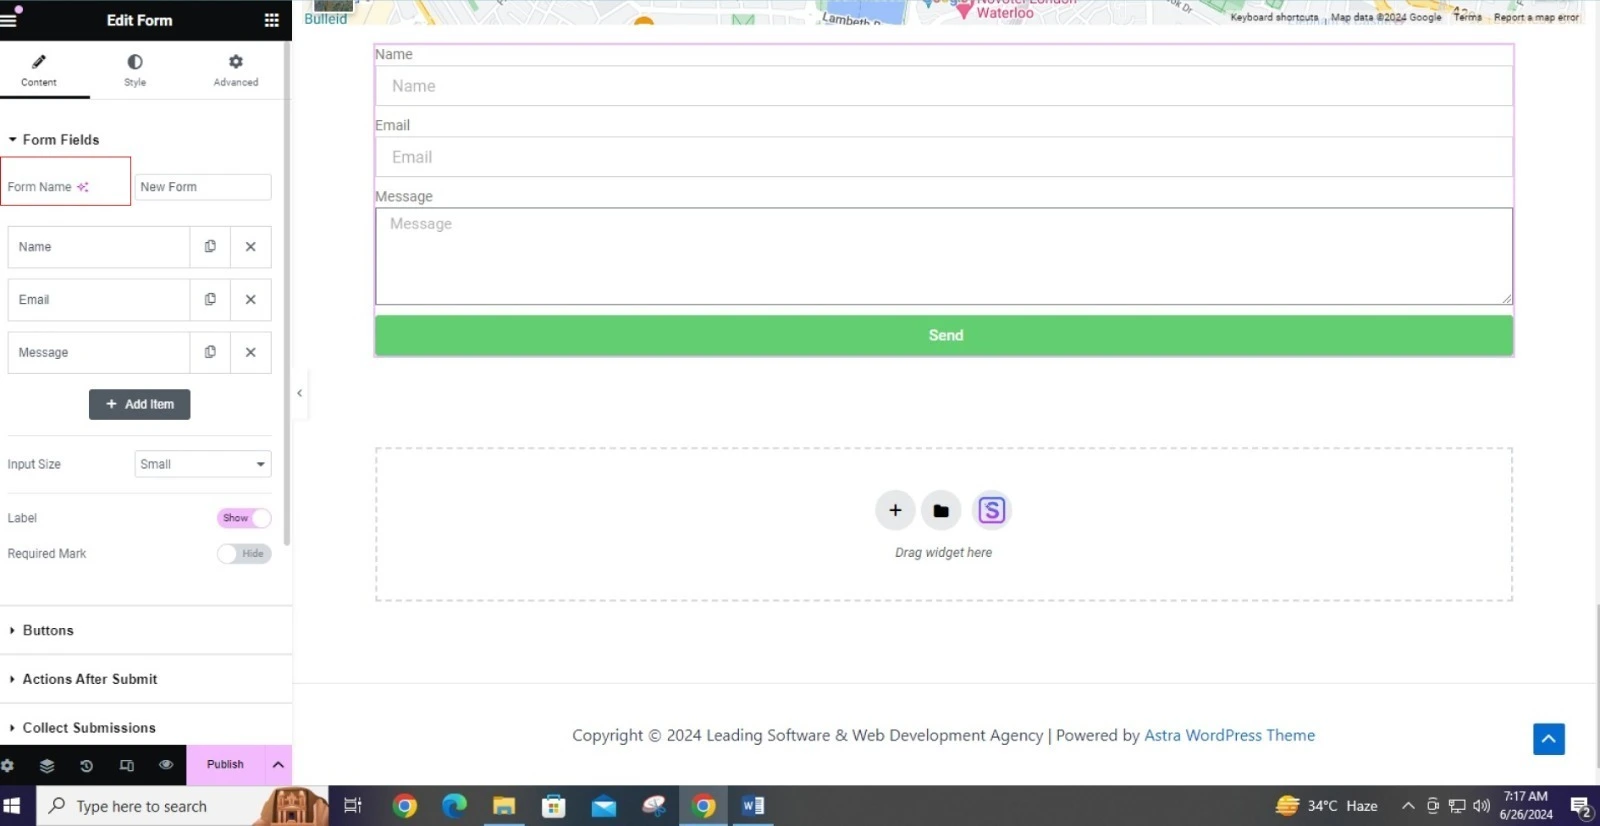
Configure Form Fields:
- Customize the form fields according to your requirements (e.g., Name, Email, Message).
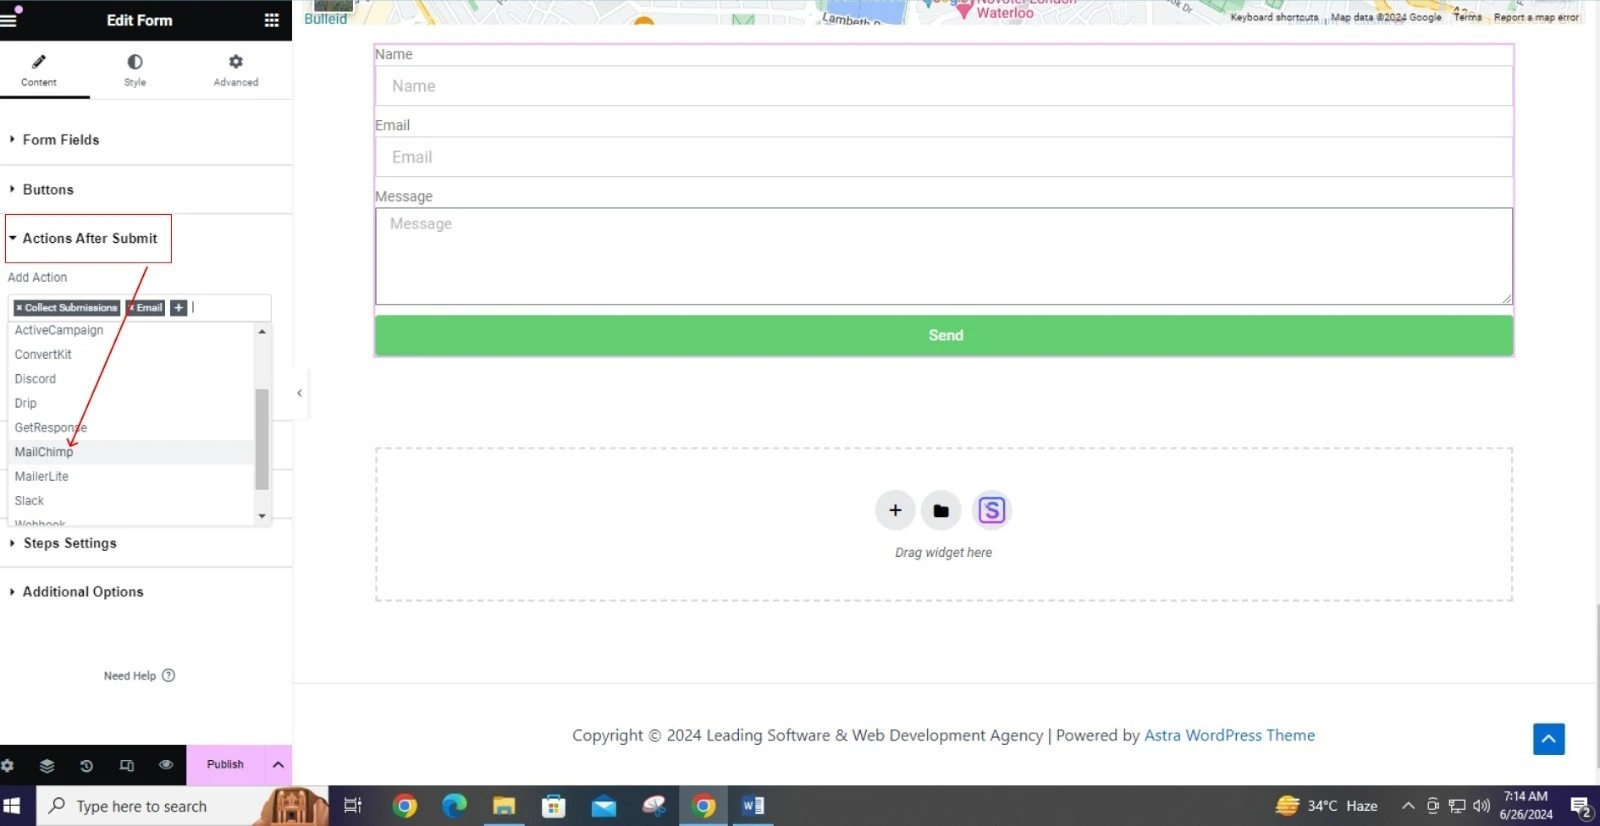
Connect to Mailchimp:
- In the Form widget settings, go to Actions After Submit > Add Action.
- Choose Mailchimp from the list of available integrations.
- Follow the prompts to connect your Mailchimp account by entering your API key and selecting the appropriate audience list.
Finalize Integration:
- Save your form settings and publish/update your page.
- Test the form to ensure submissions are correctly added to your Mailchimp audience list.
By following these steps, you can seamlessly integrate these third-party services with Elementor, enhancing your website’s analytics, search engine visibility, and email marketing capabilities.
Payment Gateways
If you’re setting up an e-commerce site, you’ll need to integrate payment gateways like PayPal or Stripe. Elementor supports WooCommerce integration, which allows you to set up a complete online store with product listings, shopping carts, and secure payment options.
Setting Up Payment Gateways (PayPal and Stripe) with WooCommerce
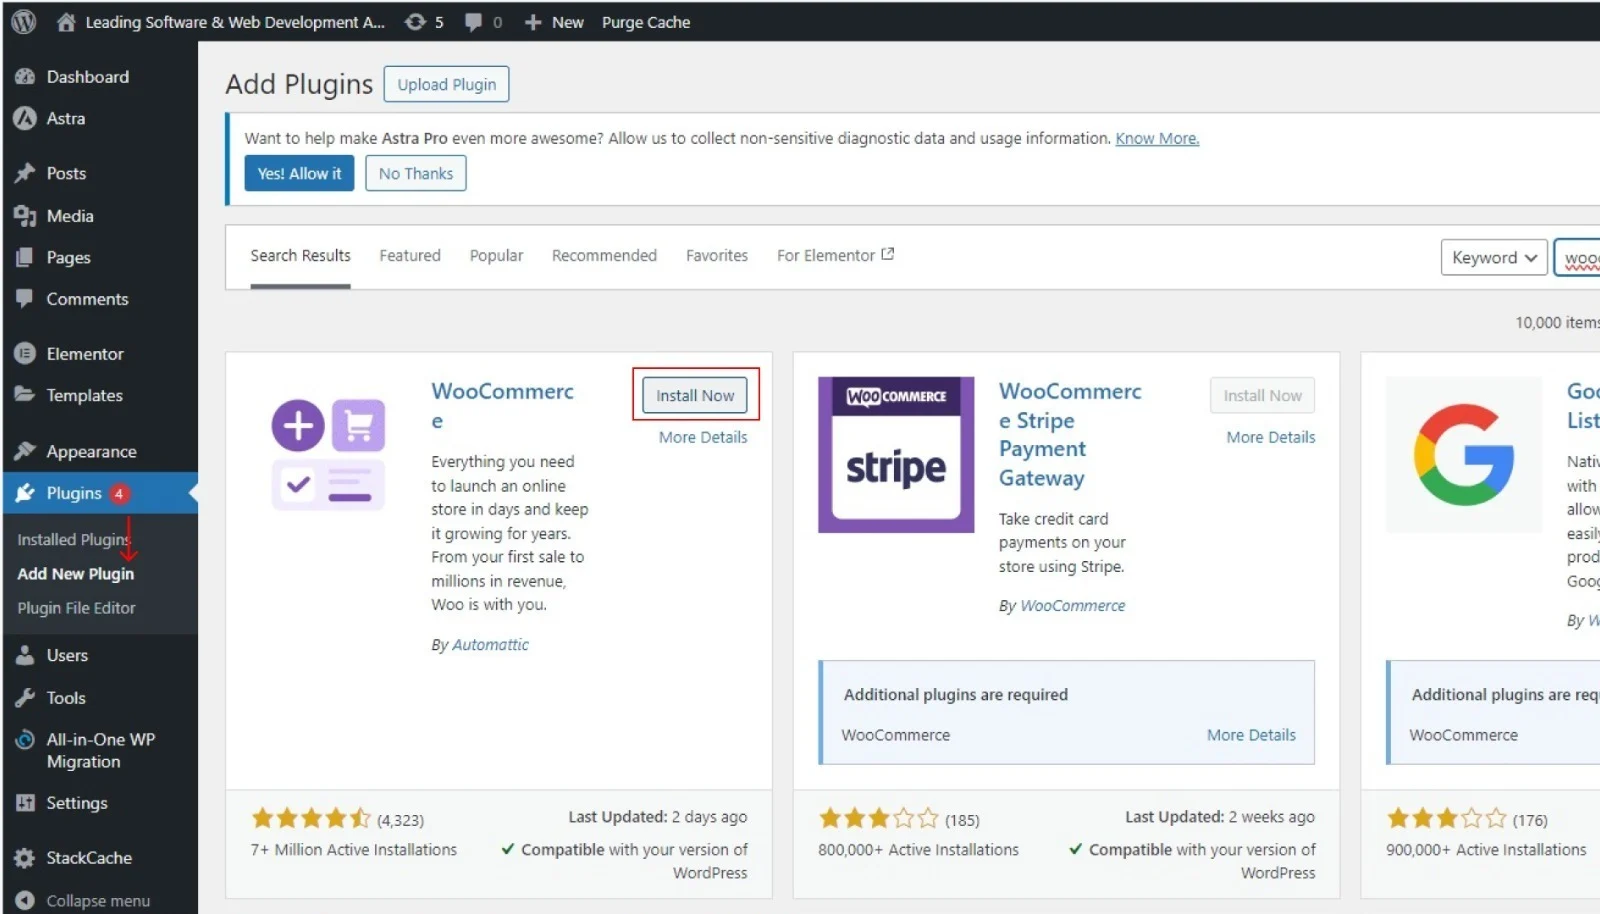
Install WooCommerce Plugin:
- From your WordPress dashboard, navigate to Plugins > Add New.
- Search for “WooCommerce,” then click “Install Now” and “Activate” it.

Set Up WooCommerce:
- Upon activation, WooCommerce will prompt you to run the setup wizard.
- Follow the wizard to configure basic store details like currency, location, shipping, and tax settings.
Install and Activate Payment Gateway Plugins:
- For PayPal:
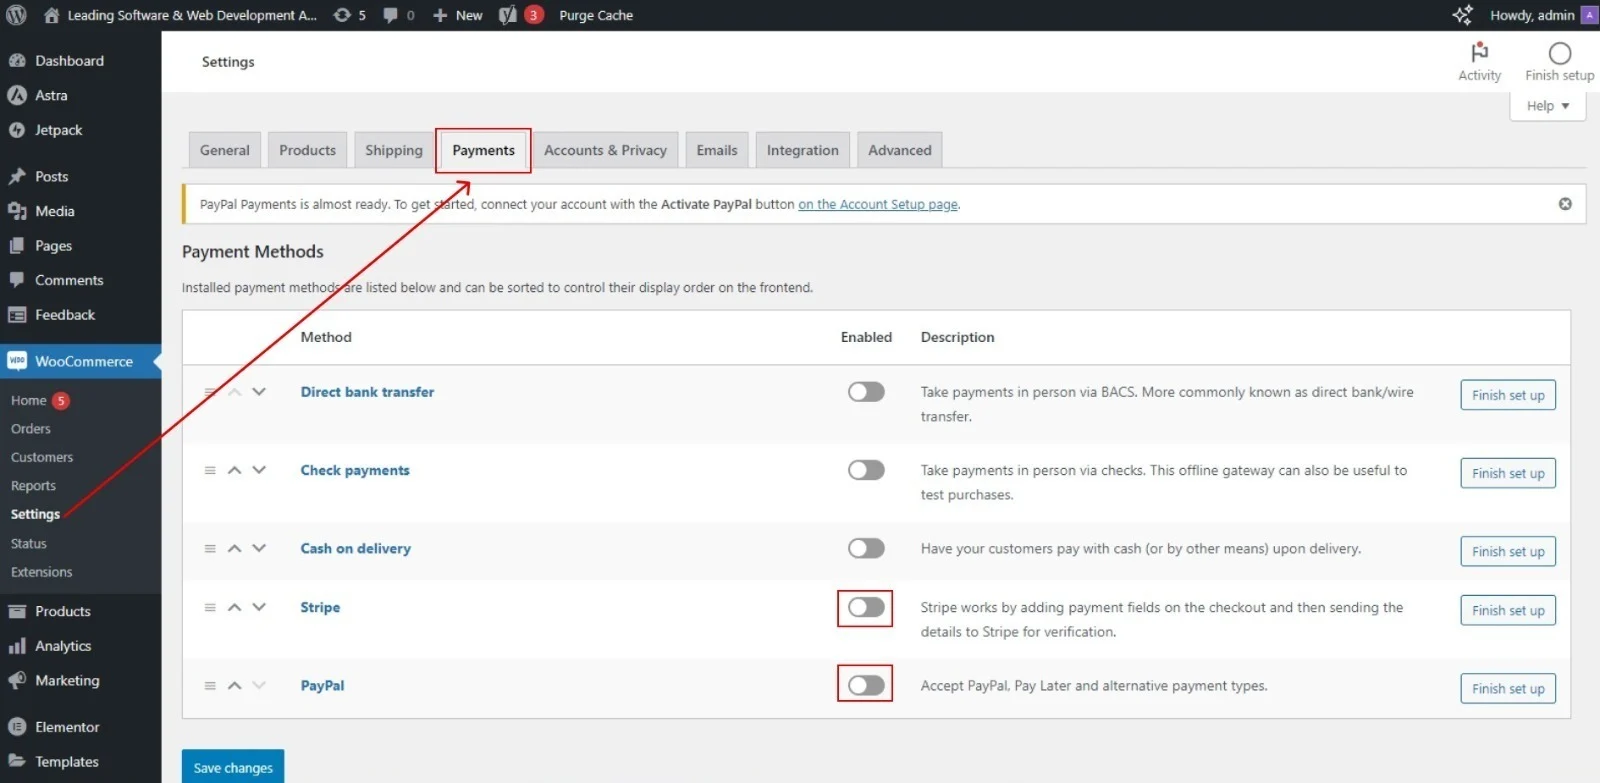
- Go to WooCommerce > Settings > Payments.
- Click on “Set Up” or “Manage” next to PayPal.
- Configure your PayPal settings by entering your PayPal email address and other required details.
- Enable PayPal as a payment method and save your settings.
- For Stripe:
- Similarly, go to WooCommerce > Settings > Payments.
- Click on “Set Up” or “Manage” next to Stripe.
- Configure your Stripe settings by entering your API keys (obtained from your Stripe account dashboard).
- Enable Stripe as a payment method and save your settings.
- For PayPal:
For PayPal:
- Go to WooCommerce > Settings > Payments.
- Click on “Set Up” or “Manage” next to PayPal.
- Configure your PayPal settings by entering your PayPal email address and other required details.
- Enable PayPal as a payment method and save your settings.
For Stripe:
- Similarly, go to WooCommerce > Settings > Payments.
- Click on “Set Up” or “Manage” next to Stripe.
- Configure your Stripe settings by entering your API keys (obtained from your Stripe account dashboard).
- Enable Stripe as a payment method and save your settings.
Test Transactions:
- Both PayPal and Stripe offer sandbox or test modes for transactions.
- Use these modes to test payments without using real money.
- Ensure transactions process correctly and reflect in your WooCommerce order dashboard.
Enable Live Transactions:
- Once testing is successful, switch your PayPal and Stripe settings to live mode.
- This allows real transactions to be processed using actual payment methods.
Additional Payment Methods (Optional):
- WooCommerce supports various other payment gateways depending on your location and business needs.
- Explore additional gateways like Square, Amazon Pay, or others if required.
- Install their respective plugins and follow similar setup steps as above.
Monitor Transactions and Settings
- Regularly monitor transaction logs within WooCommerce to ensure payments are processed smoothly.
- Stay updated with any changes or updates from PayPal, Stripe, or other payment gateway providers.
By following these steps, you can effectively integrate payment gateways like PayPal and Stripe into your Elementor-driven e-commerce site, providing secure payment options for your customers.
Security Practices for Your Website
Ensuring your website’s security is crucial to protect it from malicious attacks and vulnerabilities. Wordfence is a powerful security plugin that helps safeguard your WordPress site. Here’s how you can set it up and enhance your website’s security:
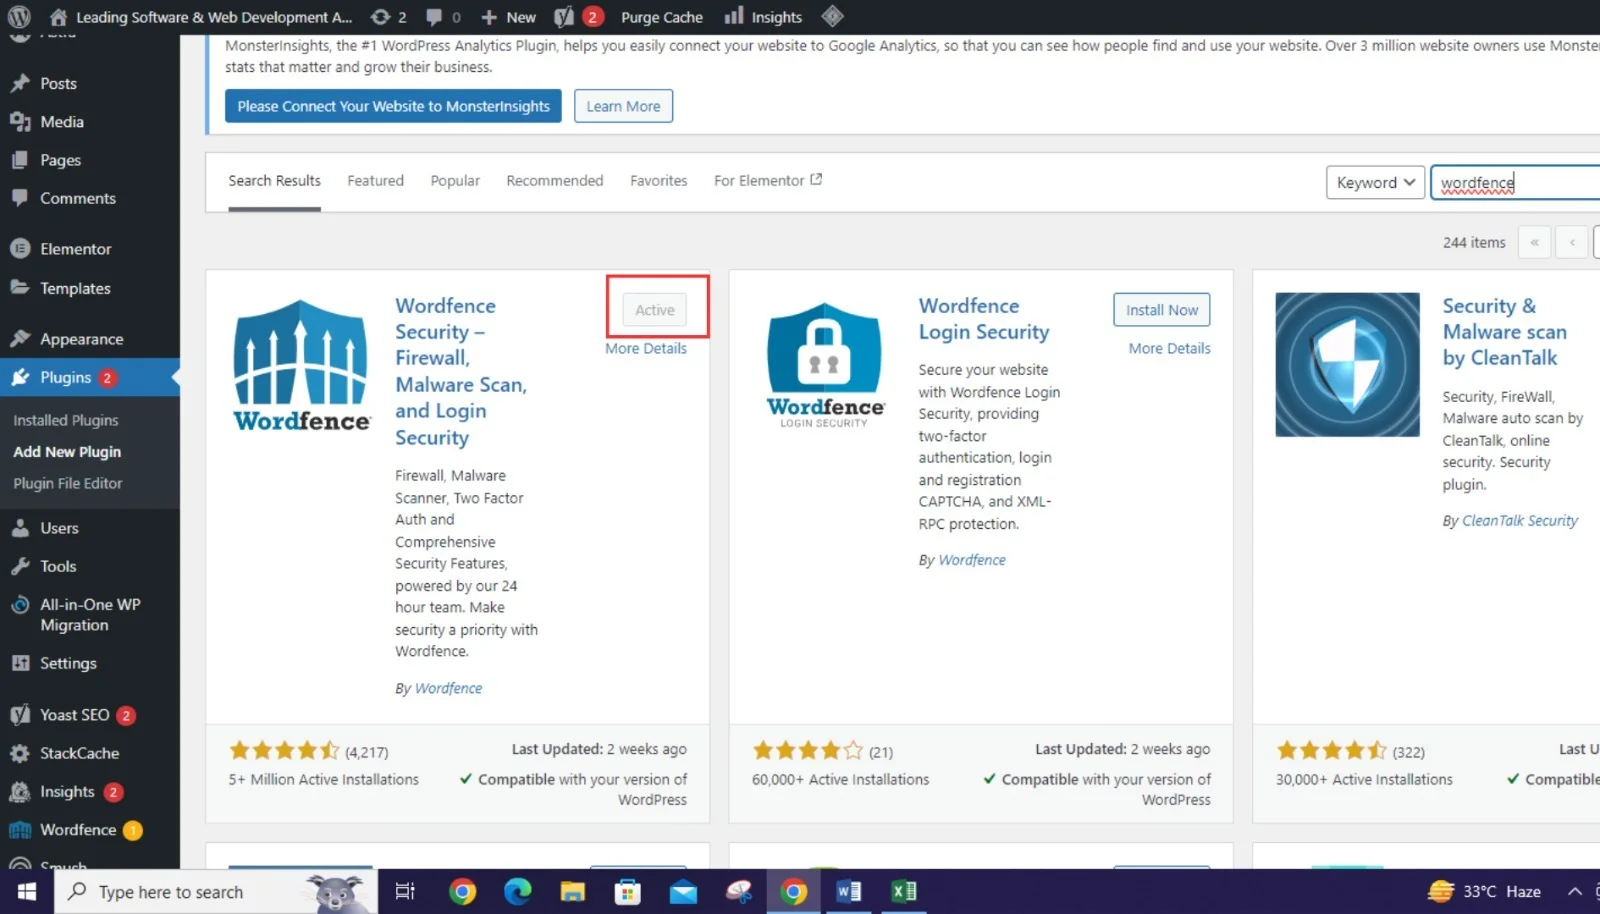
Install Wordfence Security Plugin:
- Navigate to your WordPress dashboard.
- Go to Plugins > Add New.
- Search for “Wordfence Security and click on “Install Now,” then “Activate.”
Basic Configuration
- After activation, go to Wordfence > Dashboard.
- Click on “Start Tour” to set up Wordfence quickly.
- Follow the guided steps to configure initial settings for your site’s security.
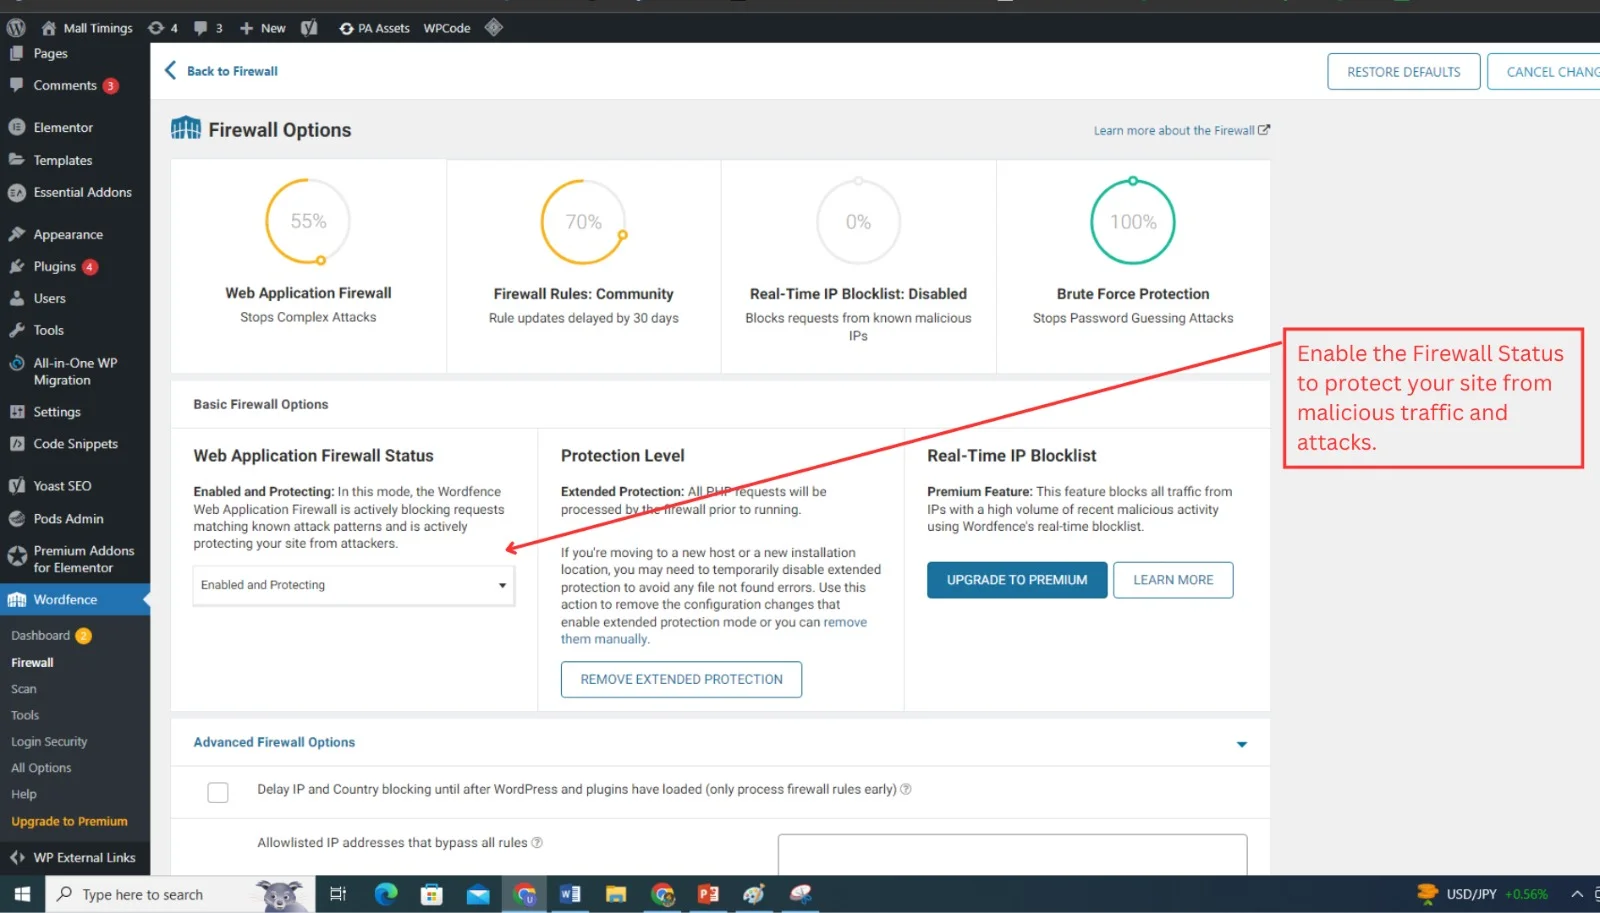
Firewall Setup:
- Go to Wordfence > Firewall.
- Enable the Firewall Status to protect your site from malicious traffic and attacks.
- Configure Firewall Options to enhance protection based on your site’s specific needs.
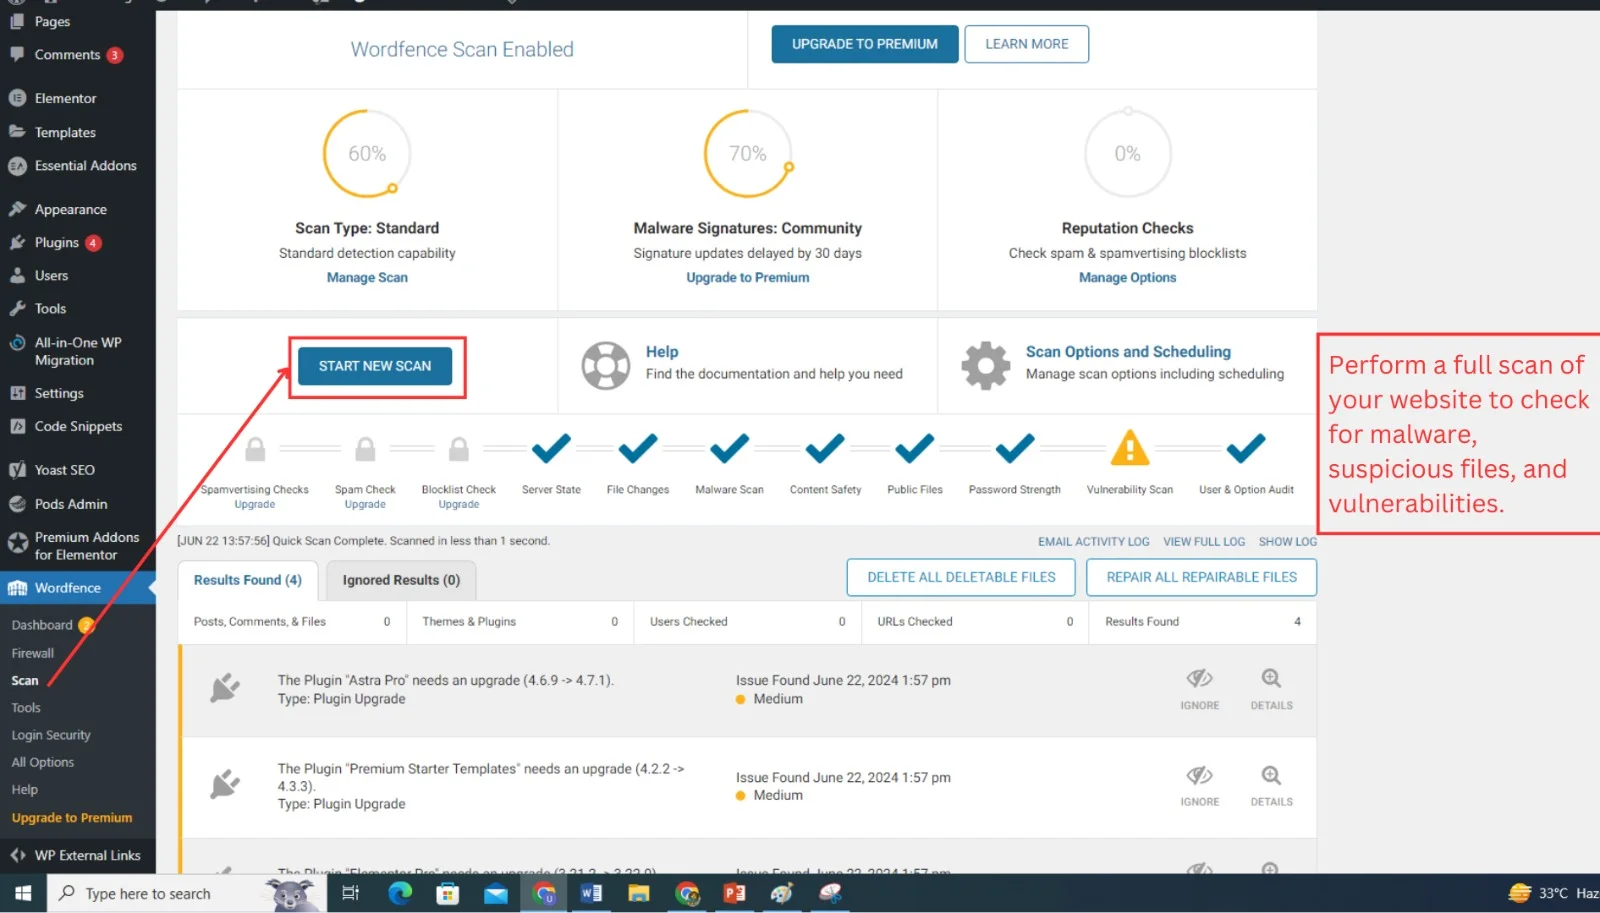
Scan Your Website:
- Go to Wordfence > Scan.
- Perform a full scan of your website to check for malware, suspicious files, and vulnerabilities.
- Schedule regular scans to ensure ongoing security monitoring.
Security Alerts and Notifications:
- Configure Wordfence > All Options to set up email alerts for security incidents and potential threats.
- Stay informed about any security issues detected on your site.
Harden Your Website:
- Go to Wordfence > All Options > Firewall Rules.
- Enable Firewall Rules to block common security threats and malicious IP addresses automatically.
Two-Factor Authentication (2FA):
- Go to Wordfence > All Options > Login Security.
- Enable Two-Factor Authentication (2FA) to add an extra layer of security to your WordPress login process.
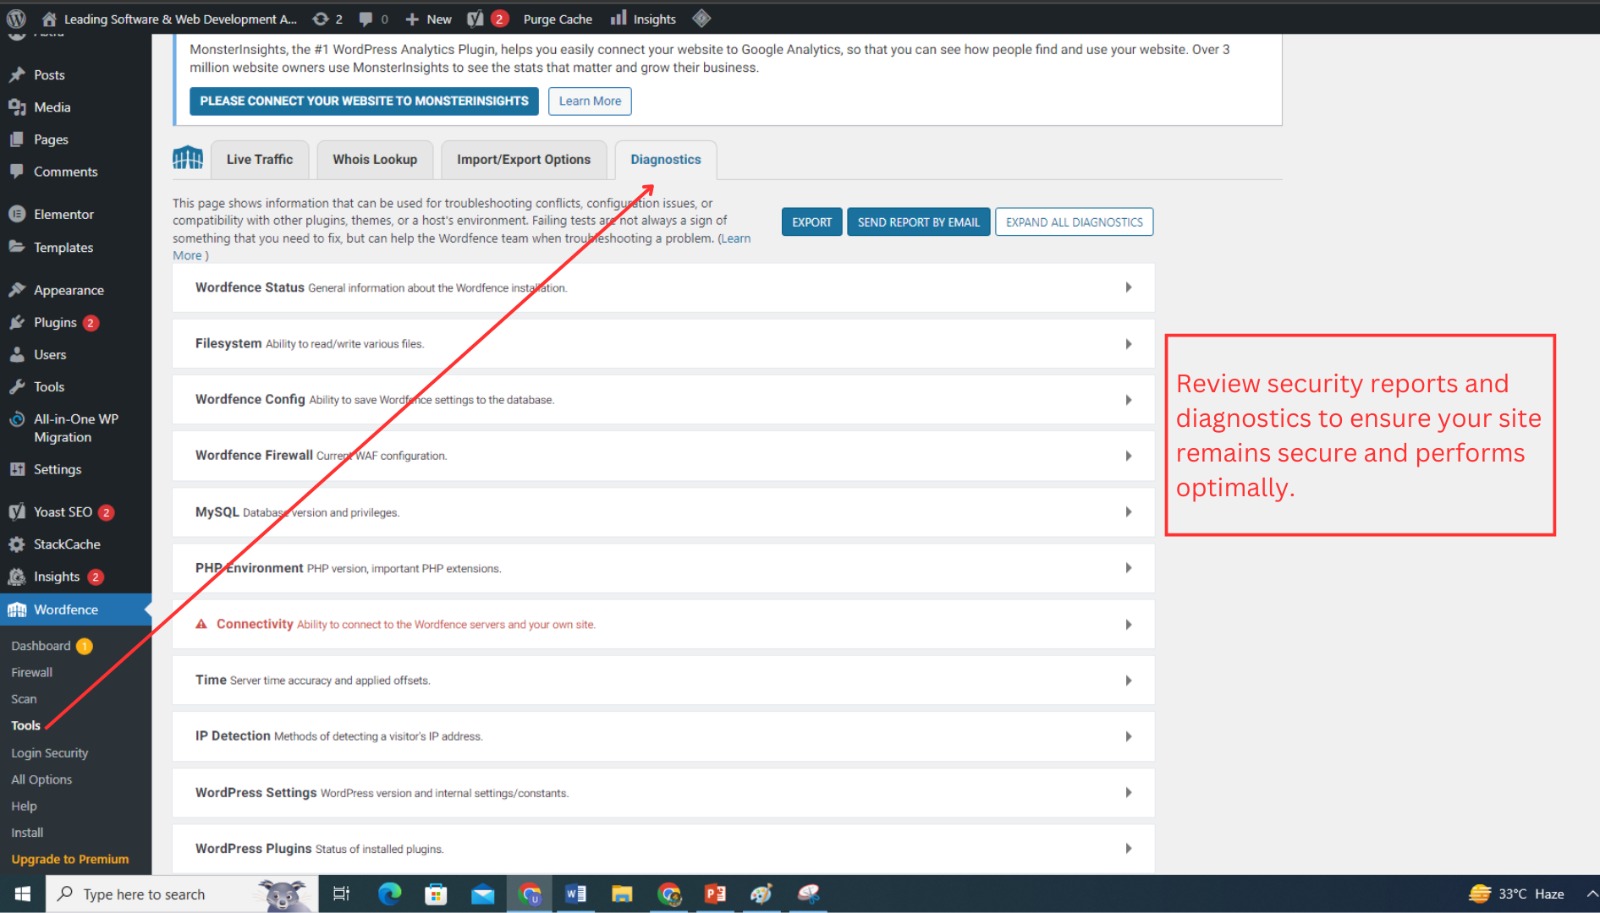
Review Wordfence Security Reports:
- Navigate to Wordfence > Tools > Diagnostics.
- Review security reports and diagnostics to ensure your site remains secure and performs optimally.
By integrating Wordfence with your Elementor-powered website, you enhance its security posture significantly. Protecting your site from potential threats ensures a safe browsing experience for your visitors and maintains your reputation online.
Testing and Publishing Your Web Page
Before you publish your website, it’s a good to test how responsive it is. Use Elementor’s device preview tool to see how your site looks on desktops, tablets, and mobile phones. This way, you can make any necessary adjustments to ensure it looks great and works well on all devices.
When you’re happy with how everything looks, it’s time to go live. In Elementor, just click the green ‘Publish’ button. Your site will then be accessible to everyone, and you can start sharing your new web address with the world.
Maintaining and Updating Your Web Page
Keeping your website fresh and secure is super important. You should regularly add new content, update any old information, and maybe even tweak the design a bit here and there. This doesn’t just keep things interesting for your visitors; it’s also great for your SEO, helping you show up better in search results.
It’s also a good idea to keep an eye on how your site is doing. Use analytics tools to see things like how much traffic you’re getting, how many people leave quickly (bounce rate), and how engaged your users are. This data is like gold—it shows you how people are interacting with your site and where you might need to make improvements. By regularly checking in on these metrics, you can make sure your site is always meeting your goals and giving visitors a great experience.
Hire A Dedicated Web Design Agency
Hiring a reliable web design firm like Website Design Coventry is a straightforward way to develop your website. They tackle various challenges and ensure your project is handled by top-notch experts, maintaining excellent communication throughout.
Our team of skilled developers, designers, project managers, and business analysts is here to ensure your web design experience is seamless and successful.
From initial concept to final launch, we’ll guide you every step of the way with clear communication and expert care. As a leading UK web design firm, we specialize in creating websites that are both visually striking and highly functional.
Conclusion
The rise of no-code tools has made it easier than ever to create a web page without coding. These platforms provide simple drag-and-drop interfaces that enable anyone to create a professional, functional website quickly and affordably. Whether you need a website for business, blogging, or personal use, no-code tools offer flexibility, control, and scalability.
You can quickly launch your site, easily maintain it, and keep it up to date with new content and features by utilizing no-code development. Adopt this strategy to build your online presence efficiently and effectively, without the need for technical knowledge.
FAQs
There are several popular no-code tools available for website development. Some popular options include Wix, Squarespace, Elementor and Webflow. Each tool has its own features and strengths, so it’s a good idea to explore them and choose the one that best suits your specific needs and preferences.
Yes, you can! No-code website builders offer a wide range of professionally designed templates and themes. These templates are crafted to ensure your website’s polished and modern appearance. With the ability to customize colors, fonts, layouts, and images, you can create a professional-looking website that reflects your unique brand or vision.
Absolutely! No-code website builders are designed specifically for beginners with no technical background. They provide intuitive interfaces and drag-and-drop functionality, allowing you to create websites without writing code. You can easily customize templates, add content, and manage your site with user-friendly tools.
Yes, using no-code website builders, you can create websites without coding knowledge.
Yes, no-code website builders are user-friendly and suitable for simple websites but may have limitations for complex projects.
Author Bio
Umer is a web designer and tech enthusiast with over three years of experience in the Web Development. Specializing in all types of web development including no-code web development, Umer has assisted many small and medium businesses and individuals create beautiful, functional websites with easy to manage GUI based backend interface without the need for intricate coding.

